谷歌+应用程序的布局中,在主操作栏和底部都有动作栏项目。目前,我正在使用android:uiOptions="splitActionBarWhenNarrow" 将项目放置在底部栏中。如何将项目放置在顶部和底部两个位置?
谷歌+应用程序的布局中,在主操作栏和底部都有动作栏项目。目前,我正在使用android:uiOptions="splitActionBarWhenNarrow" 将项目放置在底部栏中。如何将项目放置在顶部和底部两个位置?
希望我的回答对你还不算太晚。
android:uiOptions="splitActionBarWhenNarrow"(这会将一些东西添加到底部栏)。创建像下面代码这样的新布局(此布局将处理顶部栏中的所有项目)。
<?xml version="1.0" encoding="utf-8"?>
<LinearLayout xmlns:android="http://schemas.android.com/apk/res/android"
android:layout_width="fill_parent"
android:layout_height="wrap_content"
android:gravity="right" >
<Switch
    android:id="@+id/switch1"
    android:layout_width="wrap_content"
    android:layout_height="match_parent"/>
<ImageButton
    android:id="@+id/action_starred"
    android:layout_width="wrap_content"
    android:layout_height="wrap_content"
    style="?android:attr/actionButtonStyle"
    android:src="@android:drawable/ic_menu_compass"
    android:onClick="FakeMenu"/>
</LinearLayout>
将此粘贴到您的活动中
ActionBar actionBar = getActionBar();
actionBar.setCustomView(R.layout.actionbar_top); //load your layout
actionBar.setDisplayOptions(ActionBar.DISPLAY_SHOW_HOME|ActionBar.DISPLAY_SHOW_CUSTOM); //show it
就这些 :)
我认为使用标准的ActionBar是不可能实现的。当启用分割ActionBar时,所有操作都会出现在窄屏幕下方。
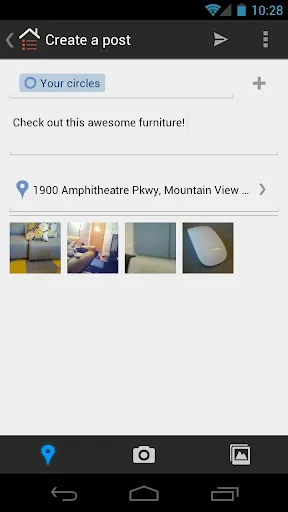
Google+应用程序“创建帖子”活动中的底部栏似乎是自定义实现的。请注意,长按以显示操作标签的功能不起作用,并且即使切换到横向方向,底部栏仍然存在。位置项是一个切换开关,这也不是标准ActionBar的行为。
<?xml version="1.0" encoding="utf-8"?>
<RelativeLayout xmlns:android="http://schemas.android.com/apk/res/android"
android:orientation="vertical" android:layout_width="match_parent"
android:layout_height="wrap_content">
<ScrollView xmlns:android="http://schemas.android.com/apk/res/android"
android:layout_width="fill_parent"
android:layout_height="fill_parent"
android:layout_alignParentTop="false"
android:layout_above="@+id/footer">
<LinearLayout xmlns:android="http://schemas.android.com/apk/res/android"
android:orientation="vertical"
android:id="@+id/container"
android:layout_width="fill_parent"
android:layout_height="wrap_content"
android:paddingLeft="@dimen/body_padding_large"
android:paddingRight="@dimen/body_padding_large"
android:paddingTop="@dimen/body_padding_medium"
android:paddingBottom="@dimen/body_padding_medium"
android:gravity="top">
</LinearLayout>
</ScrollView>
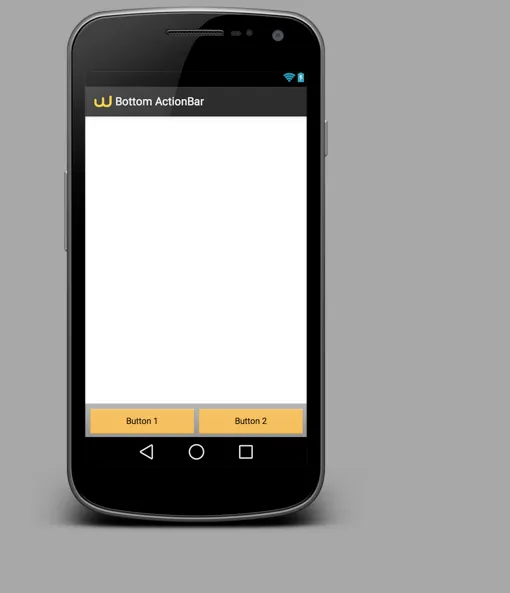
<LinearLayout android:id="@+id/footer"
android:layout_width="fill_parent"
android:layout_height="wrap_content"
android:orientation="horizontal"
android:layout_alignParentBottom="true"
style="@android:style/ButtonBar">
<Button android:id="@+id/btn_1"
android:layout_width="wrap_content"
android:layout_height="wrap_content"
android:layout_weight="1"
android:text="Button 1" />
<Button android:id="@+id/btn_2"
android:layout_width="wrap_content"
android:layout_height="wrap_content"
android:layout_weight="1"
android:text="Button 2" />
</LinearLayout>
</RelativeLayout>
当您拥有的项目超过顶部栏可以显示的项目时,底部栏将被填充。
与其显示“溢出”三个点,项目将放置在底部栏上。请记得使用:
android:showAsAction="ifRoom|withText"
在XML中设置您的菜单项。
了解更多信息: http://developer.android.com/guide/topics/ui/actionbar.html#SplitBar
<?xml version="1.0" encoding="utf-8"?>

< LinearLayout
    xmlns:android="http://schemas.android.com/apk/res/android"
    android:layout_width="fill_parent"
    android:layout_height="wrap_content"
    android:gravity="right" >

<Switch
    android:id="@+id/switch1"
    android:layout_width="wrap_content"
    android:layout_height="match_parent"/>

<ImageButton
    android:id="@+id/action_starred"
    android:layout_width="wrap_content"
    android:layout_height="wrap_content"
    style="?android:attr/actionButtonStyle"
    android:src="@android:drawable/ic_menu_compass"
    android:onClick="FakeMenu"/>

</LinearLayout>


//Then put these lines of code in your java class or activity

    ActionBar actionBar = getActionBar();
    actionBar.setCustomView(R.layout.actionbar); //load your layout
    actionBar.setDisplayOptions(ActionBar.DISPLAY_SHOW_HOME|ActionBar.DISPLAY_SHOW_USTOM); //show it
// 希望这有所帮助