cv::Mat::copyTo 做两件事情,取决于输出矩阵是否已初始化。如果您的输出矩阵未初始化,则使用带有掩码的 copyTo 创建一个新的输出矩阵,该矩阵与输入类型相同,并且所有通道的值都设置为 0。一旦发生这种情况,由掩码定义的图像数据将被复制到其余矩阵中,其值设置为 0。如果您的输出矩阵已初始化并且已经包含内容,则 copyTo 会从源中复制在掩码中定义的像素,并保留未属于掩码部分的像素以在目标中保持不变。因此,从源图像复制到输出的是由掩码定义的像素替换。
由于OpenCV现在使用
numpy来与库进行交互,因此可以很容易地完成这两种方法。为了区别于本帖中看到的其他答案,第一种方法可以通过以元素方式将掩码与图像相乘来实现。假设您的输入被称为
img,您的二进制掩码被称为
mask,其中我假设掩码是2D,则只需执行以下操作:
import numpy as np
import cv2

mask = ... # define mask here
img = cv2.imread(...) # Define input image here

# Create new image
new_image = img * (mask.astype(img.dtype))
上述代码假设
img和
mask具有相同数量的通道。如果您使用彩色图像作为源并且假定掩码为2D,则会变得棘手。因此,总通道数为2而不是3,因此上述语法将给出错误,因为两者之间的维度不再兼容。在使用彩色图像时,您需要进行适当的处理。您可以通过向掩码添加一个单例第三维来实现这一点,以便利用广播功能。
import numpy as np
import cv2
mask = ...
img = cv2.imread(...)
if len(img.shape) == 3 and len(mask.shape) != 3:
new_image = img * (mask[:,:,None].astype(img.dtype))
elif (len(img.shape) == 3 and len(mask.shape) == 3) or \
(len(img.shape) == 1 and len(mask.shape) == 1):
new_image = img * (mask.astype(img.dtype))
else:
raise Exception("Incompatible input and mask dimensions")
对于第二种方法,假设我们有另一张名为
other_image 的图像,您希望将掩模中定义的内容复制回目标图像
img。在这种情况下,您首先要做的是使用
numpy.where 确定掩模中所有非零的位置,然后使用它们来索引或切片您的图像以及想要从中复制的位置。我们还必须注意两个图像之间的通道数,就像第一种方法一样:
import numpy as np
import cv2
mask = ...
img = cv2.imread(...)
other_image = cv2.imread(...)
locs = np.where(mask != 0)
if len(img.shape) == 3 and len(other_image.shape) != 3:
img[locs[0], locs[1]] = other_image[locs[0], locs[1], None]
elif (len(img.shape) == 3 and len(other_image.shape) == 3) or \
(len(img.shape) == 1 and len(other_image.shape) == 1):
img[locs[0], locs[1]] = other_image[locs[0], locs[1]]
else:
raise Exception("Incompatible input and output dimensions")
以下是关于两种方法的示例运行。我将使用Cameraman图像,这是大多数图像处理算法中看到的标准测试图像。
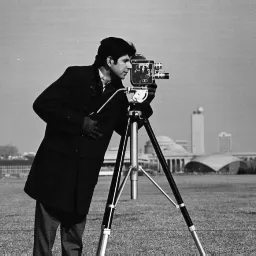
我还人为地给图像上色,即使它被可视化为灰度,但强度值将被复制到所有通道。我还将定义一个掩码,它只是左上角的100 x 100子区域,因此我们将创建一个仅复制此子区域的输出图像:
import numpy as np
import cv2
img = cv2.imread("cameraman.png")
mask = np.zeros(img.shape, dtype=np.bool)
mask[:100, :100] = True
当您使用第一种方法并显示结果时,我们会得到以下内容:
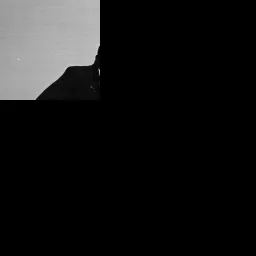
我们可以看到,我们创建了一个输出图像,其中左上角的100 x 100子区域包含我们的图像数据,其余像素设置为0。这取决于设置为
True的掩码位置。对于第二种方法,我们将创建另一幅图像,大小与输入图像相同,其所有通道都跨越
[0, 255]的随机值。
other_image = (255*np.random.rand(*img.shape)).astype(np.uint8)
使用第二种方法运行代码后,现在我得到了这个图像:
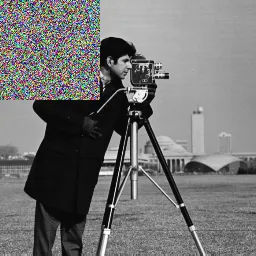
正如您所看到的,图像的左上角已更新为受到设置为
True的掩码位置的影响。
cv.CopyTo,但它似乎只实现了第一种情况(目标被初始化为零)。@LBerger:在您的PR中,难道不应该考虑第二种方法(dst已经初始化)吗? - StefcopyTo所做的。但是该PR并没有实现完整的解决方案。 - rayryeng