我正在尝试找到使用自定义字体作为工具栏标题并将其居中在工具栏(客户需求)的正确方法。
目前,我正在使用传统的ActionBar,并将标题设置为空值,然后使用setCustomView将我的自定义字体TextView放置并使用ActionBar.LayoutParams使其居中。
有更好的方法吗?可以使用新的Toolbar作为我的ActionBar。
我正在尝试找到使用自定义字体作为工具栏标题并将其居中在工具栏(客户需求)的正确方法。
目前,我正在使用传统的ActionBar,并将标题设置为空值,然后使用setCustomView将我的自定义字体TextView放置并使用ActionBar.LayoutParams使其居中。
有更好的方法吗?可以使用新的Toolbar作为我的ActionBar。
    public class TestActivity extends AppCompatActivity {
    private Toolbar toolbar;

    @Override
    protected void onCreate(Bundle savedInstanceState) {
        super.onCreate(savedInstanceState);
        super.setContentView(R.layout.activity_test);

        toolbar = (Toolbar) findViewById(R.id.tool_bar); // Attaching the layout to the toolbar object
        setSupportActionBar(toolbar);

        customizeToolbar(toolbar);
    }

    public void customizeToolbar(Toolbar toolbar){
        // Save current title and subtitle
        final CharSequence originalTitle = toolbar.getTitle();
        final CharSequence originalSubtitle = toolbar.getSubtitle();

        // Temporarily modify title and subtitle to help detecting each
        toolbar.setTitle("title");
        toolbar.setSubtitle("subtitle");

        for(int i = 0; i < toolbar.getChildCount(); i++){
            View view = toolbar.getChildAt(i);

            if(view instanceof TextView){
                TextView textView = (TextView) view;


                if(textView.getText().equals("title")){
                    // Customize title's TextView
                    Toolbar.LayoutParams params = new Toolbar.LayoutParams(Toolbar.LayoutParams.WRAP_CONTENT, Toolbar.LayoutParams.MATCH_PARENT);
                    params.gravity = Gravity.CENTER_HORIZONTAL;
                    textView.setLayoutParams(params);

                    // Apply custom font using the Calligraphy library
                    Typeface typeface = TypefaceUtils.load(getAssets(), "fonts/myfont-1.otf");
                    textView.setTypeface(typeface);

                } else if(textView.getText().equals("subtitle")){
                    // Customize subtitle's TextView
                    Toolbar.LayoutParams params = new Toolbar.LayoutParams(Toolbar.LayoutParams.WRAP_CONTENT, Toolbar.LayoutParams.MATCH_PARENT);
                    params.gravity = Gravity.CENTER_HORIZONTAL;
                    textView.setLayoutParams(params);

                    // Apply custom font using the Calligraphy library
                    Typeface typeface = TypefaceUtils.load(getAssets(), "fonts/myfont-2.otf");
                    textView.setTypeface(typeface);
                }
            }
        }

        // Restore title and subtitle
        toolbar.setTitle(originalTitle);
        toolbar.setSubtitle(originalSubtitle);
    }
}
1.4.x开始,如文档中所述,您可以使用MaterialToolbar。app:titleCentered和/或app:subtitleCentered添加到您的MaterialToolbar上,并将其设置为true。 <com.google.android.material.appbar.MaterialToolbar
android:id="@+id/topAppBar"
app:titleCentered="true"
... />

CenterAlignedTopAppBar:CenterAlignedTopAppBar(
title = { Text("Centered TopAppBar") },
navigationIcon = {
IconButton(onClick = { /* doSomething() */ }) {
Icon(
imageVector = Icons.Filled.Menu,
contentDescription = "Localized description"
)
}
}
)

TopAppBar内部内容的布局。一个非常快速和简单的设置自定义字体的方法是使用自定义titleTextAppearance和fontFamily:
添加到styles.xml:
<style name="ToolbarTitle" parent="TextAppearance.Widget.AppCompat.Toolbar.Title">
    <item name="android:textSize">16sp</item>
    <item name="android:textColor">#FF202230</item>
    <item name="android:fontFamily">@font/varela_round_regular</item>
</style>
布局:
<android.support.v7.widget.Toolbar
    android:id="@+id/toolbar_top"
    android:layout_height="wrap_content"
    android:layout_width="match_parent"
    android:minHeight="?attr/actionBarSize"
    android:background="@color/action_bar_bkgnd"
    app:theme="@style/ToolBarTheme" >

     <TextView
        android:layout_width="match_parent"
        android:layout_height="wrap_content"
        android:text="Toolbar Title"
        android:layout_gravity="center"
        android:gravity="center"
        android:id="@+id/toolbar_title" />
</android.support.v7.widget.Toolbar>
代码:
    Toolbar mToolbar = parent.findViewById(R.id.toolbar_top);
    TextView mToolbarCustomTitle = parent.findViewById(R.id.toolbar_title);

    //setup width of custom title to match in parent toolbar
    mToolbar.postDelayed(new Runnable()
    {
        @Override
        public void run ()
        {
            int maxWidth = mToolbar.getWidth();
            int titleWidth = mToolbarCustomTitle.getWidth();
            int iconWidth = maxWidth - titleWidth;

            if (iconWidth > 0)
            {
                //icons (drawer, menu) are on left and right side
                int width = maxWidth - iconWidth * 2;
                mToolbarCustomTitle.setMinimumWidth(width);
                mToolbarCustomTitle.getLayoutParams().width = width;
            }
        }
    }, 0);
 public static void applyFontForToolbarTitle(Activity a){
        Toolbar toolbar = (Toolbar) a.findViewById(R.id.app_bar);
        for(int i = 0; i < toolbar.getChildCount(); i++){
            View view = toolbar.getChildAt(i);
            if(view instanceof TextView){
                TextView tv = (TextView) view;
                if(tv.getText().equals(a.getTitle())){
                    tv.setTypeface(getRuneTypefaceBold(a));
                    break;
                }
            }
        }
    }
对于重心,我认为需要将布局参数更改为水平方向的match_parent,然后:
tv.setGravity(Gravity.CENTER);
 <android.support.v7.widget.Toolbar
    android:id="@+id/top_actionbar"
    android:layout_width="match_parent"
    android:layout_height="wrap_content"
    android:theme="@style/AppThemeToolbar">

    <TextView
        android:id="@+id/pageTitle"
        android:layout_width="match_parent"
        android:layout_height="wrap_content"
        android:layout_gravity="center"
        />
</android.support.v7.widget.Toolbar>
我不知道appcompat库是否有任何变化,但这是相当琐碎的事情,没有必要使用反射。
Toolbar toolbar = (Toolbar) findViewById(R.id.toolbar);
setSupportActionBar(toolbar);

// loop through all toolbar children right after setting support
// action bar because the text view has no id assigned

// also make sure that the activity has some title here
// because calling setText() with an empty string actually
// removes the text view from the toolbar

TextView toolbarTitle = null;
for (int i = 0; i < toolbar.getChildCount(); ++i) {
    View child = toolbar.getChildAt(i);

    // assuming that the title is the first instance of TextView
    // you can also check if the title string matches
    if (child instanceof TextView) {
        toolbarTitle = (TextView)child;
        break;
    }
}
<android.support.v7.widget.Toolbar
        android:id="@+id/toolbar"
        android:layout_width="match_parent"
        android:layout_height="?attr/actionBarSize"
        android:background="?attr/colorPrimary"
        app:popupTheme="@style/AppTheme.PopupOverlay" >

        <TextView
            android:layout_width="wrap_content"
            android:layout_height="wrap_content"
            android:text="Order History"
            android:layout_gravity="center"
            android:id="@+id/toolbar_title"
            android:textSize="17sp"
            android:textStyle="bold"
            android:textColor="@color/colorWhite"
            />

    </android.support.v7.widget.Toolbar>
您可以在Activity中编写以下代码,更改标题/标签:
Toolbar toolbarTop = (Toolbar) findViewById(R.id.toolbar_top);
使用以下代码可以在工具栏中找到一个TextView元素:
TextView mTitle = (TextView) toolbarTop.findViewById(R.id.toolbar_title);
将字符串资源设置为TextView的文本,可使用以下代码:
mTitle.setText("@string/....");
implementation 'com.google.android.material:material:1.6.1'
app:titleCentered="true"
app:subtitleCentered="true"
代码示例
<?xml version="1.0" encoding="utf-8"?>
<androidx.coordinatorlayout.widget.CoordinatorLayout
xmlns:android="http://schemas.android.com/apk/res/android"
xmlns:app="http://schemas.android.com/apk/res-auto"
xmlns:tools="http://schemas.android.com/tools"
android:layout_width="match_parent"
android:layout_height="match_parent">
<com.google.android.material.appbar.AppBarLayout
android:layout_width="match_parent"
android:layout_height="wrap_content">
<com.google.android.material.appbar.MaterialToolbar
android:id="@+id/topAppBar"
android:layout_width="match_parent"
android:layout_height="?attr/actionBarSize"
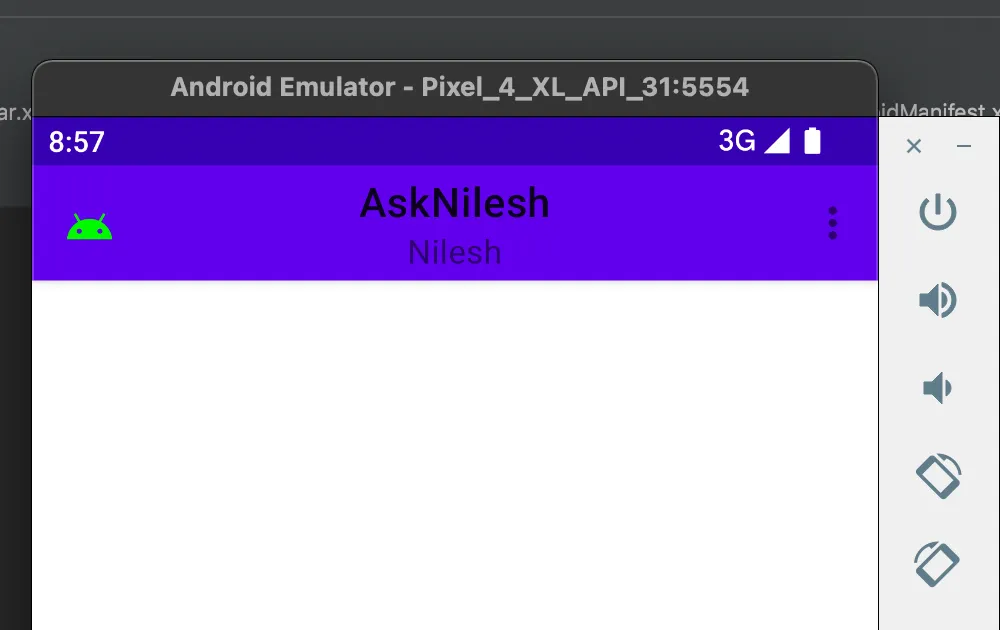
app:title="AskNilesh"
app:subtitle="Nilesh"
app:subtitleCentered="true"
app:menu="@menu/top_app_bar"
app:titleCentered="true"
app:navigationIcon="@drawable/ic_android_black_24dp" />
</com.google.android.material.appbar.AppBarLayout>
<androidx.core.widget.NestedScrollView
android:layout_width="match_parent"
android:layout_height="match_parent"
app:layout_behavior="@string/appbar_scrolling_view_behavior">
</androidx.core.widget.NestedScrollView>
</androidx.coordinatorlayout.widget.CoordinatorLayout>
输出
根据@MrEngineer13的回答更新:为了在任何情况下都将标题居中,包括汉堡图标、选项菜单,您可以在工具栏中添加一个FrameLayout,如下所示:
   <android.support.v7.widget.Toolbar
    android:id="@+id/toolbar_top"
    android:layout_height="wrap_content"
    android:layout_width="match_parent"
    android:minHeight="?attr/actionBarSize"
    android:background="@color/action_bar_bkgnd"
    app:theme="@style/ToolBarTheme" >

         <FrameLayout android:layout_width="match_parent"
                    android:layout_height="match_parent">

              <TextView
               android:layout_width="wrap_content"
               android:layout_height="wrap_content"
               android:text="Toolbar Title"
               android:layout_gravity="center"
               style="@style/TextAppearance.AppCompat.Widget.ActionBar.Title"
               android:id="@+id/toolbar_title" />

        </FrameLayout>

   </android.support.v7.widget.Toolbar>