我正在尝试将图像推送到Azure容器注册表的实例中,但即使我已经成功登录,它仍然失败。
我正在尝试将图像推送到Azure容器注册表的实例中,但即使我已经成功登录,它仍然失败。
标签需要是:
azure_registry_name.azurecr.io/container-name:tag
在我的情况下:
docker push sunlabregistry.azurecr.io/python
Create a "Container Registry", and copy the "Login server", which in the example given by Batman is sunlabregistry.azurecr.io, but I use the name my_registry.azurecr.io
In this Container Registry, create a "Token".
When creating the Token, we have a field called "Scope map". Click on "Create new"
We will get a window where we have text fields "Repository" and "Permissions". We can indicate any name we want in the text field "Repository". Let this name be my_repository. In the permissions, I selected all, which includes content/read, content/write.
Once the Scope map has been created, we can finally generate our "Token". In the token details, select password1 or password2, and select the Generate icon.
After generating a password, copy and save it to a safe location. Azure let's you copy the full docker login command with the password included, something like:
docker login -u MyToken -p my_password my_registry.azurecr.io
Do docker login with the above command (maybe adding "sudo" at the beginning)
Tag your image as follows:
sudo docker image tag <container_id>
my_registry.azurecr.io/my_repository:my_version
where my_version can be anything we want, but my_repository needs to match what we entered when creating the Token, in step 4 above.
Push the tagged image as follows:
sudo docker push my_registry.azurecr.io/my_repository:my_version
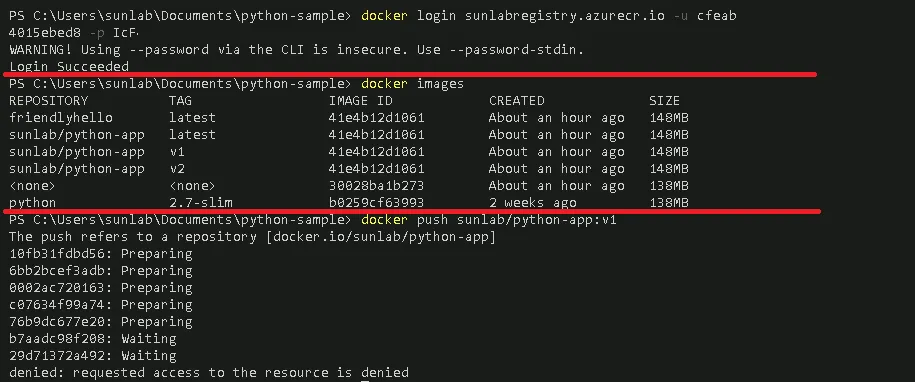
首先,您需要使用 sunlabregistry.azurecr.io/python-app:v1 标记本地图像,然后使用 docker push /python-app:v1 命令进行推送。请确保提及标签。
docker tag container-name sunlabregistry.azurecr.io/container-name:tag和docker push acidemomvp.azurecr.io/aci-tutorial-app:v1其余的步骤都在我的逐步教程中解释了。 - DragonBe