请问是否有人能够在 Cordova 中设置 Android Oreo 的自适应图标?我正在使用 android 6.4.0,我的方形图标会缩小以适应圆形图标,但我希望它不要缩小。我不介意边角被裁剪成圆形。
警告:不要使用这个答案。从 Cordova 9 开始,这已经内置支持。请参见 https://dev59.com/pVYN5IYBdhLWcg3wXnT7#55169307
我按照https://developer.android.com/studio/write/image-asset-studio.html#create-adaptive中的说明创建了图标,将它们复制到res/android中,并使用以下配置:
config.xml:
<widget ... xmlns:android="http://schemas.android.com/apk/res/android">
    <platform name="android">
        <edit-config file="app/src/main/AndroidManifest.xml" mode="merge" target="/manifest/application">
            <application android:icon="@mipmap/ic_launcher" android:roundIcon="@mipmap/ic_launcher_round" />
        </edit-config>
        <resource-file src="res/android/drawable/ic_launcher_background.xml" target="app/src/main/res/drawable/ic_launcher_background.xml" />
        <resource-file src="res/android/drawable/ic_launcher_foreground.xml" target="app/src/main/res/drawable/ic_launcher_foreground.xml" />
        <resource-file src="res/android/mipmap-anydpi-v26/ic_launcher.xml" target="app/src/main/res/mipmap-anydpi-v26/ic_launcher.xml" />
        <resource-file src="res/android/mipmap-anydpi-v26/ic_launcher_round.xml" target="app/src/main/res/mipmap-anydpi-v26/ic_launcher_round.xml" />
        <resource-file src="res/android/mipmap-hdpi/ic_launcher.png" target="app/src/main/res/mipmap-hdpi/ic_launcher.png" />
        <resource-file src="res/android/mipmap-hdpi/ic_launcher_round.png" target="app/src/main/res/mipmap-hdpi/ic_launcher_round.png" />
        <resource-file src="res/android/mipmap-mdpi/ic_launcher.png" target="app/src/main/res/mipmap-mdpi/ic_launcher.png" />
        <resource-file src="res/android/mipmap-mdpi/ic_launcher_round.png" target="app/src/main/res/mipmap-mdpi/ic_launcher_round.png" />
        <resource-file src="res/android/mipmap-xhdpi/ic_launcher.png" target="app/src/main/res/mipmap-xhdpi/ic_launcher.png" />
        <resource-file src="res/android/mipmap-xhdpi/ic_launcher_round.png" target="app/src/main/res/mipmap-xhdpi/ic_launcher_round.png" />
        <resource-file src="res/android/mipmap-xxhdpi/ic_launcher.png" target="app/src/main/res/mipmap-xxhdpi/ic_launcher.png" />
        <resource-file src="res/android/mipmap-xxhdpi/ic_launcher_round.png" target="app/src/main/res/mipmap-xxhdpi/ic_launcher_round.png" />
        <resource-file src="res/android/mipmap-xxxhdpi/ic_launcher.png" target="app/src/main/res/mipmap-xxxhdpi/ic_launcher.png" />
        <resource-file src="res/android/mipmap-xxxhdpi/ic_launcher_round.png" target="app/src/main/res/mipmap-xxxhdpi/ic_launcher_round.png" />
    </platform>
</widget>
14
app/src/main。 - Jespertheend<resource-file src="res/android/values/ic_launcher_background.xml" target="app/src/main/res/values/ic_launcher_background.xml" />(values 而不是 drawable)。感谢您发布这个解决方案,真的帮了我很大的忙! - MStrutt虽然以上答案帮助我得出答案,但它们要么过时,要么不完整。因此,为了帮助任何向前移动的人,这是一个完整的答案,包括我能想到的所有细节。
第一步:创建图标
您需要使用图像资源管理器(https://developer.android.com/studio/write/image-asset-studio)进行此操作。有许多指南可以提供帮助。
第二步:将图标移动到您的ionic / cordova项目中
将整个res文件夹复制到您的项目中。以下示例适用于ionic v1。
cp -a AndroidStudioProjects/MyApplication4/app/src/main/res MyIonicProject/myapp/resources/android/adaptiveicon
步骤3:编辑config.xml
首先,要使用图标(其他答案中缺少此项),您需要修改顶部的widget行。您需要添加xmlns:android="schemas.android.com/apk/res/android",以便它看起来像下面这样。这将允许系统更改AndroidMenifest.xml文件。
<widget id="io.ionic.starter" version="0.0.1" xmlns="http://www.w3.org/ns/widgets" xmlns:android="schemas.android.com/apk/res/android" xmlns:cdv="http://cordova.apache.org/ns/1.0">
接下来,您需要调整config.xml的平台部分。
首先从<platform name="android">部分中删除任何<icon density= ... />的实例。
然后,在Android Manifest文件中添加修改:
<edit-config file="app/src/main/AndroidManifest.xml" mode="merge" target="/manifest/application">
    <application android:icon="@mipmap/ic_launcher" android:roundIcon="@mipmap/ic_launcher_round" />
</edit-config>
最后,在新的 resources/android/adaptiveicon 文件夹中的每个文件,您都需要添加像这样的一行:
<resource-file src="resources/android/adaptiveicon/<folder>/<file>" target="app/src/main/res/<folder>/<file>" />
确保每个文件都被表示!您的最终platform部分可能会像这样(此示例适用于前景和背景均使用PNG格式的情况):
<platform name="android">
    <allow-intent href="market:*" />
    <splash density="land-ldpi" src="resources/android/splash/drawable-land-ldpi-screen.png" />
    <splash density="land-mdpi" src="resources/android/splash/drawable-land-mdpi-screen.png" />
    <splash density="land-hdpi" src="resources/android/splash/drawable-land-hdpi-screen.png" />
    <splash density="land-xhdpi" src="resources/android/splash/drawable-land-xhdpi-screen.png" />
    <splash density="land-xxhdpi" src="resources/android/splash/drawable-land-xxhdpi-screen.png" />
    <splash density="land-xxxhdpi" src="resources/android/splash/drawable-land-xxxhdpi-screen.png" />
    <splash density="port-ldpi" src="resources/android/splash/drawable-port-ldpi-screen.png" />
    <splash density="port-mdpi" src="resources/android/splash/drawable-port-mdpi-screen.png" />
    <splash density="port-hdpi" src="resources/android/splash/drawable-port-hdpi-screen.png" />
    <splash density="port-xhdpi" src="resources/android/splash/drawable-port-xhdpi-screen.png" />
    <splash density="port-xxhdpi" src="resources/android/splash/drawable-port-xxhdpi-screen.png" />
    <splash density="port-xxxhdpi" src="resources/android/splash/drawable-port-xxxhdpi-screen.png" />
    <edit-config file="app/src/main/AndroidManifest.xml" mode="merge" target="/manifest/application">
        <application android:icon="@mipmap/ic_launcher" android:roundIcon="@mipmap/ic_launcher_round" />
    </edit-config>
    <resource-file src="resources/android/adaptiveicon/drawable/ic_launcher_background.xml" target="app/src/main/res/drawable/ic_launcher_background.xml" />
    <resource-file src="resources/android/adaptiveicon/drawable-v24/ic_launcher_foreground.xml" target="app/src/main/res/drawable-v24/ic_launcher_foreground.xml" />
    <resource-file src="resources/android/adaptiveicon/mipmap-anydpi-v26/ic_launcher.xml" target="app/src/main/res/mipmap-anydpi-v26/ic_launcher.xml" />
    <resource-file src="resources/android/adaptiveicon/mipmap-anydpi-v26/ic_launcher_round.xml" target="app/src/main/res/mipmap-anydpi-v26/ic_launcher_round.xml" />
    <resource-file src="resources/android/adaptiveicon/mipmap-hdpi/ic_launcher.png" target="app/src/main/res/mipmap-hdpi/ic_launcher.png" />
    <resource-file src="resources/android/adaptiveicon/mipmap-hdpi/ic_launcher_foreground.png" target="app/src/main/res/mipmap-hdpi/ic_launcher_foreground.png" />
    <resource-file src="resources/android/adaptiveicon/mipmap-hdpi/ic_launcher_background.png" target="app/src/main/res/mipmap-hdpi/ic_launcher_background.png" />
    <resource-file src="resources/android/adaptiveicon/mipmap-hdpi/ic_launcher_round.png" target="app/src/main/res/mipmap-hdpi/ic_launcher_round.png" />
    <resource-file src="resources/android/adaptiveicon/mipmap-mdpi/ic_launcher.png" target="app/src/main/res/mipmap-mdpi/ic_launcher.png" />
    <resource-file src="resources/android/adaptiveicon/mipmap-mdpi/ic_launcher_foreground.png" target="app/src/main/res/mipmap-mdpi/ic_launcher_foreground.png" />
    <resource-file src="resources/android/adaptiveicon/mipmap-mdpi/ic_launcher_background.png" target="app/src/main/res/mipmap-mdpi/ic_launcher_background.png" />
    <resource-file src="resources/android/adaptiveicon/mipmap-mdpi/ic_launcher_round.png" target="app/src/main/res/mipmap-mdpi/ic_launcher_round.png" />
    <resource-file src="resources/android/adaptiveicon/mipmap-xhdpi/ic_launcher.png" target="app/src/main/res/mipmap-xhdpi/ic_launcher.png" />
    <resource-file src="resources/android/adaptiveicon/mipmap-xhdpi/ic_launcher_foreground.png" target="app/src/main/res/mipmap-xhdpi/ic_launcher_foreground.png" />
    <resource-file src="resources/android/adaptiveicon/mipmap-xhdpi/ic_launcher_background.png" target="app/src/main/res/mipmap-xhdpi/ic_launcher_background.png" />
    <resource-file src="resources/android/adaptiveicon/mipmap-xhdpi/ic_launcher_round.png" target="app/src/main/res/mipmap-xhdpi/ic_launcher_round.png" />
    <resource-file src="resources/android/adaptiveicon/mipmap-xxhdpi/ic_launcher.png" target="app/src/main/res/mipmap-xxhdpi/ic_launcher.png" />
    <resource-file src="resources/android/adaptiveicon/mipmap-xxhdpi/ic_launcher_foreground.png" target="app/src/main/res/mipmap-xxhdpi/ic_launcher_foreground.png" />
    <resource-file src="resources/android/adaptiveicon/mipmap-xxhdpi/ic_launcher_background.png" target="app/src/main/res/mipmap-xxhdpi/ic_launcher_background.png" />
    <resource-file src="resources/android/adaptiveicon/mipmap-xxhdpi/ic_launcher_round.png" target="app/src/main/res/mipmap-xxhdpi/ic_launcher_round.png" />
    <resource-file src="resources/android/adaptiveicon/mipmap-xxxhdpi/ic_launcher.png" target="app/src/main/res/mipmap-xxxhdpi/ic_launcher.png" />
    <resource-file src="resources/android/adaptiveicon/mipmap-xxxhdpi/ic_launcher_foreground.png" target="app/src/main/res/mipmap-xxxhdpi/ic_launcher_foreground.png" />
    <resource-file src="resources/android/adaptiveicon/mipmap-xxxhdpi/ic_launcher_background.png" target="app/src/main/res/mipmap-xxxhdpi/ic_launcher_background.png" />
    <resource-file src="resources/android/adaptiveicon/mipmap-xxxhdpi/ic_launcher_round.png" target="app/src/main/res/mipmap-xxxhdpi/ic_launcher_round.png" />
</platform>
第四步:保险起见,清理Android平台
运行以下命令以清理平台。
cd myapp
rm -rf platforms/android
ionic cordova prepare
为了更好的效果,在Ionic中修复Android模拟器启动时出现的错误:
wget https://raw.githubusercontent.com/gegenokitaro/cordova-android/8d497784ac4a40a9689e616cd486c4ed07d3e063/bin/templates/cordova/lib/emulator.js -O platforms/android/cordova/lib/emulator.js
第五步:构建!
构建:
ionic cordova build android
模拟或仿真:
ionic cordova emulate android --consolelogs --serverlogs --target "Android8"
1
android:roundIcon="@mipmap/ic_launcher_round"。所以我相信它也可以没有这个。 - pascalzon现在 Cordova Android 8.0.0 支持此功能。请参阅 公告 和 文档。
例如,在您的 config.xml 中定义图标,如下所示:
<platform name="android">
        <resource-file src="res/icons/android/colors.xml" target="/app/src/main/res/values/colors.xml" />
        <icon density="ldpi" background="@color/background" foreground="res/icons/android/ldpi-foreground.png" />
        <icon density="mdpi" background="@color/background" foreground="res/icons/android/mdpi-foreground.png" />
        <icon density="hdpi" background="@color/background" foreground="res/icons/android/hdpi-foreground.png" />
        <icon density="xhdpi" background="@color/background" foreground="res/icons/android/xhdpi-foreground.png" />
        <icon density="xxhdpi" background="@color/background" foreground="res/icons/android/xxhdpi-foreground.png" />
        <icon density="xxxhdpi" background="@color/background" foreground="res/icons/android/xxxhdpi-foreground.png" />
    </platform>
颜色文件 colors.xml 如下:
<?xml version="1.0" encoding="utf-8"?>
<resources>
    <color name="background">#FFFFFF</color>
</resources>
1
警告:不要使用此答案。自 Cordova 9 版本起,这已经成为内置功能。请参见https://dev59.com/pVYN5IYBdhLWcg3wXnT7#55169307
最近的 Android 使用了适应性图标,其中包括背景和前景图像以及一些 XML 文件。以下是我在 Ionic 应用程序中设置适应性图标的步骤:
- 在
config.xml中,将android-minSdkVersion设置为版本 26。
<preference name="android-minSdkVersion" value="26" />
<preference name="android-targetSdkVersion" value="28" />
- 在
config.xml中,删除icon density标签,并移除这些行:
        <icon density="ldpi" src="resources/android/icon/drawable-ldpi-icon.png" />
        <icon density="mdpi" src="resources/android/icon/drawable-mdpi-icon.png" />
        <icon density="hdpi" src="resources/android/icon/drawable-hdpi-icon.png" />
        <icon density="xhdpi" src="resources/android/icon/drawable-xhdpi-icon.png" />
        <icon density="xxhdpi" src="resources/android/icon/drawable-xxhdpi-icon.png" />
        <icon density="xxxhdpi" src="resources/android/icon/drawable-xxxhdpi-icon.png" />
- 接下来,我需要创建 Android 自适应图标。我使用 Android Studio 中的 Image Assets 工具。首先,我从 Photoshop 中创建了两个文件:背景图和仅包含透明图标的前景图(均为 png 格式)。之后,我按照以下步骤生成了图标:
打开 Android Studio,新建一个项目或打开现有项目。
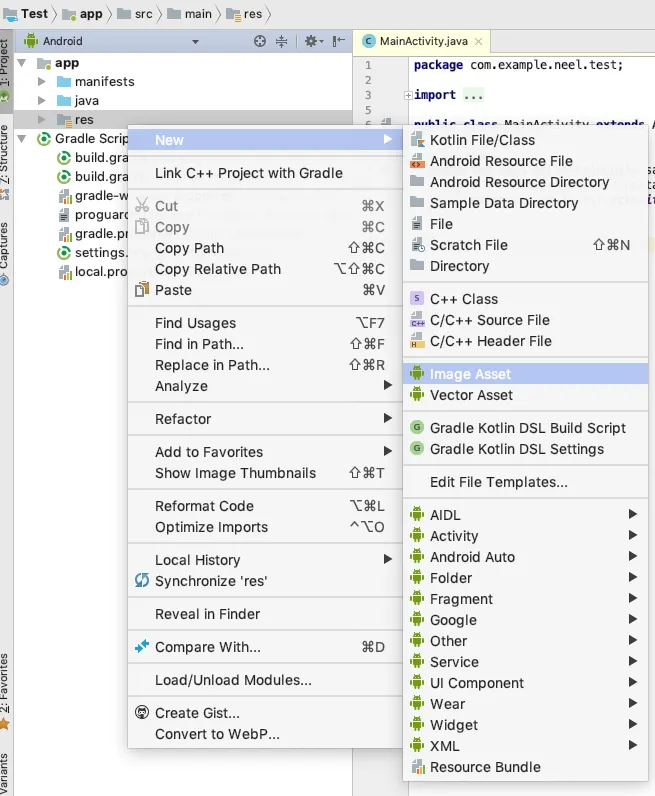
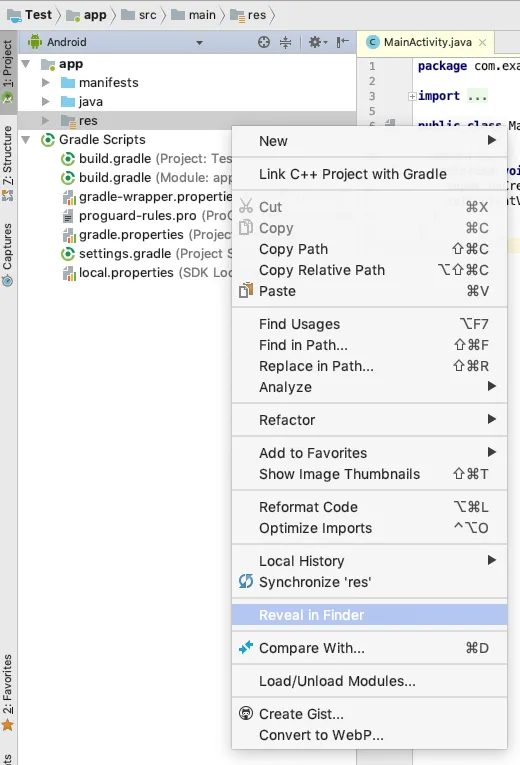
在左侧边栏中点击 app -> res。右键单击 res -> New -> Image Assets。
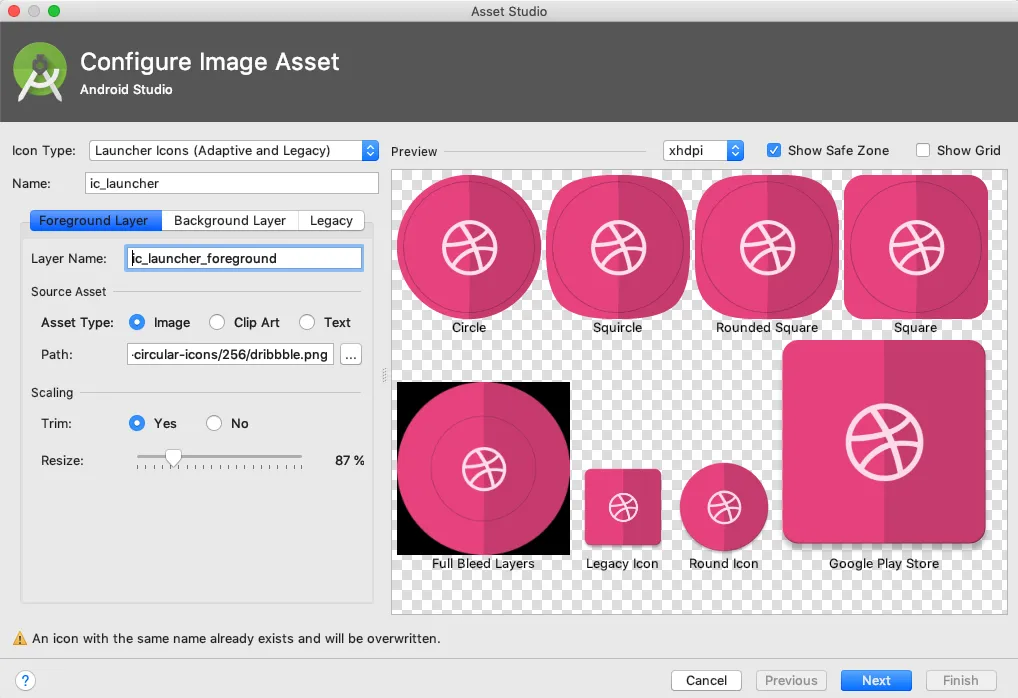
- 选择 Foreground Layer -> Asset Type 为“Image”,并选择包含透明背景的 logo 图片路径。然后选择 Trim 为 Yes 并根据需要调整大小。
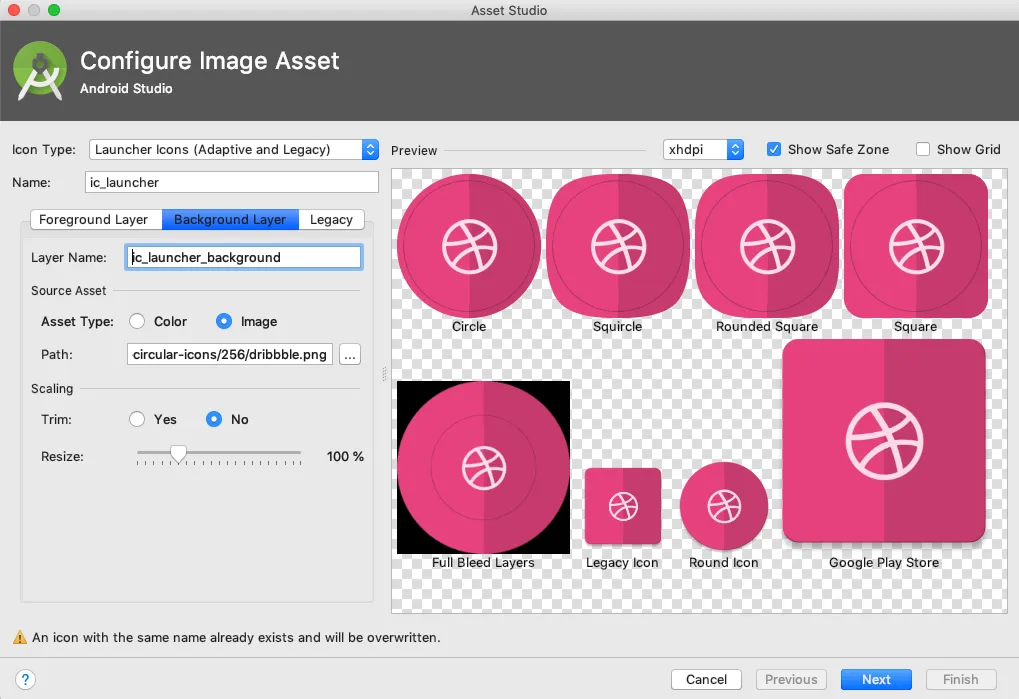
- 选择 Background Layer -> Asset Type 为“Image”,并选择路径。(另外,也可以设置为“Color”)
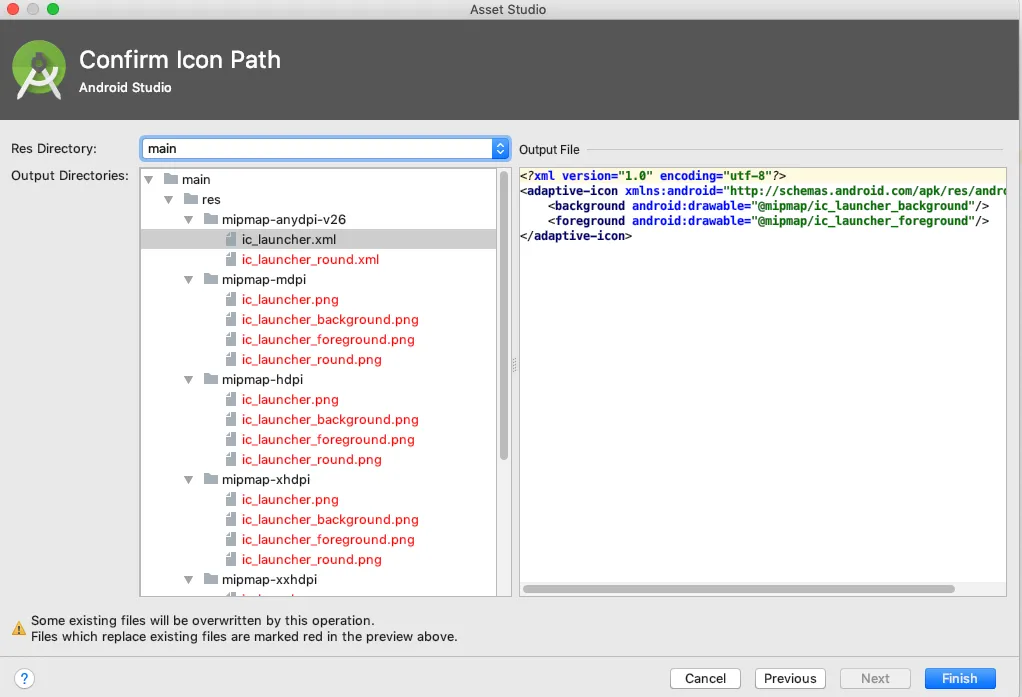
- 点击 Next,然后点击“Finish”。
- 现在,我右键单击 res 文件夹并选择“在 Finder 中显示”。
- 我复制了 res 文件夹中的所有文件夹,并将其放置在
my-app/resources/android/adaptiveicon/下。
- 接下来,我只需要将以下代码添加到 config.xml 中即可。确保适应性图标文件夹中的每个文件都正确链接,否则编译时会出现“未找到”错误。
        <edit-config file="app/src/main/AndroidManifest.xml" mode="merge" target="/manifest/application">
            <application android:icon="@mipmap/ic_launcher" android:roundIcon="@mipmap/ic_launcher_round" />
        </edit-config>
        <resource-file src="resources/android/adaptiveicon/mipmap-anydpi-v26/ic_launcher.xml" target="app/src/main/res/mipmap-anydpi-v26/ic_launcher.xml" />
        <resource-file src="resources/android/adaptiveicon/mipmap-anydpi-v26/ic_launcher_round.xml" target="app/src/main/res/mipmap-anydpi-v26/ic_launcher_round.xml" />
        <resource-file src="resources/android/adaptiveicon/mipmap-hdpi/ic_launcher.png" target="app/src/main/res/mipmap-hdpi/ic_launcher.png" />
        <resource-file src="resources/android/adaptiveicon/mipmap-hdpi/ic_launcher_round.png" target="app/src/main/res/mipmap-hdpi/ic_launcher_round.png" />
        <resource-file src="resources/android/adaptiveicon/mipmap-hdpi/ic_launcher_background.png" target="app/src/main/res/mipmap-hdpi/ic_launcher_background.png" />
        <resource-file src="resources/android/adaptiveicon/mipmap-hdpi/ic_launcher_foreground.png" target="app/src/main/res/mipmap-hdpi/ic_launcher_foreground.png" />
        <resource-file src="resources/android/adaptiveicon/mipmap-mdpi/ic_launcher.png" target="app/src/main/res/mipmap-mdpi/ic_launcher.png" />
        <resource-file src="resources/android/adaptiveicon/mipmap-mdpi/ic_launcher_round.png" target="app/src/main/res/mipmap-mdpi/ic_launcher_round.png" />
        <resource-file src="resources/android/adaptiveicon/mipmap-mdpi/ic_launcher_background.png" target="app/src/main/res/mipmap-mdpi/ic_launcher_background.png" />
        <resource-file src="resources/android/adaptiveicon/mipmap-mdpi/ic_launcher_foreground.png" target="app/src/main/res/mipmap-mdpi/ic_launcher_foreground.png" />
        <resource-file src="resources/android/adaptiveicon/mipmap-xhdpi/ic_launcher.png" target="app/src/main/res/mipmap-xhdpi/ic_launcher.png" />
        <resource-file src="resources/android/adaptiveicon/mipmap-xhdpi/ic_launcher_round.png" target="app/src/main/res/mipmap-xhdpi/ic_launcher_round.png" />
        <resource-file src="resources/android/adaptiveicon/mipmap-xhdpi/ic_launcher_background.png" target="app/src/main/res/mipmap-xhdpi/ic_launcher_background.png" />
        <resource-file src="resources/android/adaptiveicon/mipmap-xhdpi/ic_launcher_foreground.png" target="app/src/main/res/mipmap-xhdpi/ic_launcher_foreground.png" />
        <resource-file src="resources/android/adaptiveicon/mipmap-xxhdpi/ic_launcher.png" target="app/src/main/res/mipmap-xxhdpi/ic_launcher.png" />
        <resource-file src="resources/android/adaptiveicon/mipmap-xxhdpi/ic_launcher_round.png" target="app/src/main/res/mipmap-xxhdpi/ic_launcher_round.png" />
        <resource-file src="resources/android/adaptiveicon/mipmap-xxhdpi/ic_launcher_background.png" target="app/src/main/res/mipmap-xxhdpi/ic_launcher_background.png" />
        <resource-file src="resources/android/adaptiveicon/mipmap-xxhdpi/ic_launcher_foreground.png" target="app/src/main/res/mipmap-xxhdpi/ic_launcher_foreground.png" />
        <resource-file src="resources/android/adaptiveicon/mipmap-xxxhdpi/ic_launcher.png" target="app/src/main/res/mipmap-xxxhdpi/ic_launcher.png" />
        <resource-file src="resources/android/adaptiveicon/mipmap-xxxhdpi/ic_launcher_round.png" target="app/src/main/res/mipmap-xxxhdpi/ic_launcher_round.png" />
        <resource-file src="resources/android/adaptiveicon/mipmap-xxxhdpi/ic_launcher_background.png" target="app/src/main/res/mipmap-xxxhdpi/ic_launcher_background.png" />
        <resource-file src="resources/android/adaptiveicon/mipmap-xxxhdpi/ic_launcher_foreground.png" target="app/src/main/res/mipmap-xxxhdpi/ic_launcher_foreground.png" />
搞定了,现在应用程序将拥有自适应图标。
10
mipmap-ldpi,mipmap-ldpi-v26,mipmap-mdpi-v26,mipmap-hdpi-v26,mipmap-xhdpi-v26,mipmap-xxhdpi-v26,mipmap-xxxhdpi-v26,位于源代码/平台/安卓/应用/主要/资源。 - Stefan Rein将AndroidManifest.xml中的android:icon更改为:
<application android:hardwareAccelerated="true" android:icon="@drawable/ic_launcher" android:label="@string/app_name" android:supportsRtl="true">
在res/drawable中创建ic_launcher.xml文件,内容如下:
<?xml version="1.0" encoding="utf-8"?>
<adaptive-icon xmlns:android="http://schemas.android.com/apk/res/android">
    <background android:drawable="@drawable/ic_launcher_background"/>
    <foreground android:drawable="@drawable/ic_launcher_foreground"/>
</adaptive-icon>
然后在res/drawable中添加两个向量文件ic_launcher_background.xml和ic_launcher_foreground.xml。可以使用此工具创建这些文件:http://inloop.github.io/svg2android/
然后就可以开始使用了!希望Cordova很快将其整合到他们的构建中。
2
sed -i'' 's#@mipmap/icon#@drawable/ic_launcher#' platforms/android/AndroidManifest.xml - gdorbes0x6368656174的回答,值得注意的更改包括:
- 从资源目标中删除
app/src/main。 - 我的background.xml在一个
values文件夹中(我没有前景,因为我使用了一个png)。 edit-config清单文件位置与file="AndroidManifest.xml"在同一目录中。
我挣扎了几天,但这就是对我有效的方法:
config.xml
"最初的回答"
<widget ... xmlns:android="http://schemas.android.com/apk/res/android">
    <platform name="android">
    <resource-file src="resources/android/values/ic_launcher_background.xml" target="res/values/ic_launcher_background.xml" />
    <resource-file src="resources/android/mipmap-anydpi-v26/ic_launcher.xml" target="res/mipmap-anydpi-v26/ic_launcher.xml" />
    <resource-file src="resources/android/mipmap-anydpi-v26/ic_launcher_round.xml" target="res/mipmap-anydpi-v26/ic_launcher_round.xml" />
    <resource-file src="resources/android/mipmap-hdpi/ic_launcher.png" target="res/mipmap-hdpi/ic_launcher.png" />
    <resource-file src="resources/android/mipmap-hdpi/ic_launcher_round.png" target="res/mipmap-hdpi/ic_launcher_round.png" />
    <resource-file src="resources/android/mipmap-mdpi/ic_launcher.png" target="res/mipmap-mdpi/ic_launcher.png" />
    <resource-file src="resources/android/mipmap-mdpi/ic_launcher_round.png" target="res/mipmap-mdpi/ic_launcher_round.png" />
    <resource-file src="resources/android/mipmap-xhdpi/ic_launcher.png" target="res/mipmap-xhdpi/ic_launcher.png" />
    <resource-file src="resources/android/mipmap-xhdpi/ic_launcher_round.png" target="res/mipmap-xhdpi/ic_launcher_round.png" />
    <resource-file src="resources/android/mipmap-xxhdpi/ic_launcher.png" target="res/mipmap-xxhdpi/ic_launcher.png" />
    <resource-file src="resources/android/mipmap-xxhdpi/ic_launcher_round.png" target="res/mipmap-xxhdpi/ic_launcher_round.png" />
    <resource-file src="resources/android/mipmap-xxxhdpi/ic_launcher.png" target="res/mipmap-xxxhdpi/ic_launcher.png" />
    <resource-file src="resources/android/mipmap-xxxhdpi/ic_launcher_round.png" target="res/mipmap-xxxhdpi/ic_launcher_round.png" />
    <edit-config file="AndroidManifest.xml" mode="merge" target="/manifest/application">
         <application android:icon="@mipmap/ic_launcher" android:roundIcon="@mipmap/ic_launcher_round" />
    </edit-config>
    </platform>
</widget>
哎呀
可能我来晚了,但是我为了让自适应图标生效而苦苦挣扎,因为(a)使用PhoneGap Build,(b)手动操作,而不是使用Android Studio。所以,对于那些在家里玩的人,这是我所需要做的所有事情:
- 在我的
config.xml中,<platform name="android">内设置:
        <resource-file src="www/pwa/android/icon-bg.png"               target="app/src/main/res/mipmap/ic_bg.png" />
        <resource-file src="www/pwa/android/icon-fg.png"               target="app/src/main/res/mipmap/ic_fg.png" />
        <resource-file src="www/pwa/ic/mipmap-xxxhdpi/ic_launcher.png" target="app/src/main/res/mipmap/ic_launcher.png" />
        <resource-file src="www/pwa/ic/mipmap-xxxhdpi/ic_launcher.png" target="app/src/main/res/mipmap/ic_launcher_round.png" />
        <resource-file src="www/pwa/android/ic_launcher.xml"           target="app/src/main/res/mipmap-anydpi-v26/ic_launcher.xml" />
        <resource-file src="www/pwa/android/ic_launcher_round.xml"     target="app/src/main/res/mipmap-anydpi-v26/ic_launcher_round.xml" />

        <!-- Per https://forums.adobe.com/thread/2576077 -->
        <edit-config file="app/src/main/AndroidManifest.xml" mode="merge" target="/manifest/application">
            <application android:icon="@mipmap/ic_launcher" android:roundIcon="@mipmap/ic_launcher_round" />
        </edit-config>
- 上述配置中的PNG文件是不言自明的。被引用为
ic_launcher.xml和ic_launcher_round.xml的XML文件是相同的,我只是在源位置创建了这个文件,然后通过上面的资源标签进行复制。以下是这两个XML文件的内容,可以参考public/pwa/android/ic_launcher.xml和ic_launcher_round.xml的src:
<?xml version="1.0" encoding="utf-8"?>
<adaptive-icon xmlns:android="http://schemas.android.com/apk/res/android">
    <background android:drawable="@mipmap/ic_bg"/>
    <foreground android:drawable="@mipmap/ic_fg"/>
</adaptive-icon>
<preference name="phonegap-version" value="cli-8.1.1" />) 进行操作。在https://forums.adobe.com/thread/2576077中提到,您必须根据使用的cli版本,在<resource-file标记上使用不同的target路径。
希望这有所帮助,如果有任何问题,请随时问我。谢谢!
将“Original Answer”翻译成“最初的回答”。1
Android icon-android-foreground.png 432*432像素 72dpi
iOS 无透明度的png格式 72dpi
Android参考资料 https://developer.android.com/guide/practices/ui_guidelines/icon_design_adaptive
  const CordovaRes = require('cordova-res');
  const iconFolder = {
    dev: 'test',
    test: 'test',
    beta: 'beta',
    betaInternal: 'beta',
    betaRelease: 'beta',
    production: 'production'
  }[ENV];
  const sourcePath = `resources/_environments/${iconFolder}/`;
  const options = {
    resourcesDirectory: 'resources',
    platforms: {
      ios: { icon: { sources: [`${sourcePath}/icon-ios.png`] } },
      android: {
        'adaptive-icon': {
          icon: { sources: [`${sourcePath}/icon-android.png`] },
          foreground: { sources: [`${sourcePath}/icon-android-foreground.png`] },
          background: {
            sources: [{ type: 'color', color: '#b5c429' }]
          }
        }
      }
    }
  };
CordovaRes(options);首先,您需要将Cordova更新到7.0版本。Cordova 7.0支持Android Oreo。一旦您使用Cordova 7创建了一个应用程序,那么您就必须使用本机Android代码手动创建自适应图标。这个Medium博客会帮助您完成这个过程。一旦您创建了自适应图标,您可以像这样将它们添加到您的config.xml中 -
<platform name="android">
    <!--
        ldpi    : 36x36 px
        mdpi    : 48x48 px
        hdpi    : 72x72 px
        xhdpi   : 96x96 px
        xxhdpi  : 144x144 px
        xxxhdpi : 192x192 px
    -->
    <icon src="res/android/ldpi.png" density="ldpi" />
    <icon src="res/android/mdpi.png" density="mdpi" />
    <icon src="res/android/hdpi.png" density="hdpi" />
    <icon src="res/android/xhdpi.png" density="xhdpi" />
    <icon src="res/android/xxhdpi.png" density="xxhdpi" />
    <icon src="res/android/xxxhdpi.png" density="xxxhdpi" />
</platform>
1
原文链接
