限制Android上ListView的高度

93

我想在一个ListView下面显示一个按钮,但问题是,如果ListView被扩展(添加项目...),那么按钮就会被推出屏幕。

我尝试过使用权重的LinearLayout(如Android:为什么没有View的maxHeight?中建议的),但要么我权重设置不正确,要么根本不起作用。

此外,我在某处找到提示使用RelativeLayout。然后将ListView设置在android:layout_above参数所在的按钮上方。

这样做的问题是,我不知道如何定位按钮。在我找到的例子中,ListView下面的视图使用android:layout_alignParentBottom进行了调整,但我不想让我的按钮紧贴屏幕底部。

除了使用setHeight方法和计算所需空间之外,还有什么想法吗?


编辑:我得到了很多有用的答案。

  • bigstone和user639183的解决方案几乎完美地工作了。但是,我必须给按钮添加额外的填充/边距,因为它仍然会被推出屏幕的一半(但随后停止了)

  • Adinia的答案只使用相对布局,如果您想将按钮固定在屏幕底部,则可以使用它。这不是我预期的,但对其他人可能有用。

  • AngeloS的解决方案最终是我选择的,因为它刚好创造了我想要的效果。但是,我对按钮周围的LinearLayout进行了两个小更改:

    • 首先,因为我不想在我的布局中有任何绝对值,我将android:layout_height =“45px”更改为wrap_content,它同样有效。

    • 第二个问题,由于我希望按钮水平居中,而这只有通过垂直的 LinearLayout 才能实现,所以我将 android:orientation="horizontal" 改为了 "vertical"。

    AngeloS在他的初始帖子中还提到他不确定 ListView 周围的 LinearLayout 中的 android:layout_weight="0.1" 参数是否起作用;我刚试过了,它确实有用!如果没有这个参数,按钮会再次被挤出屏幕。

这样,内部相对布局会变得比屏幕更长,其中一步可以是添加android:layout_alignParentBottom="true"。但是,清楚地说,当项目很少时,您是否希望按钮保持附加到ListView的底部?如果是,请看Rich的建议。 - bigstones
是的,这就是我想要的。 - jellyfish
多年之后,由于ConstraintLayout的出现,我们现在可以设置最大高度了:https://dev59.com/RFgQ5IYBdhLWcg3wfT9R#48970129 - user1506104
16个回答

70

我在代码中解决了这个问题,只有当listview中有5个以上的项目时,才设置其高度:

if(adapter.getCount() > 5){
        View item = adapter.getView(0, null, listView);
        item.measure(0, 0);         
        ViewGroup.LayoutParams params = new ViewGroup.LayoutParams(LayoutParams.MATCH_PARENT, (int) (5.5 * item.getMeasuredHeight()));
        listView.setLayoutParams(params);
}

注意我将最大高度设置为单个项目高度的5.5倍,这样用户就可以确定需要滚动了! :)


1
好的回答。通过那段代码,我发现了我的项目的高度,现在我可以设置我的列表的大小来显示我想要的项目数量。谢谢。 - Derzu
3
这是最好的答案。当你可以用5行代码解决问题时,为什么要写50行嵌套的XML呢? - Greg Ennis
虽然现在评论这段代码有点晚了,但是它确实对我有用!顺便说一下,我使用的是 adapter.getCount 而不是 5.5。 - JayR
1
@JayR 评论永远不会太晚。 - Manza
好的解决方案。此外,我们可以使用 measure(MeasureSpec.UNSPECIFIED, MeasureSpec.UNSPECIFIED) 代替 measure(0, 0),使其更易读。 - Tejas
显示剩余2条评论

55
我曾遇到过这个问题,解决方法是创建了两个单独的LinearLayout分别用来放置ListView和Button。然后将它们都放在另一个LinearLayout中,并将该容器的android:orientation设置为vertical。我还将包含ListView的LinearLayout的权重(weight)设置为0.1,但我不知道这是否有任何影响。从那里开始,您可以将底部容器(包含按钮)的高度设置为所需的任何高度。
<LinearLayout xmlns:android="http://schemas.android.com/apk/res/android"
android:layout_width="fill_parent"
android:layout_height="fill_parent"
android:orientation="vertical">

<LinearLayout
    android:layout_width="fill_parent"
    android:layout_height="wrap_content"
    android:layout_weight="0.1"
    android:orientation="horizontal">

    <ListView
        android:id="@+id/ListView01"
        android:layout_width="fill_parent"
        android:layout_height="fill_parent"
        android:dividerHeight="2px"></ListView>
</LinearLayout>

<LinearLayout
    android:layout_width="fill_parent"
    android:layout_height="45px"
    android:background="@drawable/drawable"
    android:orientation="horizontal">

    <Button
        android:id="@+id/moreButton"
        android:layout_width="wrap_content"
        android:layout_height="fill_parent"
        android:layout_alignParentRight="true"
        android:background="@drawable/btn_more2"
        android:paddingRight="20px" />

</LinearLayout>

以上解决方案将把按钮固定在屏幕底部。


要使按钮漂浮在列表底部,请将 ListView01 的高度更改为 wrap_content

<LinearLayout xmlns:android="http://schemas.android.com/apk/res/android"
android:layout_width="fill_parent"
android:layout_height="wrap_content"
android:orientation="vertical">

<LinearLayout
    android:layout_width="fill_parent"
    android:layout_height="wrap_content"
    android:layout_weight="0.1"
    android:orientation="horizontal">

    <ListView
        android:id="@+id/ListView01"
        android:layout_width="fill_parent"
        android:layout_height="wrap_content"
        android:dividerHeight="2px"></ListView>
</LinearLayout>

<LinearLayout
    android:layout_width="fill_parent"
    android:layout_height="45px"
    android:background="@drawable/drawable"
    android:orientation="horizontal">

    <Button
        android:id="@+id/moreButton"
        android:layout_width="wrap_content"
        android:layout_height="fill_parent"
        android:layout_alignParentRight="true"
        android:background="@drawable/btn_more2"
        android:paddingRight="20px" />
</LinearLayout>


我认为它类似于HTML中的<div>标签,它只是一个包装器,这个解决方案绝对可行。 - AngeloS
关于开销方面,它与您使用相对布局并没有太大的区别。现在您有一个外部包装器,并且您正在嵌套另一个包装器。我建议您再嵌套一个包装器,将列表视图和按钮分成两个容器,在垂直线性布局中创建堆栈效果。我无法强调这是一个可行的解决方案。 - AngeloS
1
是的!这个可行!需要注意的是,你的第一种和第二种解决方案之间唯一的区别是linearlayout需要使用wrap_content,所以我最终得到了一个类似于inception的设置:http://imgur.com/c9L1Z。对于其他发现这个问题的人:权重很重要,但可以取任何值。 - Sam
2
不需要像那样包装所有视图 - 可以查看@Sparkle的解决方案 - Richard Le Mesurier
需要为按钮布局放置45像素或精确值吗?我需要放置wrap_content。 - Mario Velasco
据我所知,ListView的高度不应该设置为wrap_content,因为这会导致调用getView()多次以估算正确的高度。如果将其设置为fill_parent,这就不是问题了。 - Brandon

22

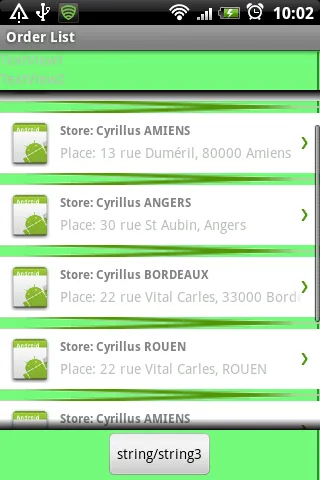
在您的最后一次编辑中,您只需在ListView代码中添加android:layout_above="@+id/butt1"即可。

为了向您(以及之前尝试回答的每个人)展示您确实不需要使用多个RelativeLayout,以下是您更正后的代码

   <RelativeLayout
    xmlns:android="http://schemas.android.com/apk/res/android"
    android:layout_width="fill_parent"
    android:layout_height="fill_parent"
    android:background="@drawable/bkg">
    <TextView
        android:id="@+id/textView1"
        android:layout_width="fill_parent"
        android:layout_height="wrap_content"
        android:text="TextView1"
        android:layout_alignParentTop="true">
    </TextView>
    <TextView
        android:id="@+id/textView2"
        android:layout_below="@+id/textView1"
        android:layout_width="fill_parent"
        android:layout_height="wrap_content"
        android:text="TextView2"
        android:layout_centerHorizontal="true">
    </TextView>
    <Button
        android:id="@+id/butt1"
        android:text="string/string3"
        android:layout_width="wrap_content"
        android:layout_height="wrap_content"
        android:layout_centerHorizontal="true"
        android:layout_alignParentBottom="true">
    </Button>
    <ListView
        android:id="@+id/android:list"
        android:layout_width="fill_parent"
        android:layout_height="wrap_content"
        android:layout_marginTop="2dip"
        android:layout_marginBottom="2dip"
        android:drawSelectorOnTop="false"
        android:visibility="visible"
        android:layout_below="@+id/textView2"
        android:layout_above="@+id/butt1" />
    </RelativeLayout>

使用一些随机列表,并给出结果
输入图像描述


1
非常非常感谢您的帮助,但是将按钮固定在屏幕底部并不是我想要的。它应该位于ListView的底部。 - jellyfish
确实,这次LinearLayouts可能是你想要的唯一解决方案;我尝试了不同的RelativeLayout组合,但没有一个真正起作用:( ...但我很高兴你找到了答案。 - Adinia

7
使用LinearLayout,将您的ListViewButton高度设置为wrap_content,并在ListView中添加weight=1。这样应该按照您的要求工作。
同时,将Buttonlayout_gravity设置为bottom

6
发现了一种不使用嵌套容器的方法,受到AngeloS解决方案的启发。我使用了一个垂直方向的LinearLayout, 它包含了一个ListView和一个按钮。我为ListView设置了android:layout_weight="0.1"。它成功使按钮始终固定在列表底部,并且当列表增长时,按钮不会被推出屏幕。
<ListView
    android:id="@+id/notes_list"
    android:layout_width="fill_parent"
    android:layout_height="wrap_content"
    android:layout_weight="0.1"        
    />

<Button
    android:id="@+id/create_note_btn"
    android:layout_width="wrap_content"
    android:layout_height="wrap_content"        
    android:onClick="onCreateButtonClicked"
    android:text="@string/create_notes"
    />

2
不,我刚试了一下,按钮仍然停留在屏幕底部,而不是停留在列表底部。 :( - Adinia
@Adinia 这个解决方案在4.4.3上至少完美运行。很好的解决方案,Sparkle,应该有更多的投票。 - Richard Le Mesurier
嗯...也许你的布局中有其他设置?我刚在安卓4.4.3的Nexus 4上进行了测试,按钮仍然停留在布局底部,而不是列表底部,它没有粘在列表上。 - Adinia
2
@Richard Le Mesurier 的确,使用 android:layout_height="wrap_content" 作为 LinearLayout 的高度,在你的解决方案中,它完美地工作了,不仅在4.4.3上如此,而且由于Sparkle没有提到它,我之前试过使用match_parent - Adinia
也在处理 Pie。+1 - Zubair Younas

5

RelativeLayout是一种解决方案,如果您不想让按钮太靠近底部,可以添加边距(填充按钮会破坏它,因为它使用9-patch背景,并设置了自己的填充)。

如果您使用LinearLayout也是一样的:实现您想要的效果的方法是将ListView设置为height=0,weight=1,并使按钮的height=wrap_content,weight=0。(像用户639183所说,将两者都设置为wrap_content将不限制ListView的高度。)


是的,它将限制ListView的高度。 - ernazm
@user639183 刚刚尝试了一下,你是对的。很抱歉,我之前非常确信那个错误。 - bigstones
我按建议更改了权重(之前,我的ListView权重为2,按钮权重为1,不知道为什么这样不起作用?)效果非常有趣:现在按钮只推出屏幕的一半。实际上,我可以通过添加一些“android:layout_marginBottom”来使它停留在我想要的位置。但是,我也可以尝试Maxim的方法,看看那是否有效。 - jellyfish
@jellyfish:我不知道,我的确信被@user639183摧毁了。这个想法是两个视图共享整个高度。它们获得的份额由它们的权重决定,所以1-0->全部给第一个(2-1将给第二个1/3的空间)。我认为在滚动视图上设置wrap_content会使其与其内容一样高。然而...你把外部布局设置为fill_parent了吗? - bigstones
真的很奇怪,嵌套的RelativeLayout(如Maxim建议的)不起作用。我可能会将其发布在上面,因为我感觉自己错过了什么... - jellyfish

2
这个想法在以下两个非常好的解决方案中得到了概述: 它们似乎至少在v4.4.3上都可以完美运行。
我仍然需要花一些时间编写测试代码来验证和确认每种方法。下面是所需的自包含、最小化测试代码。
布局基于Sparkle的解决方案,因为它包含较少的嵌套布局。此外,已更新以反映当前的LINT检查。
<LinearLayout xmlns:android="http://schemas.android.com/apk/res/android"
    xmlns:tools="http://schemas.android.com/tools"
    android:layout_width="fill_parent"
    android:layout_height="wrap_content"
    android:orientation="vertical"
    tools:context="MainActivity" >

    <ListView
        android:id="@+id/listview"
        android:layout_width="fill_parent"
        android:layout_height="0dp"
        android:layout_weight="1" />

    <Button
        android:id="@+id/btn"
        android:layout_width="fill_parent"
        android:layout_height="wrap_content"
        android:text="Grow List"
        tools:ignore="HardcodedText" />

</LinearLayout>

Activity提供了样板代码,可以方便你自己测试所解决的问题。

public class MainActivity extends Activity
{
    @Override
    protected void onCreate(Bundle savedInstanceState)
    {
        super.onCreate(savedInstanceState);
        setContentView(R.layout.activity_main);

        final ListView listview = (ListView)findViewById(R.id.listview);
        final ArrayAdapter<String> adapter = 
                new ArrayAdapter<String>(this,
                                         android.R.layout.simple_list_item_1,
                                         new ArrayList<String>());
        adapter.setNotifyOnChange(true);
        listview.setAdapter(adapter);

        findViewById(R.id.btn).setOnClickListener(new View.OnClickListener()
        {

            @Override
            public void onClick(View v)
            {
                int count = adapter.getCount();
                adapter.add(String.valueOf(count));
                listview.setSelection(count);
            }
        });
    }
}

欢迎大家随意添加或改进,因为这是“社区维基”。


2
这是最干净的做法:
<LinearLayout
    xmlns:android="http://schemas.android.com/apk/res/android"
    android:layout_width="fill_parent"
    android:layout_height="wrap_content"
    android:orientation="vertical">
  <ListView
      android:id="@+id/ListView01"
      android:layout_width="fill_parent"
      android:layout_height="0dp"
      android:layout_weight="1"
      android:dividerHeight="2px">
  </ListView>
  <FrameLayout
      android:layout_width="fill_parent"
      android:layout_height="wrap_content"
      android:background="@drawable/drawable"
      >
    <Button android:background="@drawable/btn_more2"
        android:id="@+id/moreButton"
        android:layout_width="wrap_content"
        android:layout_height="wrap_content"
        android:layout_alignParentRight="true"
        android:paddingRight="20px"
        />    
  </LinearLayout>
</LinearLayout>

这与Angelo的解决方案类似,但您不需要包装ListView的LinearLayout。此外,您可以使用一个FrameLayout来包装Button,相对于LinearLayout,它更轻便。


2
在LinearLayout中,只需将android:layout_weight="1"添加到您的ListView即可。

2

您可能可以使用嵌套容器来实现此目标。 可能需要在第二个(内部)容器中包装按钮以使其占用更多空间,并将按钮与内部容器的顶部对齐。

可能会像这样:

RelativeLayout

-- ListView

-- RelativeLayout

---- Button

通过在两个容器上使用不同的对齐选项,您应该能够使其工作。


我认为使用RelativeLayout是最好的解决方案,但我真的看不出为什么要使用嵌套容器,当你可以像这样使用android:layout_marginTop="30dip"来为按钮添加更多空间,例如在列表和按钮之间。 - Adinia
在问题中,OP说如果他严格将按钮的定位相对于ListView,一旦ListView变得足够高,它就会离开屏幕。在这种情况下,您必须使用嵌套容器来解决问题。 - Rich

网页内容由stack overflow 提供, 点击上面的
可以查看英文原文,
原文链接