以编程方式将TabLayout中的选项卡文本颜色更改为不同的颜色

7
我在屏幕上有7个日期选项卡,当选择某个选项卡时,文本显示为黑色;而其他可选择的选项卡则是白色。如果选定的日期属于另一个月份,我希望文本颜色为灰色。
我假设第一个选项卡是0,第二个选项卡是1,以此类推直到6。 如图所示,我想更改选项卡(3)、选项卡(4)、选项卡(5)和选项卡(6)的文本颜色。当满足特定条件时(不使用xml),如何以编程方式将这4个选项卡的文本颜色设置为灰色?
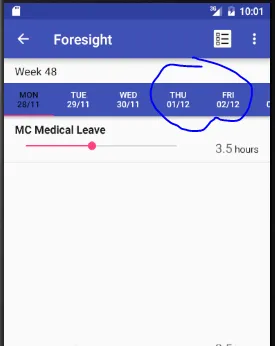
<RelativeLayout
    android:layout_width="match_parent"
    android:layout_height="wrap_content"
    android:layout_weight="1"
    android:paddingTop="8dp"
    android:paddingBottom="8dp"
    android:paddingLeft="@dimen/activity_horizontal_margin"
    android:paddingRight="@dimen/activity_horizontal_margin">

    <TextView
        android:id="@+id/lblWeekMsg"
        android:layout_width="wrap_content"
        android:layout_height="wrap_content"
        android:text="@string/week"
        android:textAppearance="?attr/textAppearanceListItem" />
    <TextView
        android:id="@+id/lblWeekNo"
        android:layout_width="wrap_content"
        android:layout_height="wrap_content"
        android:layout_toEndOf="@id/lblWeekMsg"
        android:layout_alignBaseline="@id/lblWeekMsg"
        android:text=""
        android:textAppearance="?attr/textAppearanceListItem" />

</RelativeLayout>

<android.support.design.widget.CoordinatorLayout xmlns:android="http://schemas.android.com/apk/res/android"
    xmlns:app="http://schemas.android.com/apk/res-auto"
    android:id="@+id/coordinator_layout"
    android:layout_width="match_parent"
    android:layout_height="wrap_content"
    android:layout_weight="30">

    <android.support.design.widget.AppBarLayout
        android:layout_width="match_parent"
        android:layout_height="wrap_content"
        android:id="@+id/app_bar_layout">

        <android.support.design.widget.TabLayout
            android:id="@+id/tab_layout"
            android:layout_width="match_parent"
            android:layout_height="wrap_content"
            app:tabTextColor="@android:color/white"
            app:tabMode="scrollable"
            app:tabGravity="fill" />

    </android.support.design.widget.AppBarLayout>

    <android.support.v4.view.ViewPager
        android:id="@+id/view_pager"
        android:layout_width="match_parent"
        android:layout_height="wrap_content"
        app:layout_behavior="@string/appbar_scrolling_view_behavior" />

</android.support.design.widget.CoordinatorLayout>

我用这种方式创建带有片段的标签页。
public void setupViewPager(ViewPager viewPager, ArrayList<String> id, ArrayList<String> tasks,
                           ArrayList<Double> mondayHours, ArrayList<Double> tuesdayHours,
                           ArrayList<Double> wednesdayHours, ArrayList<Double> thursdayHours,
                           ArrayList<Double> fridayHours, ArrayList<Double> saturdayHours,
                           ArrayList<Double> sundayHours) {
    Bundle bundle = new Bundle();
    bundle.putStringArrayList(EXTRA_CHECKED_TASK_ID, id);
    bundle.putStringArrayList(EXTRA_CHECKED_TASKS, tasks);
    bundle.putSerializable(EXTRA_MONDAY, mondayHours);
    bundle.putSerializable(EXTRA_TUESDAY, tuesdayHours);
    bundle.putSerializable(EXTRA_WEDNESDAY, wednesdayHours);
    bundle.putSerializable(EXTRA_THURSDAY, thursdayHours);
    bundle.putSerializable(EXTRA_FRIDAY, fridayHours);
    bundle.putSerializable(EXTRA_SATURDAY, saturdayHours);
    bundle.putSerializable(EXTRA_SUNDAY, sundayHours);

    final String MON = "MON" + "\n" + MainActivity.sevenDatesList.get(0);
    final String TUE = "TUE" + "\n" + MainActivity.sevenDatesList.get(1);
    final String WED = "WED" + "\n" + MainActivity.sevenDatesList.get(2);
    final String THU = "THU" + "\n" + MainActivity.sevenDatesList.get(3);
    final String FRI = "FRI" + "\n" + MainActivity.sevenDatesList.get(4);
    final String SAT = "SAT" + "\n" + MainActivity.sevenDatesList.get(5);
    final String SUN = "SUN" + "\n" + MainActivity.sevenDatesList.get(6);

    adapter = new ViewPagerAdapter(getSupportFragmentManager(), bundle);
    adapter.addFragment(new MondayFragment(), MON);
    adapter.addFragment(new TuesdayFragment(), TUE);
    adapter.addFragment(new WednesdayFragment(), WED);
    adapter.addFragment(new ThursdayFragment(), THU);
    adapter.addFragment(new FridayFragment(), FRI);
    adapter.addFragment(new SaturdayFragment(), SAT);
    adapter.addFragment(new SundayFragment(), SUN);

    viewPager.setAdapter(adapter);
}

我尝试过这个:这个,但我的代码没有使用tabWidget。 我也尝试过这个,但我的代码没有使用tabHost。
根据@Bhavesh Misri的建议,我的解决方案是:
ViewGroup vg = (ViewGroup) tabLayout.getChildAt(0);
    //get number of tab
    int tabsCount = vg.getChildCount();
    //loop the tab
    for (int j = 0; j < tabsCount; j++) {
        //get view of selected tab
        ViewGroup vgTab = (ViewGroup) vg.getChildAt(j);

        //when the day is not required to display - out of range
        if( j<lesserThan || j>largerThan ){
            //disable the selected tab
            vgTab.setEnabled(false);
            //set the not-required tab color transparent ratio
            vgTab.setAlpha((float) 0.50);
        } 
    }

如果可能的话,请在初始化和填充选项卡的地方发布您的业务逻辑。 - Pravin Divraniya
@PravinD 谢谢提醒,我已经添加了代码片段。 - CHAN HAU YEEN
你是否使用了自定义布局来渲染选项卡文本?另外,为什么要使用自定义方法addFragment将片段添加到适配器中,因为FragmentPagerAdapter已经有了覆盖getItem(int position)的相同目的的方法? - Pravin Divraniya
5个回答

9

请尝试这个方法并告诉我是否有效:

tabLayout.addOnTabSelectedListener(new TabLayout.OnTabSelectedListener() {
        @Override
        public void onTabSelected(TabLayout.Tab tab) {
            viewPager.setCurrentItem(tab.getPosition());
            if (tab.getPosition() == 0) {
                tabLayout.getTabAt(0).getIcon().setAlpha(255);
                tabLayout.getTabAt(1).getIcon().setAlpha(100);
                tabLayout.getTabAt(2).getIcon().setAlpha(100);
            } else if (tab.getPosition() == 1) {
                tabLayout.getTabAt(0).getIcon().setAlpha(100);
                tabLayout.getTabAt(1).getIcon().setAlpha(255);
                tabLayout.getTabAt(2).getIcon().setAlpha(100);

            } else if (tab.getPosition() == 2) {
                tabLayout.getTabAt(0).getIcon().setAlpha(100);
                tabLayout.getTabAt(1).getIcon().setAlpha(100);
                tabLayout.getTabAt(2).getIcon().setAlpha(255);

            }
        }

@Surya Prakash Kushawah你的方法更好。


1
你的 tabLayout.getTabAt(0).getIcon().setAlpha(100); 给了我提示,非常感谢! - CHAN HAU YEEN
@CHANHAUYEEN 很高兴能帮忙 :) - Abhi

9

这是设置选项卡文本颜色的方法:

tabLayout.setTabTextColors(ContextCompat.getColorStateList(this, R.color.tab_selector));
tabLayout.setSelectedTabIndicatorColor(ContextCompat.getColor(this, R.color.indicator));

谢谢。这段代码将更改整个TabLayout的文本颜色。我想要的是当单个选项卡满足条件时更改其文本颜色。 - CHAN HAU YEEN

3
在style.xml中创建一个样式,并在xml布局中按以下方式调用
 <style name="MyCustomTabLayout" parent="Widget.Design.TabLayout">

        <item name="tabIndicatorColor">@color/colorAccent</item>
        <item name="tabIndicatorHeight">2dp</item>
        <item name="tabTextAppearance">@style/MyCustomTabTextAppearance</item>
        <item name="tabSelectedTextColor">@color/colorAccent</item>
    </style>

    <style name="MyCustomTabTextAppearance" parent="TextAppearance.Design.Tab">
        <item name="android:textSize">@dimen/title_text_size</item>
        <item name="android:textColor">@color/secondaryText</item>
        <item name="textAllCaps">false</item>
        <item name="android:textStyle">normal</item>
    </style>

请在此处调用

<android.support.design.widget.TabLayout
                android:id="@+id/tab_layout"
                android:layout_width="match_parent"
                android:layout_height="wrap_content"
                app:tabTextColor="@android:color/white"
                app:tabMode="scrollable"
      **style="@style/MyCustomTabLayout"**
                app:tabGravity="fill" />

1
我需要根据某些条件改变文本颜色,因此我需要以编程的方式进行更改。 - CHAN HAU YEEN

0

基于我上面的代码的解决方案:

ViewGroup vg = (ViewGroup) tabLayout.getChildAt(0);
//get view of the 6th tab - start with zero
ViewGroup vgTabSixth = (ViewGroup) vg.getChildAt(5);
//set the not-required tab color transparent ratio 20%
vgTabSixth.setAlpha((float) 0.20);

0

在编程中,使用TabLayoutViewPager2的最佳实践。

dependencies {
    // ...
    implementation 'com.google.android.material:material:1.0.0'
    // ...
}

在XML属性中

<LinearLayout
            android:layout_width="match_parent"
            android:layout_height="match_parent"
            android:orientation="vertical"
            android:layout_below="@+id/layout_toolbar">
            <com.google.android.material.tabs.TabLayout
                    android:id="@+id/tab_layout"
                    android:layout_width="match_parent"
                    android:layout_height="wrap_content"
                    app:tabIndicatorColor="@color/white"
                    app:tabBackground="@color/colorAccent"
                    app:tabSelectedTextColor="@color/white"
                    app:tabTextColor="@color/white"
                    app:tabMode="scrollable" />
            <androidx.viewpager2.widget.ViewPager2
                android:id="@+id/view_pager"
                android:layout_width="match_parent"
                android:layout_height="match_parent"
                android:nestedScrollingEnabled="false" />
        </LinearLayout>

在 Kotlin 中

//set your adapter
//view_pager.adapter =  WebViewFragmentTabAdapter(supportFragmentManager, lifecycle)
TabLayoutMediator(tab_layout, view_pager) { tab, position ->
    tab.text = AppDataInstance.navigationTab[position].name
    view_pager.setCurrentItem(tab.position, true)
}.attach()

// in case you need to set color programmatically
(tab_layout as TabLayout).setBackgroundColor(ContextCompat.getColor(mContext, R.color.colorPrimary))
(tab_layout as TabLayout).setSelectedTabIndicatorColor(ContextCompat.getColor(mContext, R.color.white))
(tab_layout as TabLayout).setTabTextColors(ContextCompat.getColor(mContext, R.color.white),
                ContextCompat.getColor(mContext, R.color.white))

网页内容由stack overflow 提供, 点击上面的
可以查看英文原文,
原文链接