如何为NavigationView中的项目设置自定义字体?

74

通过新的NavigationView,我们可以在XML中使用菜单资源设置抽屉的项目。

这样,我们可以像这样设置每个项目

<item
  android:id="@+id/drawer_my_account"
  android:icon="@drawable/ic_my_account"
  android:title="@string/drawer_my_account" />

但是现在,我想为我的抽屉中的每个项设置自定义字体,但我无法找到一种通过XML或Java代码实现的方法。是否有方法可以做到这一点?


https://dev59.com/8VcO5IYBdhLWcg3wkiVN#53379256 - Abhinav Saxena
15个回答

171

只需将以下的类文件添加到您的项目中。

import android.graphics.Paint;
import android.graphics.Typeface;
import android.text.TextPaint;
import android.text.style.TypefaceSpan;

public class CustomTypefaceSpan extends TypefaceSpan {

    private final Typeface newType;

    public CustomTypefaceSpan(String family, Typeface type) {
        super(family);
        newType = type;
    }

    @Override
    public void updateDrawState(TextPaint ds) {
        applyCustomTypeFace(ds, newType);
    }

    @Override
    public void updateMeasureState(TextPaint paint) {
        applyCustomTypeFace(paint, newType);
    }

    private static void applyCustomTypeFace(Paint paint, Typeface tf) {
        int oldStyle;
        Typeface old = paint.getTypeface();
        if (old == null) {
            oldStyle = 0;
        } else {
            oldStyle = old.getStyle();
        }

        int fake = oldStyle & ~tf.getStyle();
        if ((fake & Typeface.BOLD) != 0) {
            paint.setFakeBoldText(true);
        }

        if ((fake & Typeface.ITALIC) != 0) {
            paint.setTextSkewX(-0.25f);
        }

        paint.setTypeface(tf);
    }
}

然后在您的活动中创建以下方法

private void applyFontToMenuItem(MenuItem mi) {
        Typeface font = Typeface.createFromAsset(getAssets(), "ds_digi_b.TTF");
        SpannableString mNewTitle = new SpannableString(mi.getTitle());
        mNewTitle.setSpan(new CustomTypefaceSpan("" , font), 0 , mNewTitle.length(),  Spannable.SPAN_INCLUSIVE_INCLUSIVE);
        mi.setTitle(mNewTitle);
}

并从活动中调用它。

navView = (NavigationView) findViewById(R.id.navView);
        Menu m = navView.getMenu();
        for (int i=0;i<m.size();i++) {
            MenuItem mi = m.getItem(i);

            //for aapplying a font to subMenu ...
            SubMenu subMenu = mi.getSubMenu();
            if (subMenu!=null && subMenu.size() >0 ) {
                for (int j=0; j <subMenu.size();j++) {
                    MenuItem subMenuItem = subMenu.getItem(j);
                    applyFontToMenuItem(subMenuItem);
                }
            }

            //the method we have create in activity
            applyFontToMenuItem(mi);
        }

这是我的输出结果:

在此输入图像描述


我的回答中没有onGobalLayout..因为我使用了自定义字体跨度..因为SpannableString允许格式化..但不允许更改字体,所以我使用了自定义字体跨度类.. - Moinkhan
给那些点踩的人,请尽量说明原因,这样我才能理解我的错误。不仅仅是在我的回答上,如果你对任何回答进行了点踩,请给出原因。 - Moinkhan
1
@AdeelTurk 是的,它给了我那个错误,但我刚刚移除了那个检查。代码运行得很好,点赞 +1。 - Satheesh
我在工具栏中使用这种方法来处理菜单项。在Android 5上一切正常,但在7版本上它不起作用。你有什么想法吗? - ViT-Vetal-
很棒的答案 @moinkhan :) - Gundu Bandgar
显示剩余9条评论

80
这个对我有用。
<android.support.design.widget.NavigationView
       android:id="@+id/navigation_view"
       android:layout_width="wrap_content"
       android:layout_height="match_parent"
       android:layout_gravity="start"
       android:background="#4A4444"
       android:clipToPadding="false"
       android:paddingBottom="50dp"
       app:itemIconTint="@color/white"
       app:menu="@menu/drawer_home"
       app1:itemTextAppearance="@style/NavigationDrawerStyle" >
</android.support.design.widget.NavigationView>
res->values->styles
 <style name="NavigationDrawerStyle">
    <item name="android:textSize">18sp</item>
    <item name="android:typeface">monospace</item>
</style>

//设置自定义字体类型 MainApplication.java

public class MainApplication extends Application {
    @Override
    public void onCreate() {
        super.onCreate();

//set Custom Typeface

        FontsOverride.setDefaultFont(this, "MONOSPACE", "OpenSans-Semibold.ttf");
    }
}

// FontsOverride.java

public final class FontsOverride {

     public static void setDefaultFont(Context context,
                String staticTypefaceFieldName, String fontAssetName) {
            final Typeface regular = Typeface.createFromAsset(context.getAssets(),
                    fontAssetName);
            replaceFont(staticTypefaceFieldName, regular);
        }

        protected static void replaceFont(String staticTypefaceFieldName,
                final Typeface newTypeface) {
            try {
                final Field staticField = Typeface.class
                        .getDeclaredField(staticTypefaceFieldName);
                staticField.setAccessible(true);

                staticField.set(null, newTypeface);
            } catch (NoSuchFieldException e) {
                e.printStackTrace();
            } catch (IllegalAccessException e) {
                e.printStackTrace();
            }
        }


}

这是一个非常干净的解决方案。 - penduDev
如果它与问题有关,那就太完美了。我们正在谈论字体,而不是字号。确实可以查看其他答案... - iBobb
嗨,iBobb,我已经更新了答案,因为我知道如何设置自定义字体。谢谢。 - Pankaj Kant Patel
完美的答案。非常棒。 - Arshad
不是 app1:itemTextAppearance="@style/NavigationDrawerStyle" 而是 app:itemTextAppearance="@style/NavigationDrawerStyle" - Abhinav Upadhyay
显示剩余6条评论

28

使用 app:itemTextAppearance="" 属性。希望这可以帮到你。

 <android.support.design.widget.NavigationView
        android:id="@+id/nav_view"
        android:layout_width="wrap_content"
        android:layout_height="match_parent"
        android:layout_gravity="start"
        android:fitsSystemWindows="true"
        app:headerLayout="@layout/nav_header_main"
        android:background="@drawable/nav_bg_gradient"
        android:theme="@style/NavigationView"
        app:itemIconTint="@color/colorWhite"
        app:itemTextColor="@color/colorWhite"
        app:itemTextAppearance="@style/NavigationText"
        app:menu="@menu/main_drawer">
在 styles.xml 中编写。
<style name="NavigationText" parent="@android:style/TextAppearance.Medium">
        <item name="android:textColor">@color/colorWhite</item>
        <item name="android:textSize">12sp</item>
        <item name="android:fontFamily">sans-serif-thin</item>
    </style>

@chris838,如果您按照以下步骤添加自定义字体,则可以使其正常工作:https://developer.android.com/guide/topics/ui/look-and-feel/fonts-in-xml.html - Mohammed Riyadh
5
这应该被接受,因为它是最新的解决方案! - katie
5
完美的解决方案。但是,如果您正在使用自定义字体,则使用<item name="android:fontFamily">@font/custom-font</item> - Ankur Gupta

14

有没有一种方法可以做到这一点?

是的。NavigationView没有直接处理这个的方式,但是可以使用View.findViewsWithText轻松实现。

有两件事情可以帮助我们处理这个问题。

  1. 每个MenuItem视图都是一个TextView。因此,这使得应用您的Typeface变得更加容易。有关NavigationView实际使用的TextView的更多信息,请参见NavigationMenuItemView
  2. NavigationView在选择MenuItem时提供回调。我们将不得不为每个MenuItem提供一个唯一的id,并且此回调将帮助尽可能通用这些id,这意味着稍后会有少量的代码。虽然这更与您是否拥有SubMenu有关。

实现

请注意,每个MenuItem id只是menuItem+Position。稍后当我们找到每个MenuItemView时,这将非常方便。

<group android:checkableBehavior="single">
    <item
        android:id="@+id/menuItem1"
        android:icon="@drawable/ic_dashboard"
        android:title="MenuItem 1" />
    <item
        android:id="@+id/menuItem2"
        android:icon="@drawable/ic_event"
        android:title="MenuItem 2" />
    <item
        android:id="@+id/menuItem3"
        android:icon="@drawable/ic_headset"
        android:title="MenuItem 3" />
    <item
        android:id="@+id/menuItem4"
        android:icon="@drawable/ic_forum"
        android:title="MenuItem 4" />
</group>

<item android:title="Sub items" >
    <menu>
        <item
            android:id="@+id/menuItem5"
            android:icon="@drawable/ic_dashboard"
            android:title="Sub item 5" />
        <item
            android:id="@+id/menuItem6"
            android:icon="@drawable/ic_forum"
            android:title="Sub item 6" />
    </menu>
</item>


/** The total number of menu items in the {@link NavigationView} */
private static final int MENU_ITEMS = 6;
/** Contains the {@link MenuItem} views in the {@link NavigationView} */
private final ArrayList<View> mMenuItems = new ArrayList<>(MENU_ITEMS);

@Override
protected void onCreate(Bundle savedInstanceState) {
    super.onCreate(savedInstanceState);
    ...
    final NavigationView navView = ...
    // Grab the NavigationView Menu
    final Menu navMenu = navView.getMenu();
    // Install an OnGlobalLayoutListener and wait for the NavigationMenu to fully initialize
    navView.getViewTreeObserver().addOnGlobalLayoutListener(new ViewTreeObserver.OnGlobalLayoutListener() {
        @Override
        public void onGlobalLayout() {
            // Remember to remove the installed OnGlobalLayoutListener
            navView.getViewTreeObserver().removeOnGlobalLayoutListener(this);
            // Loop through and find each MenuItem View
            for (int i = 0, length = MENU_ITEMS; i < length; i++) {
                final String id = "menuItem" + (i + 1);
                final MenuItem item = navMenu.findItem(getResources().getIdentifier(id, "id", getPackageName()));
                navView.findViewsWithText(mMenuItems, item.getTitle(), View.FIND_VIEWS_WITH_TEXT);
            }
            // Loop through each MenuItem View and apply your custom Typeface
            for (final View menuItem : mMenuItems) {
                ((TextView) menuItem).setTypeface(yourTypeface, Typeface.BOLD);
            }
        }
    });
}

您可以看到,使用通用的MenuItem id 可以让您利用Resources.getIdentifier并节省一些代码行。 SubMenu注意事项 需要牢记一点:您需要显式地循环遍历您的N个菜单项,而不是使用Menu.size。否则,您的SubMenu项目将无法被识别。换句话说,如果您没有SubMenu,另一种方法是:
for (int i = 0, length = navMenu.size(); i < length; i++) {
    final MenuItem item = navMenu.getItem(i);
    navigationView.findViewsWithText(mMenuItems, item.getTitle(), View.FIND_VIEWS_WITH_TEXT);
}

您不必担心为每个MenuItem应用唯一的ID。

结果

results

我在示例中使用的字体是:Smoothie Shoppe


首先,感谢您的回答。我看到您的代码可以设置自定义字体,但是我不太喜欢使用 OnGlobalLayoutListener 并以这种方式遍历 ViewTree,特别是使用 getResources().getIdentifier(...):这正是我要求“简单方法”的原因。此外,这似乎是依赖于项目标题来获取对它们的引用 - 这将使我成为标题的囚犯,对吧?我希望看到一个更松散耦合的选项。 - Júlio Zynger
你不会得到一个。NavigationView 简单地没有提供“简单”的方法来处理这个问题。但我不会担心使用 OnGlobalLayoutListener 或使用 Resources.getIdentifier。这些东西是安全的,也被 Android 框架内部使用。你将成为你的标题的囚犯,是的。我也很想看到一个更少耦合的选项。我希望设计库在这方面稍后会更加可定制。 - adneal
1
findViewsWithText不能找到超出屏幕边界的视图,这是预期行为吗? - user3161880
正如@user3161880所说,如果您的菜单恰好超出屏幕,则此技术将无法为这些菜单项设置样式。我的解决方法是在删除侦听器并设置样式之前等待找到所有项目,使用if(mMenuItems.size() != menu.size()) { return; }。这可能会影响性能,但在我的特定情况下没有问题(只需要额外调用一次onGlobalLayout())。 - Jarrod Smith
当我尝试将我的 MenuItem 强制转换为 TextView 时,它变成了 null。有任何想法原因是什么吗?在尝试对其进行类型转换之前,我可以轻松更改其文本内容。 - nilsi

10
我使用了app:theme
<android.support.design.widget.NavigationView
    android:id="@+id/nav_view"
    android:layout_width="wrap_content"
    android:layout_height="match_parent"
    android:layout_gravity="start"
    android:background="@color/colorMenuBackground"
    android:fitsSystemWindows="true"
    app:headerLayout="@layout/nav_header_main"
    app:menu="@menu/activity_main_drawer"
    app:theme="@style/NavigationViewTextAppearance"
   />

styles.xml :

<style name="NavigationViewTextAppearance">
    <item name="android:ellipsize">end</item>
    <item name="android:fontFamily">@font/badscript_regular</item>
</style>

6

设置自定义字体的另一种方法:

1. 您可以在“font”文件夹中添加您的字体,然后可以在任何TextView(或其他需要的地方)中使用它们。

enter image description here

font.xml 的示例:

<?xml version="1.0" encoding="utf-8"?>
<font-family xmlns:android="http://schemas.android.com/apk/res/android">
    <font
        android:font="@font/nunito_bold"
        android:fontStyle="normal"
        android:fontWeight="400" />
</font-family>

2. 在您的styles.xml文件中,您可以使用该字体和颜色自定义项目文本样式,并在需要的任何地方进行更改(来自@Moonis Abidi的答案)

 <style name="NavigationText" parent="@android:style/TextAppearance.Medium">
        <item name="android:textColor">@android:color/white</item>
        <item name="android:textSize">12sp</item>
        <item name="android:fontFamily">@font/nunito_semibold</item>
    </style>

3. 现在,您只需在导航视图中使用app:itemTextAppearance指定此内容即可:

<android.support.design.widget.NavigationView
        android:id="@+id/nav_view"
        android:layout_width="wrap_content"
        android:layout_height="match_parent"
        android:layout_gravity="start"
        android:fitsSystemWindows="true"
        app:headerLayout="@layout/nav_header"
        app:menu="@menu/main_menu"
        app:itemTextAppearance="@style/NavigationText"/>

// ------------- 此外,如果您需要在其他 TextView 中使用此字体,可以按以下方式使用:

 <TextView
        android:layout_width="wrap_content"
        android:layout_height="wrap_content"
        android:fontFamily="@font/nunito_bold"/>

这是在Android中设置字体的最佳方法。 - Ramin eghbalian

3

不是自定义字体,而是改变导航项目字体的另一种方式。创建名为design_navigation_item.xml的布局。

<android.support.design.internal.NavigationMenuItemView
    xmlns:android="http://schemas.android.com/apk/res/android"
    android:layout_width="match_parent"
    android:layout_height="?attr/listPreferredItemHeightSmall"
    android:paddingLeft="?attr/listPreferredItemPaddingLeft"
    android:paddingRight="?attr/listPreferredItemPaddingRight"
    android:drawablePadding="@dimen/navigation_icon_padding"
    android:gravity="center_vertical|start"
    android:maxLines="1"
    android:fontFamily="sans-serif-thin"
    android:textSize="22sp"
    android:textAppearance="?attr/textAppearanceListItem" />

然后将fontFamily更改为所需的字体。


这个布局在哪里使用? - Mohammed Riyadh

3

可能有点晚了,但我找到了一种更简洁的方法,所以想分享一下。

  • Make a custom view NavFontTextView.java:

    import android.content.Context;
    import android.support.design.internal.NavigationMenuItemView;
    import android.util.AttributeSet;
    
    import utils.CustomFontHelper;
    
    public class NavFontTextView extends NavigationMenuItemView {
    Context mContext;
    
    public NavFontTextView(Context context) {
        super(context);
        mContext = context;
        setDefaultFont();
    }
    
    public NavFontTextView(Context context, AttributeSet attrs) {
        super(context, attrs);
        mContext = context;
        setDefaultFont();
        CustomFontHelper.setCustomFont(this, context, attrs);
    }
    
    public NavFontTextView(Context context, AttributeSet attrs, int defStyleAttr) {
        super(context, attrs, defStyleAttr);
        mContext = context;
        setDefaultFont();
        CustomFontHelper.setCustomFont(this, context, attrs);
    }
    
    public void setDefaultFont() {
        CustomFontHelper.setCustomFont(this, "fonts/SourceSansPro-Regular.ttf", mContext);
    }
    }
    
  • Make a file called CustomFontHelper.java:

    import android.content.Context;
    import android.content.res.TypedArray;
    import android.graphics.Typeface;
    import android.util.AttributeSet;
    import android.widget.TextView;
    
    /**
     * Taken from: https://dev59.com/UWQn5IYBdhLWcg3wroyL#16648457
     */
    public class CustomFontHelper {
    /**
     * Sets a font on a textview based on the custom com.my.package:font attribute
     * If the custom font attribute isn't found in the attributes nothing happens
     * @param textview
     * @param context
     * @param attrs
     */
    public static void setCustomFont(TextView textview, Context context, AttributeSet attrs) {
        TypedArray a = context.obtainStyledAttributes(attrs, R.styleable.CustomFont);
        String font = a.getString(R.styleable.CustomFont_font);
        setCustomFont(textview, font, context);
        a.recycle();
    }
    
    /**
     * Sets a font on a textview
     * @param textview
     * @param font
     * @param context
     */
    public static void setCustomFont(TextView textview, String font, Context context) {
        if(font == null) {
            return;
        }
        Typeface tf = FontCache.get(font, context);
        if(tf != null) {
            textview.setTypeface(tf);
        }
    }
    }
    
  • Make a layout layout/design_navigation_item.xml (the name must be exactly the same):

    <?xml version="1.0" encoding="utf-8"?>
    <custom_view.NavFontTextView xmlns:android="http://schemas.android.com/apk/res/android"
    xmlns:app="http://schemas.android.com/apk/res-auto"
    android:layout_width="match_parent"
    android:layout_height="?attr/listPreferredItemHeightSmall"
    android:drawablePadding="10dp"
    android:gravity="center_vertical|start"
    android:maxLines="1"
    android:paddingLeft="?attr/listPreferredItemPaddingLeft"
    android:paddingRight="?attr/listPreferredItemPaddingRight"
    app:font="fonts/SourceSansPro-Bold.ttf" />
    
  • Place your font file SourceSansPro-Bold.ttf in this path: app/src/main/assets/fonts/SourceSansPro-Bold.ttf

您已经可以开始了!这种方式可以保持您的主活动干净整洁。

以下是截图:enter image description here


我非常喜欢这种方法,但似乎不起作用,因为NavigationMenuItemView没有继承自TextView。是否有遗漏的步骤? - Dan McCann

3

我已经重构了@adneal的答案。它根据索引循环遍历菜单项(而不是进入子项,只有顶级项),并设置字体。

rightNavigationView替换为您的NavigationView,并将{TYPEFACE}替换为您想要的TypeFace。

final Menu navMenu = rightNavigationView.getMenu();
        rightNavigationView.getViewTreeObserver().addOnGlobalLayoutListener(new ViewTreeObserver.OnGlobalLayoutListener() {
            @Override
            public void onGlobalLayout() {
                ArrayList<View> menuItems = new ArrayList<>(); // save Views in this array
                rightNavigationView.getViewTreeObserver().removeOnGlobalLayoutListener(this); // remove the global layout listener
                for (int i = 0; i < navMenu.size(); i++) {// loops over menu items  to get the text view from each menu item
                    final MenuItem item = navMenu.getItem(i);
                    rightNavigationView.findViewsWithText(menuItems, item.getTitle(), View.FIND_VIEWS_WITH_TEXT);
                }
                for (final View menuItem : menuItems) {// loops over the saved views and sets the font
                    ((TextView) menuItem).setTypeface({TYPE}, Typeface.BOLD);
                }
            }
        });

2

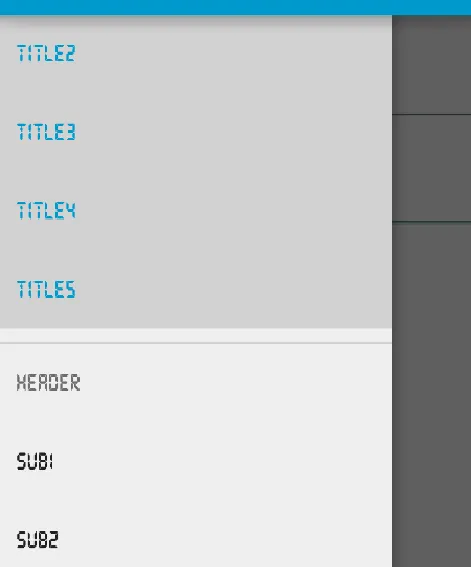
我非常喜欢“喷火龙”游戏的解决方案,但是我对textview不是很了解。您可以通过以下步骤完成:

TextView textView = (CheckedTextView) findViewById(android.support.design.R.id.design_menu_item_text);

public class StyledMenuItem extends NavigationMenuItemView {
public StyledMenuItem(Context context) {
    super(context);
}

public StyledMenuItem(Context context, AttributeSet attrs) {
    super(context, attrs);
    if (!isInEditMode()) {
        setCustomFont(context, attrs);
        setFilterTouchesWhenObscured(true);
    }
}

public StyledMenuItem(Context context, AttributeSet attrs, int defStyleAttr) {
    super(context, attrs, defStyleAttr);
    if (!isInEditMode()) {
        setCustomFont(context, attrs);
        setFilterTouchesWhenObscured(true);
    }
}

private void setCustomFont(Context ctx, AttributeSet attrs) {
    TypedArray a = ctx.obtainStyledAttributes(attrs, R.styleable.ProjectView);
    String customFont = a.getString(R.styleable.ProjectView_projectFont);
    setCustomFont(ctx, customFont);
    a.recycle();
}

private void setCustomFont(Context ctx, String asset) {
    Typeface typeFace = TypeFaceProvider.getTypeFace(ctx, asset);
    TextView textView = (CheckedTextView) findViewById(android.support.design.R.id.design_menu_item_text);
    if (typeFace != null && textView != null) {
        textView.setTypeface(typeFace);
    }
}

design_navigation_item.xml:

<?xml version="1.0" encoding="utf-8"?>

style.xml:

<style name="Body1" parent="Base.TextAppearance.AppCompat.Body1">
    <item name="projectFont">Quicksand-Regular.otf</item>
</style>

attrs.xml:

<?xml version="1.0" encoding="utf-8"?>
<resources>

<declare-styleable name="ProjectView">
    <attr name="projectFont" format="string" />
</declare-styleable>
</resources>

网页内容由stack overflow 提供, 点击上面的
可以查看英文原文,
原文链接