我知道代理(delegates)的工作原理,也知道如何使用它们。
但是,我该如何创建它们?
我知道代理(delegates)的工作原理,也知道如何使用它们。
但是,我该如何创建它们?
@protocol ServiceResponceDelegate <NSObject>

- (void) serviceDidFailWithRequestType:(NSString*)error;
- (void) serviceDidFinishedSucessfully:(NSString*)success;

@end
这是一个服务类,用于完成某些任务。它展示了如何定义委托以及如何设置委托。在实现类中,任务完成后会调用委托的方法。
@interface ServiceClass : NSObject
{
id <ServiceResponceDelegate> _delegate;
}

- (void) setDelegate:(id)delegate;
- (void) someTask;

@end

@implementation ServiceClass

- (void) setDelegate:(id)delegate
{
_delegate = delegate;
}

- (void) someTask
{
/*

   perform task

*/
if (!success)
{
[_delegate serviceDidFailWithRequestType:@”task failed”];
}
else
{
[_delegate serviceDidFinishedSucessfully:@”task success”];
}
}
@end
这是主视图类,通过将委托设置为自身来调用服务类。同时也在头文件中实现了该协议。
@interface viewController: UIViewController <ServiceResponceDelegate>
{
ServiceClass* _service;
}

- (void) go;

@end

@implementation viewController

//
//some methods
//

- (void) go
{
_service = [[ServiceClass alloc] init];
[_service setDelegate:self];
[_service someTask];
}
以下是创建委托的简单方法:
在.h文件中创建协议。确保在使用@class后面跟着UIViewController类的名称定义协议之前已经定义了该协议 <因为我将使用的协议是UIViewController类>
步骤1:创建一个名为“YourViewController”的协议类,它将是UIViewController类的子类,并将此类分配给第二个视图控制器。
步骤2:进入“YourViewController”文件并进行以下修改:
#import <UIKit/UIkit.h>
@class YourViewController;

@protocol YourViewController Delegate <NSObject>

 @optional
-(void)defineDelegateMethodName: (YourViewController *) controller;

@required
-(BOOL)delegateMethodReturningBool: (YourViewController *) controller;

  @end
  @interface YourViewController : UIViewController

  //Since the property for the protocol could be of any class, then it will be marked as a type of id.

  @property (nonatomic, weak) id< YourViewController Delegate> delegate;

@end
协议中定义的方法可以通过协议定义中的 @optional 和 @required 进行控制。
步骤:3: 委托的实现
    #import "delegate.h"

   @interface YourDelegateUser ()
     <YourViewControllerDelegate>
   @end

   @implementation YourDelegateUser

   - (void) variousFoo {
      YourViewController *controller = [[YourViewController alloc] init];
      controller.delegate = self;
   }

   -(void)defineDelegateMethodName: (YourViewController *) controller {
      // handle the delegate being called here
   }

   -(BOOL)delegateMethodReturningBool: (YourViewController *) controller {
      // handle the delegate being called here
      return YES;
   }

   @end
//在调用方法之前测试该方法是否已定义
 - (void) someMethodToCallDelegate {
     if ([[self delegate] respondsToSelector:@selector(defineDelegateMethodName:)]) {
           [self.delegate delegateMethodName:self];
     }
  }
答案已经回答了,但我想给你提供一个创建委托的“备忘单”:
DELEGATE SCRIPT

CLASS A - Where delegate is calling function

@protocol <#Protocol Name#> <NSObject>

-(void)delegateMethod;

@end

@interface <#Some ViewController#> : <#UIViewController#>

@property (nonatomic, assign) id <<#Protocol Name#>> delegate;

@end


@implementation <#Some ViewController#>

-(void)someMethod {
    [self.delegate methodName];
}

@end


CLASS B - Where delegate is called

@interface <#Other ViewController#> (<#Delegate Name#>) {}
@end

@implementation <#Other ViewController#>

-(void)otherMethod {
    CLASSA *classA = [[CLASSA alloc] init];

    [classA setDelegate:self];
}

-delegateMethod() {

}

@end
ViewController A和ViewController B的应用程序。B有两个视图,在点击时更改 ViewController 的背景颜色,没有太复杂的东西,对吧?现在让我们考虑一种简单的方式来在按下Class B的视图时更改Class A的背景颜色。
问题在于这些视图是B类的一部分,对A类毫不知情,因此我们需要找到一种方法来在这两个类之间进行通信,这就是委托的优势所在。
我将实现分为6个步骤,您可以将其用作备忘单。
第1步:在ClassBVC文件中查找#pragma mark step 1,并添加以下内容
//MARK: step 1 Add Protocol here.
protocol ClassBVCDelegate: class {
func changeBackgroundColor(_ color: UIColor?)
}
第一步是创建一个协议,这里我们将在B类中创建协议,在协议中,您可以根据实现的要求创建任意数量的函数。在这种情况下,我们只有一个简单的函数,它接受一个可选的UIColor作为参数。
将单词“delegate”添加到类名后面命名您的协议是一个好习惯,在这种情况下,是ClassBVCDelegate。
第二步:在ClassVBC中查找pragma mark步骤2,并添加此内容。
//MARK: step 2 Create a delegate property here.
weak var delegate: ClassBVCDelegate?
这里我们为该类创建一个委托属性,该属性必须采用协议类型,并且应为可选。此外,在属性之前添加 weak 关键字以避免保留周期和潜在的内存泄漏,如果您不知道这意味着什么,现在不用担心,只需记住添加此关键字。
步骤 3:在 ClassBVC 中的 handleTap 方法中查找带有 pragma mark 步骤 3 的代码段,并添加此内容。
//MARK: step 3 Add the delegate method call here.
delegate?.changeBackgroundColor(tapGesture.view?.backgroundColor)
有一件事情需要注意,运行应用程序并点击任何视图,您不会看到任何新的行为,这是正确的,但我想指出的是,当委托被调用时应用程序不会崩溃,因为我们将其创建为可选值,这就是为什么即使委托尚不存在,它也不会崩溃。现在让我们转到ClassAVC文件并使其成为代理。
第4步:在ClassAVC中的handleTap方法中查找pragma mark step 4,并像这样在类类型旁边添加它。
//MARK: step 4 conform the protocol here.
class ClassAVC: UIViewController, ClassBVCDelegate {
}
现在,ClassAVC采用了ClassBVCDelegate协议,你会发现编译器给你一个错误提示,说“Type 'ClassAVC does not conform to protocol 'ClassBVCDelegate'”,这只意味着你还没有使用协议的方法。想象一下,当A类采用协议时,就像与B类签订合同一样,“任何采用我的类都必须使用我的函数!”
快速提醒:如果你来自Objective-C背景,你可能认为你也可以通过将方法设置为可选来消除这个错误,但令我惊讶的是,Swift语言不支持可选协议。如果你想这样做,你可以为你的协议创建一个扩展或在你的协议实现中使用@objc关键字。
个人而言,如果我必须创建一个具有不同可选方法的协议,我更喜欢将其拆分成不同的协议,这样我就能遵循将单一职责赋予我的对象的概念,但具体实现可能会有所不同。
这里有一篇关于可选方法的好文章。
第五步:在prepare for segue方法中查找pragma mark 步骤5,并添加以下内容。
//MARK: step 5 create a reference of Class B and bind them through the `prepareforsegue` method.
if let nav = segue.destination as? UINavigationController, let classBVC = nav.topViewController as? ClassBVC {
classBVC.delegate = self
}
在这里,我们只是创建了一个ClassBVC的实例,并将其委托给self,但是这里的self是什么?嗯,self就是已经被委托的ClassAVC!
步骤6:最后,在ClassAVC中寻找pragma步骤6,让我们使用protocol的函数,开始输入func changeBackgroundColor,你会发现它正在为你自动完成。你可以在其中添加任何实现,在这个例子中,我们只是改变背景颜色,加入这个。
//MARK: step 6 finally use the method of the contract
func changeBackgroundColor(_ color: UIColor?) {
view.backgroundColor = color
}
现在运行应用程序!
委托随处可见,您可能甚至在不知不觉中使用它们,如果您过去创建了一个tableview,则使用了委托,许多UIKIT类围绕它们工作,许多其他框架也是如此,它们解决了这些主要问题。
- 避免对象之间的紧密耦合。
- 修改行为和外观而无需子类化对象。
- 允许将任务处理交给任意对象。
恭喜,您刚刚实现了自定义委托,我知道您可能会想,这么麻烦就为了这个?好吧,委托是一种非常重要的设计模式,如果您想成为iOS开发人员,就必须了解它,并始终记住它们之间具有一对一的关系。
您可以在此处查看原始教程。
ViewController.h
@protocol NameDelegate <NSObject>

-(void)delegateMEthod: (ArgType) arg;

@end

@property id <NameDelegate> delegate;
ViewController.m
[self.delegate delegateMEthod: argument];
MainViewController.m
ViewController viewController = [ViewController new];
viewController.delegate = self;
方法:
-(void)delegateMEthod: (ArgType) arg{
}
typedef enum
{
 DDSTATE,
 DDCITY
}DropDownType;

@protocol DropDownListDelegate <NSObject>
@required
- (void)dropDownDidSelectItemWithString:(NSString*)itemString     DropDownType:(DropDownType)dropDownType;
@end
@interface DropDownViewController : UIViewController
{
 BOOL isFiltered;
}
@property (nonatomic, assign) DropDownType dropDownType;
@property (weak) id <DropDownListDelegate> delegate;
@property (strong, nonatomic) NSMutableArray *array1DropDown;
@property (strong, nonatomic) NSMutableArray *array2DropDown;
 - (CGFloat)tableView:(UITableView *)tableView heightForRowAtIndexPath:(NSIndexPath *)indexPath{
CGFloat rowHeight = 44.0f;
return rowHeight;
}

-(NSInteger)numberOfSectionsInTableView:(UITableView *)tableView {
return 1;
}
- (NSInteger)tableView:(UITableView *)tableView numberOfRowsInSection:(NSInteger)section{
return isFiltered?[self.array1DropDown count]:[self.array2DropDown count];
}
- (UITableViewCell *)tableView:(UITableView *)tableView cellForRowAtIndexPath:(NSIndexPath *)indexPath {
static NSString *simpleTableIdentifier = @"TableCell";
UITableViewCell *cell = [tableView dequeueReusableCellWithIdentifier:simpleTableIdentifier];
if (cell == nil) {
    cell = [[UITableViewCell alloc] initWithStyle:UITableViewCellStyleDefault reuseIdentifier:simpleTableIdentifier];
}

if (self.delegate) {
    if (self.dropDownType == DDCITY) {
        cell.textLabel.text = [self.array1DropDown objectAtIndex:indexPath.row];
    }
    else if (self.dropDownType == DDSTATE) {
        cell.textLabel.text = [self.array2DropDown objectAtIndex:indexPath.row];
    }
}
return cell;
}

- (void)tableView:(UITableView *)tableView didSelectRowAtIndexPath:(NSIndexPath *)indexPath
{
 [self dismissViewControllerAnimated:YES completion:^{
    if(self.delegate){
        if(self.dropDownType == DDCITY){
            [self.delegate dropDownDidSelectItemWithString:[self.array1DropDown objectAtIndex:indexPath.row] DropDownType:self.dropDownType];
        }
        else if (self.dropDownType == DDSTATE) {
            [self.delegate dropDownDidSelectItemWithString:[self.array2DropDown objectAtIndex:indexPath.row] DropDownType:self.dropDownType];
        }
    }
}];
}
在这里,所有内容都已经设置好了,以便使用自定义委托类。之后,您可以在需要的地方使用此委托方法。例如...
在我的另一个视图控制器中导入后
创建调用委托方法的操作,就像这样
- (IBAction)dropDownBtn1Action:(id)sender {
DropDownViewController *vehicleModelDropView = [[DropDownViewController alloc]init];
vehicleModelDropView.dropDownType = DDCITY;
vehicleModelDropView.delegate = self;
[self presentViewController:vehicleModelDropView animated:YES completion:nil];
}
- (void)dropDownDidSelectItemWithString:(NSString *)itemString DropDownType:(DropDownType)dropDownType {
switch (dropDownType) {
    case DDCITY:{
        if(itemString.length > 0){
            //Here i am printing the selected row
            [self.dropDownBtn1 setTitle:itemString forState:UIControlStateNormal];
        }
    }
        break;
    case DDSTATE: {
        //Here i am printing the selected row
        [self.dropDownBtn2 setTitle:itemString forState:UIControlStateNormal];
    }

    default:
        break;
}
}
让我们以一个例子开始,如果我们在线购买一个产品,它会经历不同团队处理的运输/交付过程。因此,如果运输完成,运输团队应该通知交付团队,并且应该是一对一的通信,因为广播此信息将成为其他人的负担/供应商可能只想将此信息传递给所需的人。
因此,如果我们从我们的应用程序角度来考虑,事件可以是在线订单,而不同的团队可以像多个视图一样。
这里是代码,将ShippingView视为运输团队,DeliveryView视为交付团队:
//Declare the protocol with functions having info which needs to be communicated
protocol ShippingDelegate : class {
    func productShipped(productID : String)
}
//shippingView which shows shipping status of products
class ShippingView : UIView
{

    weak var delegate:ShippingDelegate?
    var productID : String

    @IBAction func checkShippingStatus(sender: UIButton)
    {
        // if product is shipped
        delegate?.productShipped(productID: productID)
    }
}
//Delivery view which shows delivery status & tracking info
class DeliveryView: UIView,ShippingDelegate
{
    func productShipped(productID : String)
    {
        // update status on view & perform delivery
    }
}

//Main page on app which has both views & shows updated info on product whole status
class ProductViewController : UIViewController
{
    var shippingView : ShippingView
    var deliveryView : DeliveryView

    override func viewDidLoad() {
        super.viewDidLoad()
        // as we want to update shipping info on delivery view, so assign delegate to delivery object
        // whenever shipping status gets updated it will call productShipped method in DeliveryView & update UI.
        shippingView.delegate = deliveryView
        //
    }
}
//1.
//Custom delegate
@protocol TB_RemovedUserCellTag <NSObject>

-(void)didRemoveCellWithTag:(NSInteger)tag;

@end

//2.
//Create a weak reference in a class where you declared the delegate
@property(weak,nonatomic)id <TB_RemovedUserCellTag> removedCellTagDelegate;

//3.
// use it in the class
  [self.removedCellTagDelegate didRemoveCellWithTag:self.tag];

//4. import the header file in the class where you want to conform to the protocol
@interface MyClassUsesDelegate ()<TB_RemovedUserCellTag>

@end
//5. 在类.m中实现以下方法 -(void)didRemoveCellWithTag:(NSInteger)tag { NSLog@("Tag %d",tag);
}
委托:创建
@protocol addToCartDelegate <NSObject>

-(void)addToCartAction:(ItemsModel *)itemsModel isAdded:(BOOL)added;

@end
发送并请指定代理以查看您正在发送的数据
[self.delegate addToCartAction:itemsModel isAdded:YES];
一张图片胜过千言万语 :-P
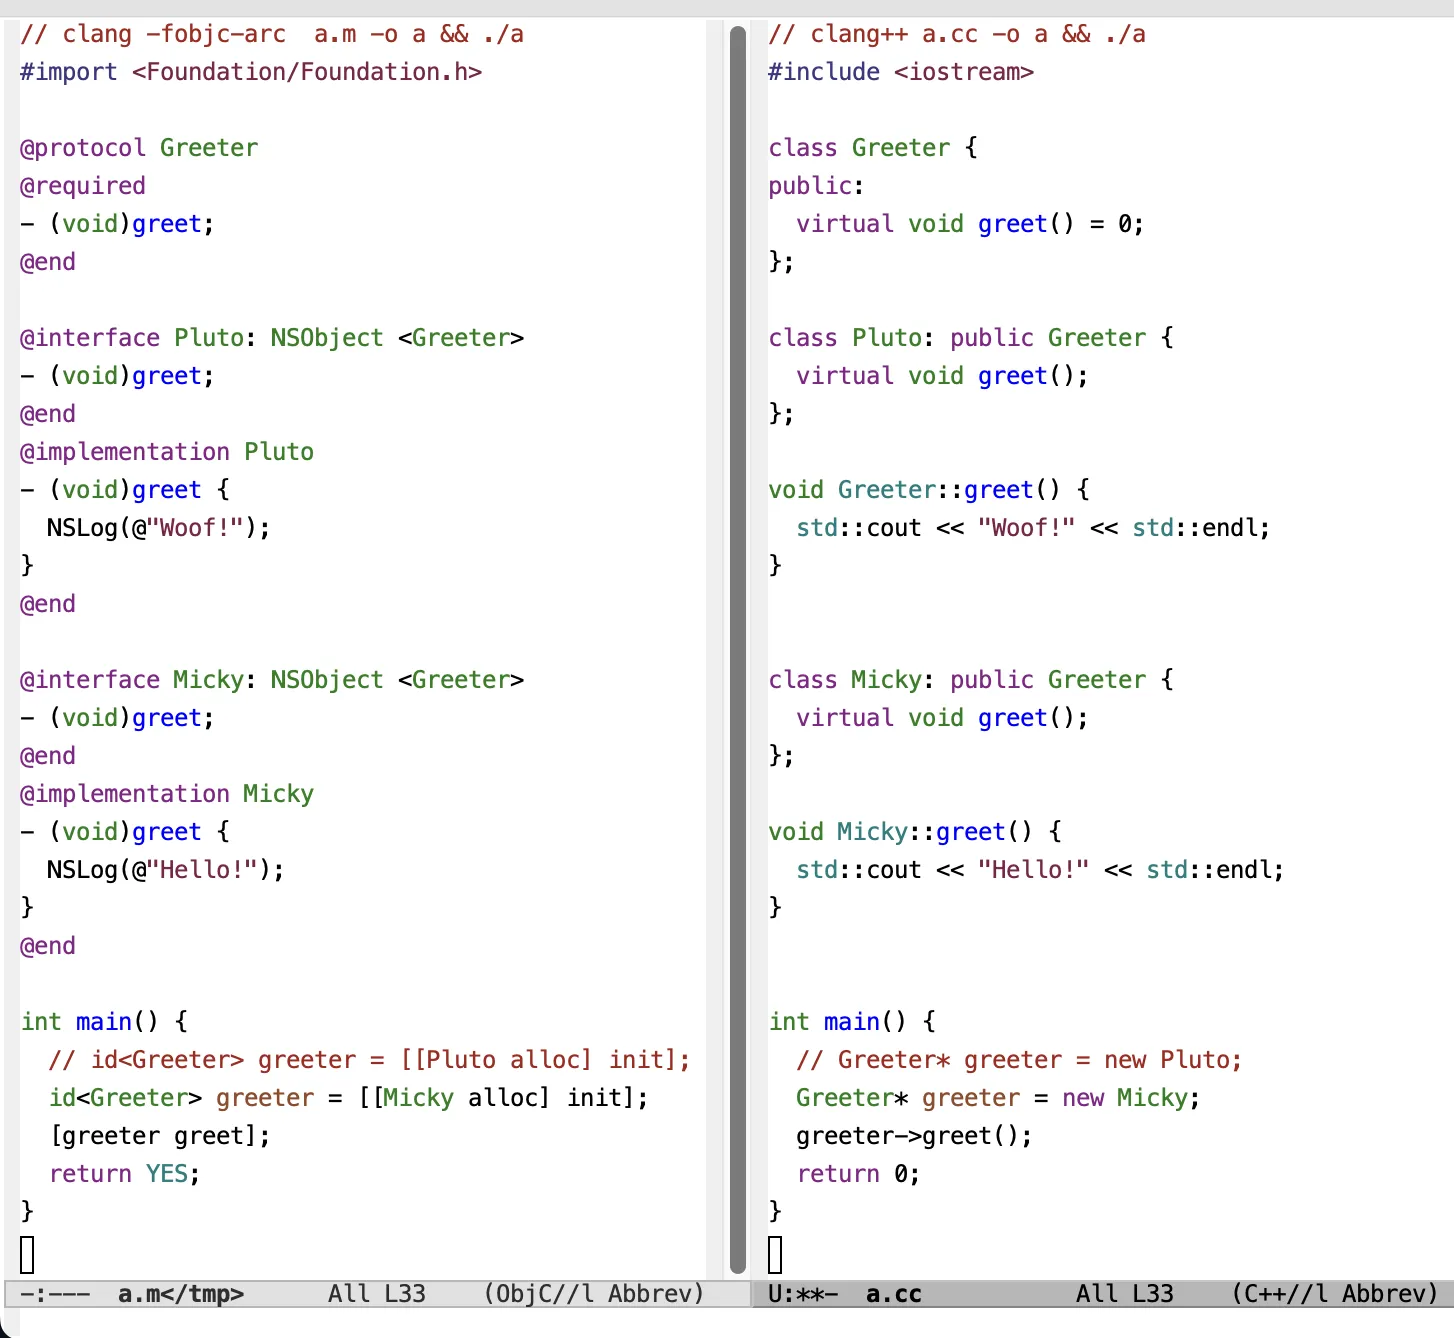
Objective-C 代码中 main 函数中的变量 greeter 被称为 代理,它不过是一个指向实现纯虚函数类的对象的 C++ 指针。