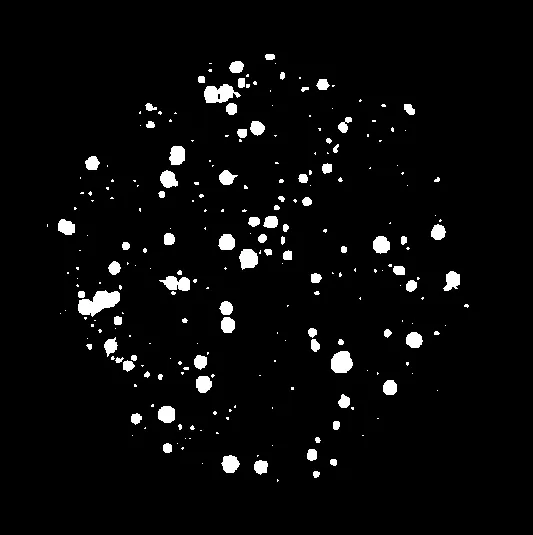
这里一个好的方法可能是使用cv2.inRange()进行颜色阈值分割。思路是将图像转换为HSV格式,然后使用上下限颜色阈值来分割菌落。我们在蒙版上绘制检测到的菌落,然后在蒙版上找到轮廓。
绘制在蒙版上的颜色分割的菌落
结果

我们还可以跟踪菌落数量
244
如果想要仅检测中等/大菌落,则可使用cv2.contourArea()和最小阈值面积等其他过滤器进行优化。可能需要提供更高分辨率的图像以获得更精确的结果。
import numpy as np
import cv2

image = cv2.imread('1.png')
hsv = cv2.cvtColor(image, cv2.COLOR_BGR2HSV)

lower = np.array([0, 71, 0], dtype="uint8")
upper = np.array([179, 255, 255], dtype="uint8")
mask = cv2.inRange(hsv, lower, upper)

cnts = cv2.findContours(mask, cv2.RETR_EXTERNAL, cv2.CHAIN_APPROX_SIMPLE)
cnts = cnts[0] if len(cnts) == 2 else cnts[1]

colonies = []

for c in cnts:
    cv2.drawContours(image, [c], -1, (36, 255, 12), 2)
    colonies.append(c)

print(len(colonies))
cv2.imshow('mask', mask)
cv2.imshow('image', image)
cv2.imwrite('mask.png', mask)
cv2.imwrite('image.png', image)
cv2.waitKey()
可以使用此脚本找到下限和上限。
import cv2
import sys
import numpy as np
def nothing(x):
pass
useCamera=False
if (len(sys.argv) <= 1) :
print("'Usage: python hsvThresholder.py <ImageFilePath>' to ignore camera and use a local image.")
useCamera = True
cv2.namedWindow('image')
cv2.createTrackbar('HMin','image',0,179,nothing)
cv2.createTrackbar('SMin','image',0,255,nothing)
cv2.createTrackbar('VMin','image',0,255,nothing)
cv2.createTrackbar('HMax','image',0,179,nothing)
cv2.createTrackbar('SMax','image',0,255,nothing)
cv2.createTrackbar('VMax','image',0,255,nothing)
cv2.setTrackbarPos('HMax', 'image', 179)
cv2.setTrackbarPos('SMax', 'image', 255)
cv2.setTrackbarPos('VMax', 'image', 255)
hMin = sMin = vMin = hMax = sMax = vMax = 0
phMin = psMin = pvMin = phMax = psMax = pvMax = 0
if useCamera:
cap = cv2.VideoCapture(0)
waitTime = 330
else:
img = cv2.imread(sys.argv[1])
output = img
waitTime = 33
while(1):
if useCamera:
ret, img = cap.read()
output = img
hMin = cv2.getTrackbarPos('HMin','image')
sMin = cv2.getTrackbarPos('SMin','image')
vMin = cv2.getTrackbarPos('VMin','image')
hMax = cv2.getTrackbarPos('HMax','image')
sMax = cv2.getTrackbarPos('SMax','image')
vMax = cv2.getTrackbarPos('VMax','image')
lower = np.array([hMin, sMin, vMin])
upper = np.array([hMax, sMax, vMax])
hsv = cv2.cvtColor(img, cv2.COLOR_BGR2HSV)
mask = cv2.inRange(hsv, lower, upper)
output = cv2.bitwise_and(img,img, mask= mask)
if( (phMin != hMin) | (psMin != sMin) | (pvMin != vMin) | (phMax != hMax) | (psMax != sMax) | (pvMax != vMax) ):
print("(hMin = %d , sMin = %d, vMin = %d), (hMax = %d , sMax = %d, vMax = %d)" % (hMin , sMin , vMin, hMax, sMax , vMax))
phMin = hMin
psMin = sMin
pvMin = vMin
phMax = hMax
psMax = sMax
pvMax = vMax
cv2.imshow('image',output)
if cv2.waitKey(waitTime) & 0xFF == ord('q'):
break
if useCamera:
cap.release()
cv2.destroyAllWindows()
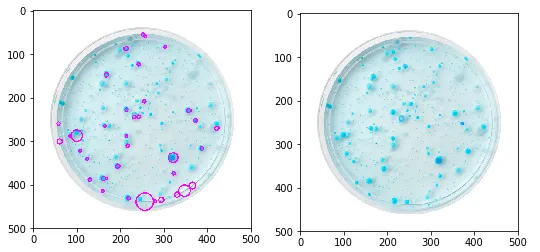 我可以清楚地看到有许多未被圈出的轮廓(菌落)。同时,有一些轮廓指向无物。