有没有示例项目展示如何在上集成APNS,以及如何获取设备令牌?
如何在iOS应用中实现苹果推送通知服务?
3
- Musthafa
2
https://dev59.com/tHNA5IYBdhLWcg3wNa6T - icecurtain
3http://mattgemmell.com/2008/12/08/what-have-you-tried/ - rishi
3个回答
24
以下是您需要遵循的几个简单步骤:
在您的应用程序委托 didFinishLaunchingWithOptions 中,您应该注册远程通知。请注意,Apple的文档建议每次应用程序运行时注册,因为令牌可能会不时更改。您可以通过调用以下方法来执行此操作:
[[UIApplication sharedApplication] registerForRemoteNotificationTypes:UIRemoteNotificationTypeAlert | UIRemoteNotificationTypeBadge | UIRemoteNotificationTypeSound];
在注册远程通知后,您的应用程序委托中将调用一个方法,该方法已传递令牌,您需要在应用程序委托中实现此方法并将令牌发送到您的服务器(将向您发送通知)。该方法将如下所示:
- (void)application:(UIApplication *)application didRegisterForRemoteNotificationsWithDeviceToken:(NSData *)deviceToken {
    // send deviceToken to your server
}
- (void)application:(UIApplication *)application didRegisterForRemoteNotificationsWithDeviceToken:(NSData *)deviceToken{
NSLog(@"device token is: %@",deviceToken);
[server sendToken:deviceToken];
}
你还应该实现这个功能:
-(void)application:(UIApplication *)application didFailToRegisterForRemoteNotificationsWithError:(NSError *)error{}
一旦你收到通知,你需要处理它们。在处理接收到的通知时,有几种不同的情况(应用程序在后台或前台等),如果应用程序在前台接收到通知,则处理通知的方法应该在应用程序委托中实现。以下是示例:
-(void)application:(UIApplication *)application didReceiveRemoteNotification:(NSDictionary *)userInfo{
    NSLog(@"received notification");
    //handle the notification here
}
- David Ben Ari
0
这是一份关于如何在iOS中启用和发送推送通知的简要文档。
启用推送通知
设置推送通知的第一步是在Xcode 8中为您的应用程序启用该功能。只需转到目标的项目编辑器,然后单击“功能”选项卡。查找“推送通知”并将其值切换为ON:
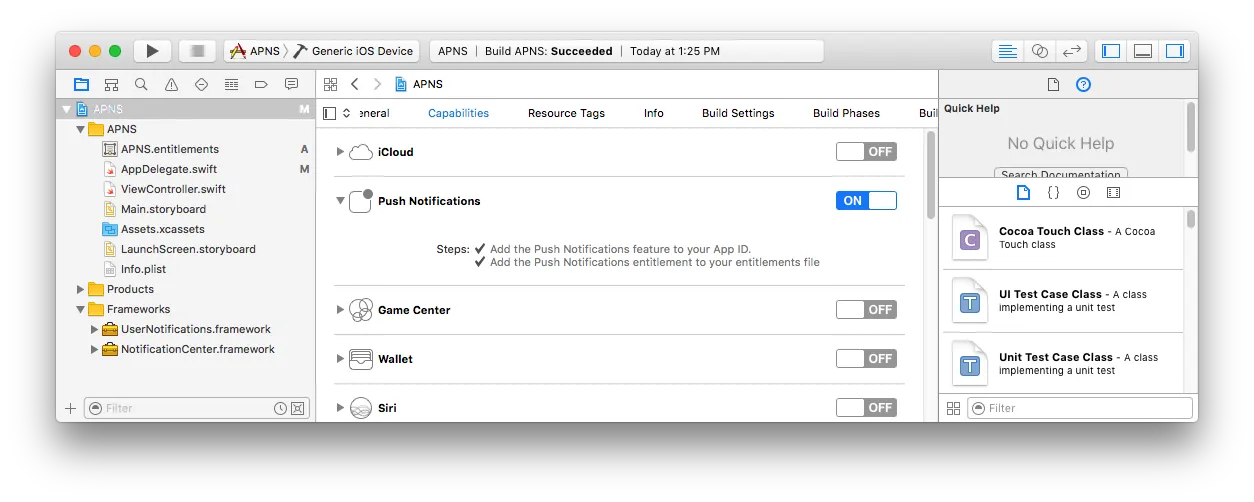
切换功能
Xcode 应该显示两个复选标记,表示已成功启用该功能。在幕后,Xcode 在开发者中心创建一个应用程序 ID,并为您的应用程序启用推送通知服务。
注册设备
需要对设备进行唯一标识以接收推送通知。
每个安装您的应用程序的设备都会被 APNs 分配一个唯一的设备令牌,您可以随时使用它来推送。一旦设备被分配了唯一的令牌,它应该被持久化存储在您的后端数据库中。
示例设备令牌如下:
5810F4C8C2AF5F7 F7 D6AF71A 22745D0FB50DED 665E0E882 BC5370D9CF0A F19E16
要为当前设备请求设备令牌,请打开AppDelegate.swift并在return语句之前的didFinishLaunchingWithOptions回调函数中添加以下内容:
// iOS 10 support
if #available(iOS 10, *) {
    UNUserNotificationCenter.current().requestAuthorization(options:[.badge, .alert, .sound]){ (granted, error) in }
    application.registerForRemoteNotifications()
}
// iOS 9 support
else if #available(iOS 9, *) {
    UIApplication.shared.registerUserNotificationSettings(UIUserNotificationSettings(types: [.badge, .sound, .alert], categories: nil))
    UIApplication.shared.registerForRemoteNotifications()
}
// iOS 8 support
else if #available(iOS 8, *) {
    UIApplication.shared.registerUserNotificationSettings(UIUserNotificationSettings(types: [.badge, .sound, .alert], categories: nil))
    UIApplication.shared.registerForRemoteNotifications()
}
// iOS 7 support
else {
    application.registerForRemoteNotifications(matching: [.badge, .sound, .alert])
}
在iOS 10中,引入了一个名为UserNotifications的新框架,必须导入该框架才能访问UNUserNotificationCenter类。
在AppDelegate.swift的顶部添加以下导入语句:
import UserNotifications
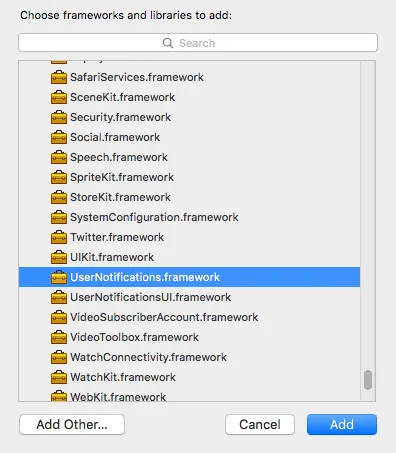
下一步,进入目标项目的项目编辑器,在“General”选项卡中查找“Linked Frameworks and Libraries”部分。
点击“+”并选择“UserNotifications.framework”:
// Called when APNs has assigned the device a unique token
func application(_ application: UIApplication, didRegisterForRemoteNotificationsWithDeviceToken deviceToken: Data) {
    // Convert token to string
    let deviceTokenString = deviceToken.reduce("", {$0 + String(format: "%02X", $1)})

    // Print it to console
    print("APNs device token: \(deviceTokenString)")

    // Persist it in your backend in case it's new
}

// Called when APNs failed to register the device for push notifications
func application(_ application: UIApplication, didFailToRegisterForRemoteNotificationsWithError error: Error) {
    // Print the error to console (you should alert the user that registration failed)
    print("APNs registration failed: \(error)")
}
由您来实现将令牌持久化到应用程序后端的逻辑。在本指南的后面,您的后端服务器将连接到APNs并提供此设备令牌以指示哪些设备应接收通知,从而发送推送通知。
请注意,由于各种原因,设备令牌可能会在未来更改,因此请使用NSUserDefaults(本地键值存储)将令牌保留在本地,并仅在令牌更改时更新后端,以避免不必要的请求。
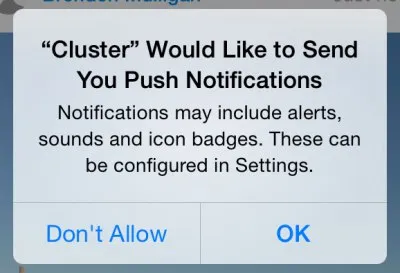
在对AppDelegate.swift进行必要的修改后,在物理iOS设备上运行您的应用程序(iOS模拟器无法接收通知)。查找以下对话框,并按“确定”允许您的应用程序接收推送通知:
警报对话框
一两秒钟内,Xcode控制台应显示您设备的唯一标识符。复制它并保存以备后用。
准备接收通知
在AppDelegate.swift中添加以下回调函数,当您的应用程序接收到后端服务器发送的推送通知时将被调用:
// Push notification received
func application(_ application: UIApplication, didReceiveRemoteNotification data: [AnyHashable : Any]) {
    // Print notification payload data
    print("Push notification received: \(data)")
}
请注意,只有当用户从锁屏/通知中心点击或滑动与您的推送通知交互时,或者在设备接收到推送通知时您的应用程序处于打开状态时,才会调用此回调函数。
当通知被交互时,需要开发实际执行的逻辑。例如,如果您有一个即时通讯应用程序,"新消息"推送通知应该打开相关的聊天页面,并导致从服务器更新消息列表。在即时通讯应用程序示例中,可以利用数据对象,其中将包含您从应用程序后端发送的任何数据,例如聊天ID。
需要注意的是,如果您的应用程序在接收到推送通知时处于打开状态,用户将根本看不到通知,因此需要以某种方式通知用户。这个StackOverflow问题列出了一些可能的解决方法,例如显示类似于iOS库存通知横幅的应用内横幅。
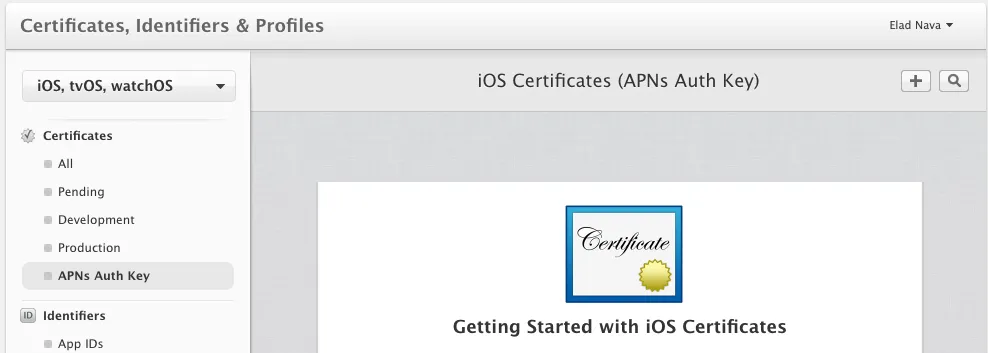
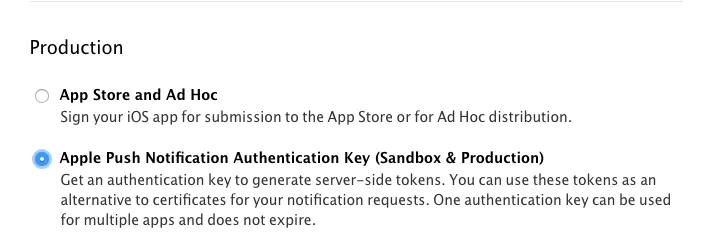
生成APNs身份验证密钥
在您的开发者中心中打开APNs身份验证密钥页面,然后单击+按钮创建新的APNs身份验证密钥。
苹果将会生成一个包含你的 APNs 授权密钥的 .p8 密钥文件。
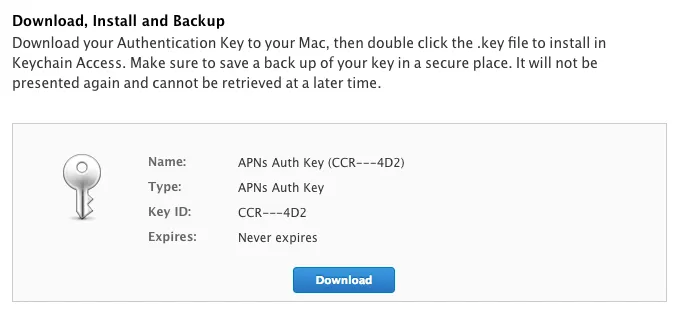
下载.p8密钥文件到您的计算机并保存以备后用。此外,请务必在某个地方记下密钥ID,因为在连接到APNs时您将需要它。
发送推送通知
现在,请查看这里以了解APNS流程:iOS推送通知是如何工作的?
- Krunal
0
- (BOOL)application:(UIApplication *)application didFinishLaunchingWithOptions:(NSDictionary *)launchOptions {
 // Register for Push Notitications, if running on iOS 8
if ([[[UIDevice currentDevice] systemVersion] floatValue] >= 8.0){
    [[UIApplication sharedApplication] registerUserNotificationSettings:[UIUserNotificationSettings settingsForTypes:(UIUserNotificationTypeSound | UIUserNotificationTypeAlert | UIUserNotificationTypeBadge) categories:nil]];
    [[UIApplication sharedApplication] registerForRemoteNotifications];
 }else{
    [application registerForRemoteNotificationTypes:(UIRemoteNotificationTypeAlert | UIRemoteNotificationTypeBadge | UIRemoteNotificationTypeSound)];
}
  return YES;
}
#pragma mark
#pragma mark -- Push Notification Delegate Methods
- (void)application:(UIApplication *)application didRegisterUserNotificationSettings:   (UIUserNotificationSettings *)notificationSettings{
//register to receive notifications
[application registerForRemoteNotifications];
}
-(void)application:(UIApplication*)application didRegisterForRemoteNotificationsWithDeviceToken:(NSData*)deviceToken{
// Prepare the Device Token for Registration (remove spaces and < >)
 NSString* devToken = [[[[deviceToken description]
              stringByReplacingOccurrencesOfString:@"<"withString:@""]
             stringByReplacingOccurrencesOfString:@">" withString:@""]
            stringByReplacingOccurrencesOfString: @" " withString: @""];
NSLog(@"My token is: %@", devToken);
}
-(void)application:(UIApplication*)application didFailToRegisterForRemoteNotificationsWithError:(NSError*)error{
//  NSLog(@"Failed to get token, error: %@", error);
}

- (void)application:(UIApplication *)application didReceiveRemoteNotification:(NSDictionary *)userInfo{
NSLog(@"%s..userInfo=%@",__FUNCTION__,userInfo);
/**
 * Dump your code here according to your requirement after receiving push
 */
 }
- Mannam Brahmam
1
最近的回答不错。也许可以稍微改进一下,加上一些评论。 - Drew
网页内容由stack overflow 提供, 点击上面的可以查看英文原文,
原文链接
原文链接