使用绘制线段和椭圆弧的函数,可以实现您想要的效果。
您想要绘制的框架由4个相似部分组成(每个角落一个),每个部分都旋转(或镜像)。
让我们看看左上角:
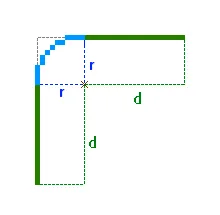
正如您所看到的,我们需要绘制2条长度为d的线段和一段弧(半径为r的1/4圆)。
假设左上角的坐标是(x1, y1)。
那么,弧的中心将位于位置(x1 + r, y1 + r)。
其中一条线段将从(x1 + r, y1)延伸到(x1 + r + d, y1)。
另一条线段将从(x1, y1 + r)延伸到(x1, y1 + r + d)。
其他角落也会发生类似的情况。
示例代码:
import cv2
import numpy as np
def draw_border(img, pt1, pt2, color, thickness, r, d):
x1,y1 = pt1
x2,y2 = pt2
cv2.line(img, (x1 + r, y1), (x1 + r + d, y1), color, thickness)
cv2.line(img, (x1, y1 + r), (x1, y1 + r + d), color, thickness)
cv2.ellipse(img, (x1 + r, y1 + r), (r, r), 180, 0, 90, color, thickness)
cv2.line(img, (x2 - r, y1), (x2 - r - d, y1), color, thickness)
cv2.line(img, (x2, y1 + r), (x2, y1 + r + d), color, thickness)
cv2.ellipse(img, (x2 - r, y1 + r), (r, r), 270, 0, 90, color, thickness)
cv2.line(img, (x1 + r, y2), (x1 + r + d, y2), color, thickness)
cv2.line(img, (x1, y2 - r), (x1, y2 - r - d), color, thickness)
cv2.ellipse(img, (x1 + r, y2 - r), (r, r), 90, 0, 90, color, thickness)
cv2.line(img, (x2 - r, y2), (x2 - r - d, y2), color, thickness)
cv2.line(img, (x2, y2 - r), (x2, y2 - r - d), color, thickness)
cv2.ellipse(img, (x2 - r, y2 - r), (r, r), 0, 0, 90, color, thickness)
img = np.zeros((256,256,3), dtype=np.uint8)
draw_border(img, (10,10), (100, 100), (127,255,255), 1, 10, 20)
draw_border(img, (128,128), (240, 160), (255,255,127), 1, 5, 5)
cv2.imwrite('round_rect.png', img)
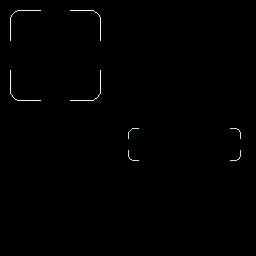
结果: