如何使用create-react-app配置服务工作者

22

我正在使用create-react-app工具创建一个ReactJS应用程序。如何配置它以使用包含服务工作者的文件?

编辑:从JavaScript方面来看,我清楚了,在我的index.js中添加注册即可。

if ('serviceWorker' in navigator) {
  navigator.serviceWorker.register('./service_workers/sw.js')
  .then(function(registration) {
    // Registration was successful...
  }).catch(function(err) {
    // registration failed ...
  });
}

那么我的服务工作者文件中的配置(对我来说是在service_wokers/sw.js中):

self.addEventListener('install', function(event) {//my code here...});
self.addEventListener('activate', function(event) {//my code here...});
self.addEventListener('fetch', function(event) {//my code here...});
当我运行这个时,控制台显示: ServiceWorker注册失败:DOMException:在获取脚本时收到错误的HTTP响应代码(404)。 因为我没有配置Webpack来处理文件,所以文件不存在。 所以我正在尝试通过输出复制sw.js文件。
test: 
     /\.(js)$/,
     loader: "file?name=[path][name].[ext]&context=./service_workers",
     include: '/service_worker'

我认为没有必要说我对Webpack完全是新手。

嗨,马龙,我没有太具体。 - LilSap
参见:https://github.com/facebookincubator/create-react-app/issues/192 - Jeff Posnick
谢谢@jeff,我会尝试并在评论中说明是否适用于我。 - LilSap
@LilSap,你做到了吗?是作用域的问题还是响应头的问题? - nettutvikler
@nettutvikler,最终我只是将服务工作者文件设置在根项目路径(如果我没记错的话),并且对我的需求来说运行得很好,服务工作者已在浏览器中注册。 - LilSap
您可能还想查看 https://dev59.com/N7Lma4cB1Zd3GeqPd6Xz#67013187 - emi
4个回答

11

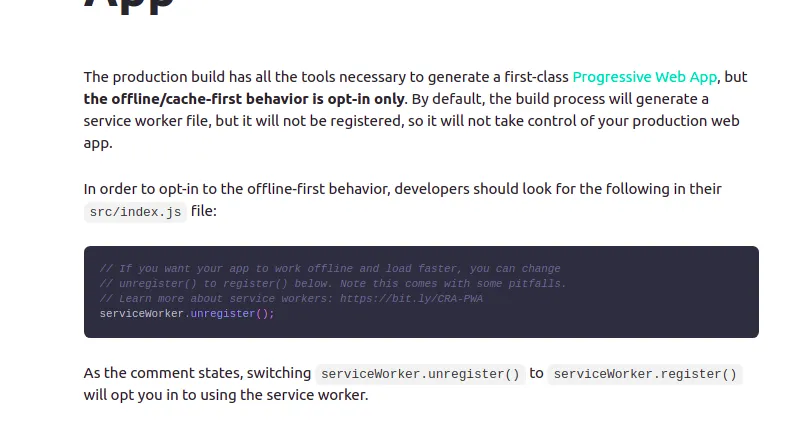
对于仍在苦苦挣扎的人,请参考https://create-react-app.dev/docs/making-a-progressive-web-app

enter image description here

CRA中已经配置了service worker,将会为您处理缓存! 您只需更改:

serviceWorker.unregister();
serviceWorker.register();

在你的src/index.js文件中;

此外,Service Worker仅在生产模式下工作,请确保在测试应用程序的Service Worker之前构建并在本地提供它。

npm i http-server -D

然后在你的脚本中将这段代码添加到package.json中。

"scripts": {
    "start": "react-scripts start",
    "build": "react-scripts build",
    "test": "react-scripts test",
    "eject": "react-scripts eject",
    "start-sw": "http-server ./build"
}

现在运行:

npm run build && npm run start-sw

希望能对你有所帮助!


我还必须覆盖PUBLIC_URL才能使其正常工作。像这样:PUBLIC_URL =。npm run build && npm run start-sw - AndiDev
这个救了我。谢谢。 - Debbs

8

首先,您需要在package.json中进行一些更改:

package.json中的更改:

{
  "name": "create-react-pwa",
  "version": "0.1.0",
  "private": true,
  "devDependencies": {
    "react-scripts": "0.7.0",
    "sw-precache": "^4.2.2"
  },
  "dependencies": {
    "react": "^15.4.0",
    "react-dom": "^15.4.0"
  },
  "scripts": {
    "start": "react-scripts start",
    "build": "react-scripts build && sw-precache --config=sw-precache-config.js",
    "test": "react-scripts test --env=jsdom",
    "eject": "react-scripts eject"
  }
}

接下来,在您的项目根目录中创建一个名为“sw-precache-confi.js”的js文件:

sw-precache-config.js:

 module.exports = {
    stripPrefix: 'build/',
    staticFileGlobs: [
      'build/*.html',
      'build/manifest.json',
      'build/static/**/!(*map*)'
    ],
    dontCacheBustUrlsMatching: /\.\w{8}\./,
    swFilePath: 'build/service-worker.js'
};

在 index.html 中进行的更改,将服务工作线程添加到 index.html 中:

<!doctype html>
<html lang="en">
  <head>
    <meta charset="utf-8">
    <meta name="viewport" content="width=device-width, initial-scale=1">
    <link rel="shortcut icon" href="%PUBLIC_URL%/favicon.ico">
    <link rel="manifest" href="%PUBLIC_URL%/manifest.json">
    <!--
      Notice the use of %PUBLIC_URL% in the tag above.
      It will be replaced with the URL of the `public` folder during the build.
      Only files inside the `public` folder can be referenced from the HTML.
      Unlike "/favicon.ico" or "favicon.ico", "%PUBLIC_URL%/favicon.ico" will
      work correctly both with client-side routing and a non-root public URL.
      Learn how to configure a non-root public URL by running `npm run build`.
    -->
    <title>React App</title>
  </head>
  <body>
    <div id="root"></div>
    <!--
      This HTML file is a template.
      If you open it directly in the browser, you will see an empty page.
      You can add webfonts, meta tags, or analytics to this file.
      The build step will place the bundled scripts into the <body> tag.
      To begin the development, run `npm start`.
      To create a production bundle, use `npm run build`.
    -->
    <script>
      if ('serviceWorker' in navigator) {
        window.addEventListener('load', function() {
          navigator.serviceWorker.register('/service-worker.js');
        });
      }
    </script>
  </body>
</html>

在项目的根目录下执行所有操作后,请运行npm install,然后再运行npm start
更多阅读资料:https://github.com/jeffposnick/create-react-pwa#what-additional-changes-might-be-needed

12
如果您解释为什么需要这些步骤而不是盲目遵循指示,那就太好了。 - mrtnmgs

6
我建议使用名为 cra-append-sw 的库来向 CRA 添加自定义服务工作者。
大部分如何使用它的细节都在npm页面上,但简单来说,你只需要安装库(npm i --save cra-append-sw)。
对 package.json 进行一些更改:
"start": "react-scripts start && cra-append-sw --mode dev ./public/custom-sw-import.js",
"build": "react-scripts build && cra-append-sw --skip-compile ./public/custom-sw-import.js" 

最后,在您的公共文件夹中创建一个名为custom-sw-import.js的文件,您在那里编写的所有服务工作者代码将简单地附加到cra的服务工作者上。
我可以验证这个方法有效,因为我应用了相同的原则来制作我的网站www.futurist-invenzium.com,该网站演示了PWA提供的所有功能。
如果您想要更深入的答案,我还发现这篇博客文章很有帮助:https://medium.freecodecamp.org/how-to-build-a-pwa-with-create-react-app-and-custom-service-workers-376bd1fdc6d3

0

Service workers和离线功能现在应该包含在create-react-app构建中,参见this pr


4
它已经包含在内,但无法进行配置。 - Stas Arshanski

网页内容由stack overflow 提供, 点击上面的
可以查看英文原文,
原文链接