我想为我的UITextFields使用自定义背景。虽然这样可以工作得很好,但问题是我必须使用UITextBorderStyleNone才能使其看起来漂亮。这将强制文本紧贴左侧且没有填充。
我是否可以手动设置填充,以使其外观类似于UITextBorderStyleRoundedRect,而不使用自定义背景图像?
我想为我的UITextFields使用自定义背景。虽然这样可以工作得很好,但问题是我必须使用UITextBorderStyleNone才能使其看起来漂亮。这将强制文本紧贴左侧且没有填充。
我是否可以手动设置填充,以使其外观类似于UITextBorderStyleRoundedRect,而不使用自定义背景图像?
我发现了一个聪明的小技巧,可以设置左侧填充的精确大小。
基本上,你需要将 UITextField 的 leftView 属性设置为空视图,并且该视图的大小与你想要设置的填充大小相同:
UIView *paddingView = [[UIView alloc] initWithFrame:CGRectMake(0, 0, 5, 20)];
textField.leftView = paddingView;
textField.leftViewMode = UITextFieldViewModeAlways;
对我非常有效!
在 Swift 3 / Swift 4 中,可以通过执行以下操作来完成
let paddingView: UIView = UIView(frame: CGRect(x: 0, y: 0, width: 5, height: 20))
textField.leftView = paddingView
textField.leftViewMode = .always
我创建了这个类别实现,并将其添加到.m文件的顶部。
@implementation UITextField (custom)
    - (CGRect)textRectForBounds:(CGRect)bounds {
        return CGRectMake(bounds.origin.x + 10, bounds.origin.y + 8,
                          bounds.size.width - 20, bounds.size.height - 16);
    }
    - (CGRect)editingRectForBounds:(CGRect)bounds {
        return [self textRectForBounds:bounds];
    }
@end
根据Piotr Blasiak提供的链接,这种方法似乎比创建一个全新的子类更简单,也比添加额外的UIView更简单。但是,似乎缺少某些东西来控制文本字段内部的填充。
Swift 4解决方案:
class CustomTextField: UITextField {
    struct Constants {
        static let sidePadding: CGFloat = 10
        static let topPadding: CGFloat = 8
    }

    override func textRect(forBounds bounds: CGRect) -> CGRect {
        return CGRect(
            x: bounds.origin.x + Constants.sidePadding,
            y: bounds.origin.y + Constants.topPadding,
            width: bounds.size.width - Constants.sidePadding * 2,
            height: bounds.size.height - Constants.topPadding * 2
        )
    }

    override func editingRect(forBounds bounds: CGRect) -> CGRect {
        return self.textRect(forBounds: bounds)
    }
}
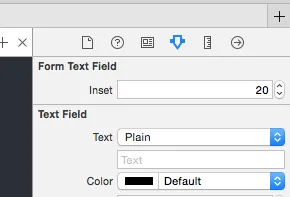
CGRectInset 吗..? - shashwat这是适用于Xcode >6的Swift 3版本,您可以在Interface Builder / Storyboard中编辑插入值。
import UIKit

@IBDesignable
class FormTextField: UITextField {

    @IBInspectable var inset: CGFloat = 0

    override func textRect(forBounds bounds: CGRect) -> CGRect {
        return bounds.insetBy(dx: inset, dy: inset)
    }

    override func editingRect(forBounds bounds: CGRect) -> CGRect {
        return textRect(forBounds: bounds)
    }

}
override func placeholderRectForBounds(bounds: CGRect) -> CGRect { return CGRectInset(bounds, inset, inset) } - Michael@IBDesignable和@IBInspectable的解释或者相关链接,会更有帮助。比如这篇文章:http://nshipster.com/ibinspectable-ibdesignable/。 - Russell Austinreturn super.textRectForBounds(CGRectInset(bounds, inset, inset))将正确处理附属视图的偏移量。 - Mike Fay编辑:在iOS 11.3.1中仍可使用
在iOS 6中,myTextField.leftView = paddingView;会导致问题。
这解决了问题。
myTextField.layer.sublayerTransform = CATransform3DMakeTranslation(5, 0, 0)
如要右对齐文本字段,请按照评论中 latenitecoder 的建议使用 CATransform3DMakeTranslation(-5, 0, 0)
一个好的方法是通过创建子类并添加edgeInsets属性来为UITextField添加填充。然后设置edgeInsets,UITextField将相应地被绘制。这也能够正确地与自定义的leftView或rightView一起使用。
OSTextField.h
#import <UIKit/UIKit.h>

@interface OSTextField : UITextField

@property (nonatomic, assign) UIEdgeInsets edgeInsets;

@end
OSTextField.m
#import "OSTextField.h"

@implementation OSTextField

- (id)initWithFrame:(CGRect)frame{
    self = [super initWithFrame:frame];
    if (self) {
        self.edgeInsets = UIEdgeInsetsZero;
    }
    return self;
}

-(id)initWithCoder:(NSCoder *)aDecoder{
    self = [super initWithCoder:aDecoder];
    if(self){
        self.edgeInsets = UIEdgeInsetsZero;
    }
    return self;
}

- (CGRect)textRectForBounds:(CGRect)bounds {
    return [super textRectForBounds:UIEdgeInsetsInsetRect(bounds, self.edgeInsets)];
}

- (CGRect)editingRectForBounds:(CGRect)bounds {
    return [super editingRectForBounds:UIEdgeInsetsInsetRect(bounds, self.edgeInsets)];
}

@end
只需像这样对UITextField进行子类化:
@implementation DFTextField


- (CGRect)textRectForBounds:(CGRect)bounds
{
    return CGRectInset(bounds, 10.0f, 0);
}

- (CGRect)editingRectForBounds:(CGRect)bounds
{
    return [self textRectForBounds:bounds];
}


@end
这将在每侧添加10点的水平填充。
PaddingTextField.swift
import UIKit
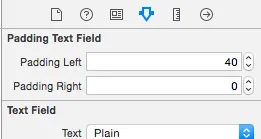
class PaddingTextField: UITextField {
@IBInspectable var paddingLeft: CGFloat = 0
@IBInspectable var paddingRight: CGFloat = 0
override func textRectForBounds(bounds: CGRect) -> CGRect {
return CGRectMake(bounds.origin.x + paddingLeft, bounds.origin.y,
bounds.size.width - paddingLeft - paddingRight, bounds.size.height);
}
override func editingRectForBounds(bounds: CGRect) -> CGRect {
return textRectForBounds(bounds)
}}
将您的文本框类设置为 PaddingTextField 并根据需要自定义填充。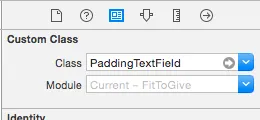
享受它!
Objective C 代码
MyTextField.h
#import <UIKit/UIKit.h>
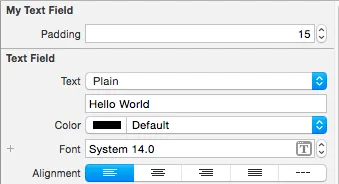
@interface MyTextField : UITextField
@property (nonatomic) IBInspectable CGFloat padding;
@end
我的TextField.m
#import "MyTextField.h"

IB_DESIGNABLE
@implementation MyTextField

@synthesize padding;

-(CGRect)textRectForBounds:(CGRect)bounds{
    return CGRectInset(bounds, padding, padding);
}

-(CGRect)editingRectForBounds:(CGRect)bounds{
    return [self textRectForBounds:bounds];
}

@end
[self textRectForBounds:bounds];,文档明确提到不要直接调用它:https://developer.apple.com/documentation/uikit/uitextfield/1619636-textrect - Pierre@interface UITextField (PaddingText)
-(void) setLeftPadding:(int) paddingValue;
-(void) setRightPadding:(int) paddingValue;
@end
实现文件:
#import "UITextField+PaddingText.h"

@implementation UITextField (PaddingText)

-(void) setLeftPadding:(int) paddingValue
{
    UIView *paddingView = [[UIView alloc] initWithFrame:CGRectMake(0, 0, paddingValue, self.frame.size.height)];
    self.leftView = paddingView;
    self.leftViewMode = UITextFieldViewModeAlways;
}

-(void) setRightPadding:(int) paddingValue
{
    UIView *paddingView = [[UIView alloc] initWithFrame:CGRectMake(0, 0, paddingValue, self.frame.size.height)];
    self.rightView = paddingView;
    self.rightViewMode = UITextFieldViewModeAlways;
}

@end
使用示例
#import "UITextField+PaddingText.h"

[self.YourTextField setLeftPadding:20.0f];
希望这能帮到你们
谢谢
Swift版本:
extension UITextField {
    @IBInspectable var padding_left: CGFloat {
        get {
            LF.log("WARNING no getter for UITextField.padding_left")
            return 0
        }
        set (f) {
            layer.sublayerTransform = CATransform3DMakeTranslation(f, 0, 0)
        }
    }
}
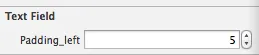
IBInspectable 允许您在运行时应用 setter 代码,因此只需将数字放入 Interface Builder 中即可正常工作。 - superarts.org