场景图支持两种类型的抗锯齿。例如矩形和图像等基本元素将通过在其边缘上添加更多顶点来进行抗锯齿处理,使得边缘逐渐变为透明。这种方法称为顶点抗锯齿。如果您请求一个多采样OpenGL上下文,场景图将优先使用基于多采样的抗锯齿(MSAA)。
即使两个边缘在数学上相同,顶点抗锯齿也可能在相邻基本元素的边缘之间产生接缝。而多采样抗锯齿则不会出现这种情况。
多采样抗锯齿是一种硬件功能,其中硬件计算每个像素在基元中的覆盖值。某些硬件可以以非常低的成本进行多采样,而其他硬件可能需要更多的内存和GPU周期来呈现帧。
要启用多采样抗锯齿,您应该使用
QQuickWindow::setFormat()设置具有大于0的样本的
QSurfaceFormat。
QQuickView view;
QSurfaceFormat format = view.format();
format.setSamples(16);
view.setFormat(format);
view.show();
顶点抗锯齿
可以使用Item::antialiasing属性在每个项目上启用或禁用顶点抗锯齿。它将在不考虑底层硬件支持的情况下工作,并为通常渲染的基本图形和捕获到帧缓冲对象中的基本图形产生更高质量的抗锯齿效果。
使用顶点抗锯齿的缺点是必须对启用了抗锯齿的每个基本图形进行混合。在批处理方面,这意味着渲染器需要做更多的工作来确定是否可以对基本图形进行批处理,由于与场景中其他元素的重叠,这也可能导致较少的批处理,从而影响性能。
要将顶点抗锯齿应用于从QQuickItem派生的自定义QML元素,请按照以下步骤进行:
1)创建自定义材料和OpenGL着色器程序。
smoothcolormaterial.h
#include <QSGMaterial>
#include <QSGMaterialShader>
class QSGSmoothColorMaterial : public QSGMaterial
{
public:
QSGSmoothColorMaterial();
int compare(const QSGMaterial *other) const;
protected:
virtual QSGMaterialType *type() const;
virtual QSGMaterialShader *createShader() const;
};
class QSGSmoothColorMaterialShader : public QSGMaterialShader
{
public:
QSGSmoothColorMaterialShader();
virtual void updateState(const RenderState &state, QSGMaterial *newEffect, QSGMaterial *oldEffect);
virtual char const *const *attributeNames() const;
private:
void initialize();
int m_matrixLoc;
int m_opacityLoc;
int m_pixelSizeLoc;
};
smoothcolormaterial.cpp
QSGSmoothColorMaterial::QSGSmoothColorMaterial()
{
setFlag(RequiresFullMatrixExceptTranslate, true);
setFlag(Blending, true);
}
int QSGSmoothColorMaterial::compare(const QSGMaterial *other) const
{
Q_UNUSED(other)
return 0;
}
QSGMaterialType *QSGSmoothColorMaterial::type() const
{
static QSGMaterialType type;
return &type;
}
QSGMaterialShader *QSGSmoothColorMaterial::createShader() const
{
return new QSGSmoothColorMaterialShader();
}
QSGSmoothColorMaterialShader::QSGSmoothColorMaterialShader()
: QSGMaterialShader()
{
setShaderSourceFile(QOpenGLShader::Vertex, QStringLiteral(":/shaders/smoothcolor.vert"));
setShaderSourceFile(QOpenGLShader::Fragment, QStringLiteral(":/shaders/smoothcolor.frag"));
}
void QSGSmoothColorMaterialShader::updateState(const QSGMaterialShader::RenderState &state, QSGMaterial *newEffect, QSGMaterial *oldEffect)
{
Q_UNUSED(newEffect)
if (state.isOpacityDirty())
program()->setUniformValue(m_opacityLoc, state.opacity());
if (state.isMatrixDirty())
program()->setUniformValue(m_matrixLoc, state.combinedMatrix());
if (oldEffect == 0) {
QRect r = state.viewportRect();
program()->setUniformValue(m_pixelSizeLoc, 2.0f / r.width(), 2.0f / r.height());
}
}
const char * const *QSGSmoothColorMaterialShader::attributeNames() const
{
static char const *const attributes[] = {
"vertex",
"vertexColor",
"vertexOffset",
0
};
return attributes;
}
void QSGSmoothColorMaterialShader::initialize()
{
m_matrixLoc = program()->uniformLocation("matrix");
m_opacityLoc = program()->uniformLocation("opacity");
m_pixelSizeLoc = program()->uniformLocation("pixelSize");
}
片段着色器
varying lowp vec4 color;

void main()
{
    gl_FragColor = color;
}
顶点着色器
uniform highp vec2 pixelSize;
uniform highp mat4 matrix;
uniform lowp float opacity;

attribute highp vec4 vertex;
attribute lowp vec4 vertexColor;
attribute highp vec2 vertexOffset;

varying lowp vec4 color;

void main()
{
    highp vec4 pos = matrix * vertex;
    gl_Position = pos;

    if (vertexOffset.x != 0.) {
        highp vec4 delta = matrix[0] * vertexOffset.x;
        highp vec2 dir = delta.xy * pos.w - pos.xy * delta.w;
        highp vec2 ndir = .5 * pixelSize * normalize(dir / pixelSize);
        dir -= ndir * delta.w * pos.w;
        highp float numerator = dot(dir, ndir * pos.w * pos.w);
        highp float scale = 0.0;
        if (numerator < 0.0)
            scale = 1.0;
        else
            scale = min(1.0, numerator / dot(dir, dir));
        gl_Position += scale * delta;
    }

    if (vertexOffset.y != 0.) {
        highp vec4 delta = matrix[1] * vertexOffset.y;
        highp vec2 dir = delta.xy * pos.w - pos.xy * delta.w;
        highp vec2 ndir = .5 * pixelSize * normalize(dir / pixelSize);
        dir -= ndir * delta.w * pos.w;
        highp float numerator = dot(dir, ndir * pos.w * pos.w);
        highp float scale = 0.0;
        if (numerator < 0.0)
            scale = 1.0;
        else
            scale = min(1.0, numerator / dot(dir, dir));
        gl_Position += scale * delta;
    }

    color = vertexColor * opacity;
}
2) 为 QSGGeometry 创建自定义的 AttributeSet。
myquickitem.cpp
namespace
{
    struct Color4ub
    {
        unsigned char r, g, b, a;
    };

    inline Color4ub colorToColor4ub(const QColor &c)
    {
        Color4ub color = { uchar(c.redF() * c.alphaF() * 255),
                           uchar(c.greenF() * c.alphaF() * 255),
                           uchar(c.blueF() * c.alphaF() * 255),
                           uchar(c.alphaF() * 255)
                         };
        return color;
    }

    struct SmoothVertex
    {
        float x, y;
        Color4ub color;
        float dx, dy;
        void set(float nx, float ny, Color4ub ncolor, float ndx, float ndy)
        {
            x = nx; y = ny; color = ncolor;
            dx = ndx; dy = ndy;
        }
    };

    const QSGGeometry::AttributeSet &smoothAttributeSet()
    {
        static QSGGeometry::Attribute data[] = {
            QSGGeometry::Attribute::create(0, 2, GL_FLOAT, true),
            QSGGeometry::Attribute::create(1, 4, GL_UNSIGNED_BYTE, false),
            QSGGeometry::Attribute::create(2, 2, GL_FLOAT, false)
        };
        static QSGGeometry::AttributeSet attrs = { 3, sizeof(SmoothVertex), data };
        return attrs;
    }
}
3) 将自定义材质和自定义几何图形应用于 QSGGeometryNode。
myquickitem.cpp
QSGNode *MyQuickItem::updatePaintNode(QSGNode *oldNode, QQuickItem::UpdatePaintNodeData *data)
{
     QSGGeometryNode *node = 0;

     QSGGeometry *geometry;
     QSGSmoothColorMaterial *material;
     node = static_cast<QSGGeometryNode *>(oldNode);
     if(!node) {
         node = new QSGGeometryNode;
         geometry = new QSGGeometry(smoothAttributeSet(), 0);
         geometry->setDrawingMode(GL_TRIANGLE_STRIP);
         material = new QSGSmoothColorMaterial();
         node->setGeometry(geometry);
         node->setFlag(QSGNode::OwnsGeometry);
         node->setMaterial(material);
         node->setFlag(QSGNode::OwnsMaterial);
     } else {
         geometry = node->geometry();
         material = static_cast<QSGSmoothColorMaterial *>(node->material());
     }
4) 获取顶点数据的指针。
 int vertexStride = geometry->sizeOfVertex();
 int vertexCount = 8;

 geometry->allocate(vertexCount, 0);
 SmoothVertex *smoothVertices = reinterpret_cast<SmoothVertex *>(geometry->vertexData());
 memset(smoothVertices, 0, vertexCount * vertexStride);
5) 设置顶点数据。
您需要4个点。
 float lineWidth = 4;
 float tlX = 0;   float tlY = 0;               //top-left
 float blX = 0;   float blY = 0 + lineWidth;   //bottom-left
 float trX = 500; float trY = 100;             //top-right
 float brX = 500; float brY = 100 + lineWidth; //bottom-right
 float delta = lineWidth * 0.5f;

 Color4ub fillColor = colorToColor4ub(QColor(255,0,0,255));
 Color4ub transparent = { 0, 0, 0, 0 };
为了绘制抗锯齿线,您需要设置8个顶点以绘制6个三角形(2个用于线条,4个用于抗锯齿)。顶点0和2、1和3、4和6、5和7具有相同的坐标,但颜色不同且顶点偏移相反。
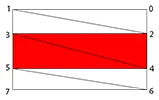
 smoothVertices[0].set(trX, trY, transparent, delta, -delta);
 smoothVertices[1].set(tlX, tlY, transparent, -delta, -delta);

 smoothVertices[2].set(trX, trY, fillColor, -delta, delta);
 smoothVertices[3].set(tlX, tlY, fillColor, delta, delta);
 smoothVertices[4].set(brX, brY, fillColor, -delta, -delta);
 smoothVertices[5].set(blX, blY, fillColor, delta, -delta);

 smoothVertices[6].set(brX, brY, transparent, delta, delta);
 smoothVertices[7].set(blX, blY, transparent, -delta, delta);


 node->markDirty(QSGNode::DirtyGeometry);

 return node;
 }
true。顺便问一下,为什么不使用QQuickPaintedItem?那会更容易/更安全,可以参考这个例子。 - BaCaRoZzo