UPS API OAuth令牌请求失败

18
UPS开发者门户中,我创建了一个应用程序,它有一个客户端ID和客户端密钥。接下来,我想获取一个OAuth令牌,以便可以使用它来访问他们的其他API。我按照规范创建了我的令牌请求,但是我收到了以下错误信息:
{"response":{"errors":[{"code":"10400","message":"Invalid/Missing Authorization Header"}]}}

规范中有一个“试用”功能,您可以获取一个测试令牌。它提示用户填写一个x-merchant-id参数和一个grant_type表单变量,并创建一个类似于以下的curl请求:
curl -X POST "https://wwwcie.ups.com/security/v1/oauth/token" 
     -H "accept: application/json" 
     -H "x-merchant-id: {My_Client_Id_Goes_Here}" 
     -H "Content-Type: application/x-www-form-urlencoded" 
     -d "grant_type=client_credentials"

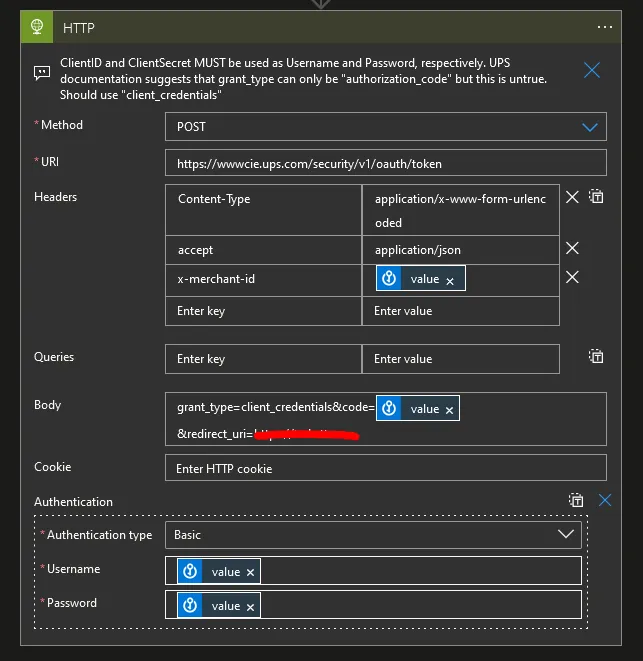
对于x-merchant_id,我已经使用了我的应用程序的客户端ID。不清楚grant_type的值应该是client_credentials这个短语(页面似乎只有这个有效值),还是我的应用程序的实际客户端密钥。我尝试了两种方式,每次都得到相同的错误。
关于如何获取OAuth令牌,除了上面链接的说明之外,几乎没有任何实际的例子,只有一百万个关于如何使用他们(旧风格)API密钥的示例!
7个回答

17

你的curl看起来不错,只是缺少一个名为Authorization的头信息,该头信息需要使用base64(id:secret)进行编码。

curl -X POST "https://wwwcie.ups.com/security/v1/oauth/token" 
     -H "Authorization: Basic {id}:{secret}" 
     -H "accept: application/json" 
     -H "x-merchant-id: {My_Client_Id_Goes_Here}" 
     -H "Content-Type: application/x-www-form-urlencoded" 
     -d "grant_type=client_credentials"

如果您正在使用“尝试”功能,请选择顶部的Authorize按钮并输入客户端ID和密钥,这是用于设置授权标头的地方。需要注意的一件事是,“尝试”功能仅适用于分配给您的应用程序的测试产品。
额外信息:
UPS有两个环境
  • 测试:wwwcie.ups.com
  • 生产:onlinetools.ups.com
测试环境仅接受测试产品,请注意添加到您的应用程序中的产品。

1
谢谢您的帮助。我已经注意到关于测试环境和正确产品的批准...这对我来说都很好。在该页面使用“授权”按钮确实向请求中添加了“Authorization: Basic blahblahblah”标头,但我仍然收到不同的错误(代码:10401,消息:ClientId无效)。如果我暂时忽略这个新错误,当我从我的应用程序而不是文档页面执行此操作时,我应该在授权头中放置什么? - ConfuedProblemSolver
7
哈,应该仔细阅读你的回复!他们的文档页面误导了人们。它将ups.com用户名/密码组合进行编码,并将其放入标题中。实际上,应该对客户端ID/密钥组合进行编码。一旦我这样做了,我就得到了一个令牌。 - ConfuedProblemSolver
1
这意味着只有5个人从SOAP迁移到REST,获得了5个赞(2023年8月29日)。:) 感谢您发布这个提示。由于2023年的文档仍然不完善,这为我节省了很多麻烦。 - ggenglish
@ConfueduProblemSolver 你解决了一些麻烦。此外,令牌生成可以在不添加x-merchent-id头部的情况下工作,因为这基本上与客户端ID相同。 - undefined
谢谢兄弟,你真是省时的。重要的是这一行: 它将ups.com的用户名/密码组合进行编码,并将其放入头部。实际上应该是客户端ID/密钥组合应该被编码。 - undefined

9

我被这个问题困扰了很长时间。

你的评论最终确实帮助了我。但我希望能够更清晰地说明,以便以后读到这篇文章的人们能够更好地理解......

与其在授权头中使用UPS用户名和密码,你需要用冒号将clientId和secret编码,并发送那个编码。

对于PHP:

$clientID = base64_encode("{clientID}:{clientSecret}");

$headers = array();
$headers[] = "Authorization: Basic $clientID";
$headers[] = 'Accept: application/json';
$headers[] = "X-Merchant-Id: {clientID}";
$headers[] = 'Content-Type: application/x-www-form-urlencoded';

5

以防有.NET/C#背景的人在寻找类似话题时,这是一个关于UPS RESTFul API授权和跟踪信息处理的解决方案,以下是我使用建议的方法成功运作的:

#define TEST_MODE

using System;
using System.Collections.Generic;
using System.Net;
using System.Net.Http;
using System.Text;
using System.Text.Json;
using System.Text.Json.Nodes;

...

if (!ServicePointManager.Expect100Continue)
{
    ServicePointManager.Expect100Continue = true;
    ServicePointManager.SecurityProtocol = (SecurityProtocolType)(3072); // SecurityProtocolType.Tls;
    ServicePointManager.ServerCertificateValidationCallback += (sender, certificate, chain, errors) => true;
}

var myClientID = "{Type your ClientId here}";
var mySecretID = "{Type your SecretID here}";

#if TEST_MODE
var baseAddress = "https://wwwcie.ups.com";         // testing
#else
var baseAddress = "https://onlinetools.ups.com";  // production
#endif

var accessID = $"{myClientID}:{mySecretID}";
var base64AccessID = Convert.ToBase64String(Encoding.ASCII.GetBytes(accessID));

using (var client = new HttpClient())
{
    // Get Access Token
    var request = new HttpRequestMessage()
    {
        Method = HttpMethod.Post,
        RequestUri = new Uri($"{baseAddress}/security/v1/oauth/token"),
        Content = new FormUrlEncodedContent(new[]
        {
            new KeyValuePair<string, string>("grant_type", "client_credentials")
        })
    };
    request.Headers.Add("Authorization", $"Basic {base64AccessID}");

    var response = await client.SendAsync(request);

    var jsonResult = await response.Content.ReadAsStringAsync();
    var result = JsonSerializer.Deserialize<JsonObject>(jsonResult);

    var access_token = result?["access_token"]?.ToString();

    // Get Tracking Info
    var trackingNumber = "1Z5338FF0107231059";  // provided by UPS for testing

    request = new HttpRequestMessage()
    {
        Method = HttpMethod.Get,
        RequestUri = new Uri($"{baseAddress}/api/track/v1/details/{trackingNumber}")
    };
    request.Headers.Add("Authorization", $"Bearer {access_token}");
    request.Headers.Add("transId", $"{DateTime.Now.Ticks}");
#if TEST_MODE
    request.Headers.Add("transactionSrc", $"testing");
#else
    request.Headers.Add("transactionSrc", $"{App Name and version}");
#endif

    response = await client.SendAsync(request);
    jsonResult = await response.Content.ReadAsStringAsync();

    Console.WriteLine(jsonResult);
}

【更新】
Nick最近在他对这个解决方案的评论中指出的那样,“我不得不在代码的顶部添加了一个TLS1.2声明,否则它会抛出一个关于无法建立安全连接/通道的错误”原始代码必须通过在其顶部添加以下代码行来进行修正:
if (!ServicePointManager.Expect100Continue)
{
    ServicePointManager.Expect100Continue = true;
    ServicePointManager.SecurityProtocol = (SecurityProtocolType)(3072); // SecurityProtocolType.Tls;
    ServicePointManager.ServerCertificateValidationCallback += (sender, certificate, chain, errors) => true;
}

我还要注意的是,为了使解决方案代码能够在.NET Framework 4.7.x/4.8下编译通过,需要使用Package Manager的命令。
  Install-Package System.Text.Json

必须在“Package Manager Console”中执行,或者您可以使用Newtonsoft.Json NuGet的包来替代System.Text.Json,但在后一种情况下,您可能需要进行一些小的代码编辑。

非常感谢这个例子。基本上就直接使用了。我不得不在代码顶部添加了一个TLS1.2声明,否则会出现无法建立安全连接/通道的错误。 - Nick
@nNck: 很高兴能帮到你!你是指像这里提出的代码行吗:"The request was aborted: Could not create SSL/TLS secure channel for HttpWebRequest"?我应该在我的应用程序的其他部分与另外两行代码一起使用它:ServicePointManager.Expect100Continue = true;ServicePointManager.SecurityProtocol = (SecurityProtocolType)(3072);在上述解决方案之前插入。 - ShamilS
1
没错 - 我必须添加那两行准确的代码,一切都运行得很完美。 - Nick

3

除了其他答案之外,还要确保将“OAuth”产品添加到您的UPS应用程序中。我已经添加了“追踪”和“追踪测试”,但没有添加OAuth。当我尝试获取令牌时,我收到了“{"code":"10401","message":"ClientId is Invalid"}”响应,即使我确定其他所有内容都是正确的。

向我的UPS应用程序添加OAuth可能会将我的ClientID添加到他们的OAuth系统中,我的令牌请求开始工作。


1

Linux/Ubuntu 命令行示例:

#!/bin/bash

ClientId=paste from your UPS Apps - Credentials - Client Id

ClientSecret=paste from your UPS Apps - Credentials - Client Secret


ClientIdAndSecret=${ClientId}:${ClientSecret}

EncodedClientIdAndSecret=$(echo -n "${ClientIdAndSecret}" | base64  -w0)

echo $EncodedClientIdAndSecret


curl -X POST "https://onlinetools.ups.com/security/v1/oauth/token"  \
     -H "Authorization: Basic ${EncodedClientIdAndSecret}"  \
     -H "accept: application/json"  \
     -H "x-merchant-id: $ClientID"  \
     -H "Content-Type: application/x-www-form-urlencoded"  \
     -d "grant_type=client_credentials"

1

Azure Logic Apps使用HTTP操作的示例。

  1. 头部:
Content-Type: application/x-www-form-urlencoded

accept: application/json

x-merchant-id: your UPS Client ID

2. 身体
grant_type=client_credentials&code=YOUR_UPS_CLIENTID&redirect_uri=YOUR_CALLBACK_URL

认证
基本
用户名是您的UPS客户ID。
密码是您的UPS客户密钥。
在我的示例中,我从Azure Key Vault获取我的客户端ID和客户端密钥值。我还处于测试环境中,所以我正在使用UPS测试服务器URI。 Azure Logic Apps HTTP Token Request Action

1
以下方法使用C#,RestSharp和System.Text.Json来请求和接收UPS客户端OAuth凭据
using System.Net;
using System.Text.Json;
using System.Text.Json.Serialization;
using RestSharp;
using RestSharp.Authenticators;
* * *
/// JSON Schema to receive the UPS OAuth Token
public class Ups_OAuthToken
{
    [JsonInclude]
    public string? token_type;

    [JsonInclude]
    public string? issued_at;

    [JsonInclude]
    public string? client_id;

    [JsonInclude]
    public string? access_token;

    [JsonInclude]
    public string? scope;

    [JsonInclude]
    public string? expires_in;

    [JsonInclude]
    public string? refresh_count;

    [JsonInclude]
    public string? status;
}

Ups_OAuthToken myUpsToken = null;
* * *
/// Setup a RestSharp RestClient and RestRequest
RestSharp.RestClient restClient = new("https://onlinetools.ups.com")
RestSharp.RestRequest apiRequest = new("/security/v1/oauth/token", Method.Post)
    {
        Authenticator = new HttpBasicAuthenticator("myclientid", "myclientsecret"))
    };    
apiRequest.AddHeader("Content-Type", "application/x-www-form-urlencoded");
apiRequest.AddHeader("x-merchant-id", "string");
apiRequest.AddParameter("grant_type", "client_credentials", true);
RestSharp.RestResponse apiResponse = restClient?.Execute(apiRequest)!

switch (apiResponse.StatusCode)
{
    case HttpStatusCode.OK:  // 200 Successful Operation
        // Authorization Token Received!
        myUpsToken = JsonSerializer.Deserialize<Ups_OAuthToken(apiResponse?.Content!.ToString()!, m_jsonOptions)!;
        break;
}
* * *

上面的代码是为了概念说明而进行编辑的。它是从我在Visual Studio 2022 v 17.6.5、C# 11.0、.NET 7.0和RestSharp 110.2.0(通过nuget)开发的应用程序中剪切出来的。

真有趣,我昨天早上还在搜索像你这样的代码,然后你就在几分钟之后发布了它 :-) 谢谢,点赞! - Andreas

网页内容由stack overflow 提供, 点击上面的
可以查看英文原文,
原文链接