在安卓中将双按钮布局左右对齐

53

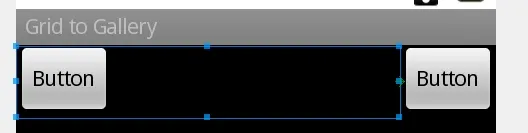
我想在线性布局中将两个按钮对齐,一个在左边,一个在右边,就像图库中的下一个和上一个按钮一样。我试着对齐它们,但没有成功。

XML布局代码:

<?xml version="1.0" encoding="utf-8"?>
<LinearLayout xmlns:android="http://schemas.android.com/apk/res/android"
    android:layout_width="fill_parent"
    android:layout_height="fill_parent"
    android:orientation="vertical"
    android:background="@android:color/white"
    android:gravity="bottom" >


    <LinearLayout
        android:id="@+id/linearLayout1"
        android:layout_width="fill_parent"
        android:layout_height="wrap_content"
        android:background="@android:color/black" >

        <Button
            android:id="@+id/button1"
            android:layout_width="wrap_content"
            android:layout_height="wrap_content"
            android:text="prev"
            android:layout_alignParentRight="true" />

        <Button
            android:id="@+id/button2"
            android:layout_width="wrap_content"
            android:layout_height="wrap_content"
            android:text="next" />

    </LinearLayout>

</LinearLayout>

实际输出:

期望输出:

我该如何解决它?

12个回答

105

使用 RelativeLayout。在这里,您可以设置 android:layout_alignParentLeftandroid:layout_alignParentRight。对于您来说,这应该可以工作:

<?xml version="1.0" encoding="utf-8"?>
<LinearLayout xmlns:android="http://schemas.android.com/apk/res/android"
    android:layout_width="fill_parent"
    android:layout_height="fill_parent"
    android:orientation="vertical"
    android:background="@android:color/white"
    android:gravity="bottom" >


    <RelativeLayout
        android:id="@+id/relativeLayout1"
        android:layout_width="fill_parent"
        android:layout_height="wrap_content"
        android:background="@android:color/black" >

        <Button
            android:id="@+id/button1"
            android:layout_width="wrap_content"
            android:layout_height="wrap_content"
            android:text="prev"
            android:layout_alignParentLeft="true" />

        <Button
            android:id="@+id/button2"
            android:layout_width="wrap_content"
            android:layout_height="wrap_content"
            android:text="next"
            android:layout_alignParentRight="true"/>

    </RelativeLayout>

</LinearLayout>

如果我想在这些按钮之间放置一个TextView。这个TextView应该与这些按钮垂直居中,并且应该占据这两个按钮中心的全部剩余空间。请帮帮我。 - Robin Purbia
1
感谢您的回复。我通过使用具有layout_weight属性的线性布局来解决了这个问题。 - Robin Purbia
@RobinPurbia 是的,你可以使用下面给出的代码:https://dev59.com/kmgu5IYBdhLWcg3wln8O#50719521 - Manmohan Soni

9

使用线性布局

<LinearLayout
        android:layout_width="match_parent"
        android:layout_height="wrap_content">

        <LinearLayout
            android:layout_width="0dp"
            android:layout_height="wrap_content"
            android:layout_weight="1">

            <Button
                android:layout_width="wrap_content"
                android:layout_height="wrap_content"
                android:text="Prev"/>
        </LinearLayout>


        <Button
            android:layout_width="wrap_content"
            android:layout_height="wrap_content"
            android:text="Next"/>

</LinearLayout>

使用相对布局
With Relative Layout
<RelativeLayout
        android:layout_width="match_parent"
        android:layout_height="wrap_content">

        <Button
            android:layout_width="wrap_content"
            android:layout_height="wrap_content"
            android:text="Prev"
            android:layout_alignParentLeft="true"/>

        <Button
            android:layout_width="wrap_content"
            android:layout_height="wrap_content"
            android:text="Next"
            android:layout_alignParentRight="true"/>
</RelativeLayout>

6

在你的LinearLayout中使用相对布局;

还需要为“prev”Button添加android:layout_alignParentLeft="true"

以及为“next”Button添加android:layout_alignParentRight="true"

<?xml version="1.0" encoding="utf-8"?>
<LinearLayout xmlns:android="http://schemas.android.com/apk/res/android"
    android:layout_width="fill_parent"
    android:layout_height="fill_parent"
    android:background="@android:color/white"
    android:gravity="bottom"
    android:orientation="vertical" >

    <RelativeLayout
        android:id="@+id/relativeLayout1"
        android:layout_width="fill_parent"
        android:layout_height="wrap_content"
        android:background="@android:color/black" >

        <Button
            android:id="@+id/button1"
            android:layout_width="wrap_content"
            android:layout_height="wrap_content"
            android:layout_alignParentLeft="true"    <---- ADD this prop
            android:text="prev" />

        <Button
            android:id="@+id/button2"
            android:layout_width="wrap_content"
            android:layout_height="wrap_content"
            android:layout_alignParentRight="true"    <----- ADD this prop
            android:text="next" />
    </RelativeLayout>

</LinearLayout>

你的内部LinearLayout没有用处,可以将其删除。只需在RelativeLayout中添加颜色属性即可。 - Chintan Raghwani

5
我猜,最简单的解决方案是在您的内部 LinearLayout 中使用 View。
<LinearLayout
    android:layout_width="match_parent"
    android:layout_height="wrap_content">

    <Button
        android:id="@+id/button1"
        android:layout_width="wrap_content"
        android:layout_height="wrap_content"
        android:text="prev"/>

    <View
        android:layout_width="0dp"
        android:layout_height="0dp"
        android:layout_weight="1"/>

    <Button
        android:id="@+id/button2"
        android:layout_width="wrap_content"
        android:layout_height="wrap_content"
        android:text="next"/>

</LinearLayout>

简单而整洁...完美! - Christopher Kikoti

3

类似这样的:

<?xml version="1.0" encoding="utf-8"?>
<LinearLayout xmlns:android="http://schemas.android.com/apk/res/android"
    android:layout_width="match_parent"
    android:layout_height="match_parent"
    android:orientation="vertical" >

    <RelativeLayout
        android:layout_width="wrap_content"
        android:layout_height="match_parent"
        android:gravity="right" >

        <Button
            android:id="@+id/button1"
            android:layout_width="wrap_content"
            android:layout_height="wrap_content"
            android:layout_alignParentRight="true"
            android:text="Button" />

        <LinearLayout
            android:layout_width="match_parent"
            android:layout_height="wrap_content"
            android:layout_toLeftOf="@+id/button1"
            android:orientation="vertical" >

            <Button
                android:id="@+id/button2"
                android:layout_width="wrap_content"
                android:layout_height="wrap_content"
                android:text="Button" />
        </LinearLayout>
    </RelativeLayout>

</LinearLayout>

思路是,创建一个RelativeLayout容器,并将第一个按钮放入其中,然后将其粘贴到父视图的右侧。之后,在LinearLayout内添加另一个按钮inside,并将此LinearLayout设置为第一个按钮的左侧。

这就是结果。

enter image description here


你是对的。我在测试代码时只是随意布局。 - ariefbayu
这是一个不错的技巧,因为它可以解决文本重叠的问题。但感觉还不够标准化。 - TheRealChx101

3
您的布局XML应如下所示:

ur layout xml应该如下所示

<?xml version="1.0" encoding="utf-8"?>
 <RelativeLayout xmlns:android="http://schemas.android.com/apk/res/android"
    android:layout_width="fill_parent"
    android:layout_height="fill_parent"
    android:gravity="bottom"
    android:background="#fff">


 <RelativeLayout
    android:id="@+id/relativeLayout1"
    android:layout_width="match_parent"
    android:layout_height="wrap_content"
    android:background="#000"
    android:layout_gravity="bottom" >
    <Button      
       android:id="@+id/button1"
       android:layout_width="wrap_content"
       android:layout_height="wrap_content"
       android:layout_alignParentLeft="true"
       android:text="Pre" />

   <Button
      android:id="@+id/button2"
      android:layout_width="wrap_content"
      android:layout_height="wrap_content"
      android:layout_alignParentRight="true"
      android:text="Next" />
</RelativeLayout>
  </RelativeLayout>

2
您可以像这样使用RelativeLayout:
<?xml version="1.0" encoding="utf-8"?>
<LinearLayout xmlns:android="http://schemas.android.com/apk/res/android"
    android:layout_width="fill_parent"
    android:layout_height="fill_parent"
    android:background="@android:color/white"
    android:orientation="vertical" >

    <RelativeLayout
        android:layout_width="fill_parent"
        android:layout_height="wrap_content"
        android:background="@android:color/black"
        android:gravity="bottom"
        android:orientation="horizontal" >

        <Button
            android:id="@+id/button1"
            android:layout_width="wrap_content"
            android:layout_height="wrap_content"
            android:layout_alignParentLeft="true"
            android:text="prev" />

        <Button
            android:id="@+id/button2"
            android:layout_width="wrap_content"
            android:layout_height="wrap_content"
            android:layout_alignParentRight="true"
            android:text="next" />
    </RelativeLayout>

</LinearLayout>

(我在截图中使用了灰色而不是白色) 布局

2
使用RelativeLayout代替LinearLayout,可以在每个按钮上添加标签android:layout_alignParentRight="true"android:layout_alignParentLeft="true"

1
使用FrameLayout,并在每个按钮中添加layout_gravity属性。

0

做类似这样的事情肯定会帮助你解决问题

<?xml version="1.0" encoding="utf-8"?>
        <LinearLayout xmlns:android="http://schemas.android.com/apk/res/android"
                      android:orientation="vertical"
                      android:layout_width="match_parent"
                      android:layout_height="match_parent"
        >
            <TextView android:layout_width="wrap_content"
                      android:layout_height="wrap_content"
                      android:text="@string/Linear"

                      android:textSize="35dp"
                      android:layout_margin="90dp"

            />

            <LinearLayout
                    android:id="@+id/linearLayout1"
                    android:layout_width="fill_parent"
                    android:layout_height="wrap_content"
                    android:background="@android:color/black">

                <Button
                        android:id="@+id/button1"
                        android:layout_width="wrap_content"
                        android:layout_height="wrap_content"
                        android:text="Relative"
                        />

                <Button
                        android:id="@+id/button2"
                        android:layout_width="wrap_content"
                        android:layout_height="wrap_content"
                        android:layout_marginStart="200dp"
                        android:text="Constraint" />

            </LinearLayout>

        </LinearLayout>

网页内容由stack overflow 提供, 点击上面的
可以查看英文原文,
原文链接