使用Swift中的ImagePickerController裁剪图像

17

我目前正在使用Swift制作一个程序,其中涉及使用操作表从相机或照片库中选择图像的屏幕。这是完全功能的,但我想能够从所选图像中选择一个正方形区域,类似于苹果默认应用程序。我该如何实现这一点?这是我的功能代码:

func chooseImage(_ sender: Any) {

    let imagePickerController = UIImagePickerController()
    imagePickerController.delegate = self

    let actionSheet = UIAlertController(title: "Photo Source", message: "Choose a source", preferredStyle: .actionSheet)

    actionSheet.addAction(UIAlertAction(title: "Camera", style: .default, handler: { (action:UIAlertAction) in

        if UIImagePickerController.isSourceTypeAvailable(.camera) {
            imagePickerController.sourceType = .camera
            self.present(imagePickerController, animated: true, completion: nil)
        }else{
            print("Camera not available")
        }


    }))

    actionSheet.addAction(UIAlertAction(title: "Photo Library", style: .default, handler: { (action:UIAlertAction) in
        imagePickerController.sourceType = .photoLibrary
        self.present(imagePickerController, animated: true, completion: nil)
    }))

    actionSheet.addAction(UIAlertAction(title: "Default", style: .default, handler: { (action:UIAlertAction) in
        self.avatarImageView.image = UIImage(named: "Avatar.png")


    }))

    actionSheet.addAction(UIAlertAction(title: "Cancel", style: .cancel, handler: nil))

    self.present(actionSheet, animated: true, completion: nil)


}

func imagePickerController(_ picker: UIImagePickerController, didFinishPickingMediaWithInfo info: [String : Any]) {
    let image = info[UIImagePickerControllerOriginalImage] as! UIImage

    avatarImageView.image = image

    picker.dismiss(animated: true, completion: nil)
}

func imagePickerControllerDidCancel(_ picker: UIImagePickerController) {
    picker.dismiss(animated: true, completion: nil)
}
// Saves the User singleton object onto the device
static func saveData() {
    let savedData = NSKeyedArchiver.archivedData(withRootObject: User.sharedUser)
    UserDefaults.standard.set(savedData, forKey: "user")
}
5个回答

37

您可以使用默认控件来实现图像裁剪。

self.imgPicker.allowsEditing = true

委托方法

//MARK: image picker delegate method
    //MARK:
    func imagePickerController(_ picker: UIImagePickerController, didFinishPickingMediaWithInfo info: [String : Any]) {

        var image : UIImage!

        if let img = info[UIImagePickerControllerEditedImage] as? UIImage
        {
            image = img

        }
        else if let img = info[UIImagePickerControllerOriginalImage] as? UIImage
        {
            image = img
        }


        picker.dismiss(animated: true,completion: nil)
 }

4
在安卓系统中,裁剪是一项痛苦的工作,但在iOS中只需要一行代码就能搞定! - odvan
解决方案对我来说并不完全有效。图像没有正确裁剪。这可能是什么原因?详细信息请参考此处 - AnonProgrammer
这里的裁剪比例只有正方形,我需要自由裁剪。有人遇到过类似的问题吗? - dakshbhatt21
1
@dakshbhatt21,这是默认功能,您无法修改它。是的,您可以使用许多第三方库来裁剪图像。 - Jay Mehta

9

Swift 4.0+

func imagePickerController(_ picker: UIImagePickerController, didFinishPickingMediaWithInfo info: [UIImagePickerController.InfoKey : Any]) {
    var image : UIImage!

    if let img = info[UIImagePickerController.InfoKey.editedImage] as? UIImage
    {
        image = img

    }
    else if let img = info[UIImagePickerController.InfoKey.originalImage] as? UIImage
    {
        image = img
    }


    picker.dismiss(animated: true, completion: nil)
}

不要忘记将allowsEditing设置为true。

另一个选项是使用TOCropViewController。它在更少的代码量下实现了更多功能。我发现它很好的地方是允许你改变裁剪矩形。

class ViewController: UIViewController, CropViewControllerDelegate {

    ... //your viewcontroller code

    func presentCropViewController {
        let image: UIImage = ... //Load an image

        let cropViewController = CropViewController(image: image)
        cropViewController.delegate = self
        present(cropViewController, animated: true, completion: nil)
    }

    func cropViewController(_ cropViewController: CropViewController, 
         didCropToImage image: UIImage, withRect cropRect: CGRect, angle: Int) {
        // 'image' is the newly cropped version of the original image
    }
}

感谢关于TOCropViewController的提示。 - ashishn

5
Swift 5.0

最简短的声明方式:

//MARK: image picker delegate method
func imagePickerController(_ picker: UIImagePickerController, didFinishPickingMediaWithInfo info: [String : Any]) {

     var image : UIImage!
     if let img = info[.editedImage] as? UIImage {
         image = img
     } else if let img = info[.originalImage] as? UIImage {
         image = img
     }
     picker.dismiss(animated: true,completion: nil)
 }

按钮发送器:

@objc func buttonClicked(sender: UIButton!) {

    if UIImagePickerController.isSourceTypeAvailable(UIImagePickerController.SourceType.photoLibrary) {
        let picker = UIImagePickerController()
        picker.delegate = self
        picker.sourceType = UIImagePickerController.SourceType.photoLibrary
        picker.allowsEditing = true
        present(picker, animated: true, completion: nil)
    }
}

不要忘记在 .plist 文件中授予照片库访问权限。

0
- (void)cropViewController:(TOCropViewController *)cropViewController didCropToImage:(UIImage *)image withRect:(CGRect)cropRect angle:(NSInteger)angle

{

[[NSUserDefaults standardUserDefaults] setObject:UIImageJPEGRepresentation(image, 1) forKey:@"image"];
[[NSUserDefaults standardUserDefaults] setBool:YES forKey:@"cameraOn"];

[cropViewController dismissViewControllerAnimated:YES completion:^{

    [self performSegueWithIdentifier:@"YourSegueIdentifier" sender:self];

}];
//UIImageWriteToSavedPhotosAlbum(image, nil, nil, nil);

}

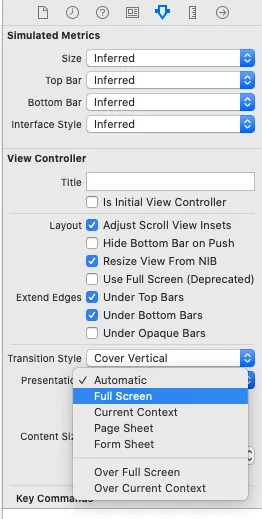
(针对iOS13):使用故事板或代码,将所有ViewController的“cropController.modalPresentationStyle =.fullScreen”设置为全屏。
这样做可以很好地工作,并且可以轻松地导航到另一个控制器。我还附上了图片,以便您可以轻松了解如何更改演示样式。

storyboard images


0
func imagePickerController(_ picker: UIImagePickerController, didFinishPickingMediaWithInfo info: [UIImagePickerController.InfoKey : Any]) {
        picker.dismiss(animated: true, completion: nil)
        
        if let image = info[.editedImage] as? UIImage {
            profilePicImageView.image = image
            profilePicImageView.layer.cornerRadius = profilePicImageView.frame.height/2
        } else if let image = info[.originalImage] as? UIImage {
            profilePicImageView.image = image
            profilePicImageView.layer.cornerRadius = profilePicImageView.frame.height/2
        }
    }

在选择图像后,还可以为图像视图提供一个漂亮的圆形形状。


网页内容由stack overflow 提供, 点击上面的
可以查看英文原文,
原文链接