你如何为Flutter应用添加启动屏?它应该在任何其他内容加载之前就能够加载和显示。目前,Scaffold(home:X)小部件加载之前会有短暂的闪烁。
在Flutter应用中添加启动画面
265
- Pieter
5
2我不确定设置一个自定义定时器来添加启动画面是否是正确的方法。我不喜欢让处理器处于空闲状态,为什么不要做一些类似于检查所需文件或目录、同步某些日志或在后台备份某些文件等任务,同时在前端完成品牌推广。毕竟,对于处理器来说,3-4秒是很长的时间。 - Mahesh Jamdade
2这个链接解释了如何实现它:https://flutter.dev/docs/development/ui/splash-screen/android-splash-screen - live-love
请参阅 Flutter 中深色和浅色模式的启动屏幕。 - Suragch
使用Flutter原生闪屏包,您将能够轻松完成此操作。这里有一个关于它的教程:https://youtu.be/GV19Hawgpeg - Tawanda Muzavazi
我为Flutter启动屏幕创建了一个教程,其中一个是不使用任何库的,另一个是使用库,即Flutter Native Splash,它们肯定会对你有所帮助。不使用任何库的教程:https://youtu.be/MCosWsD5yKc
使用Flutter Native Splash的教程:https://www.youtube.com/watch?v=GV19Hawgpeg - undefined
25个回答
5
有多种方法可以实现此操作,但我使用的最简单的方法是:
对于启动图标,我使用Flutter库Flutter Launcher Icon。
对于自定义闪屏界面,我创建不同的屏幕分辨率,然后根据Android的分辨率将闪屏图片添加到mipmap文件夹中。
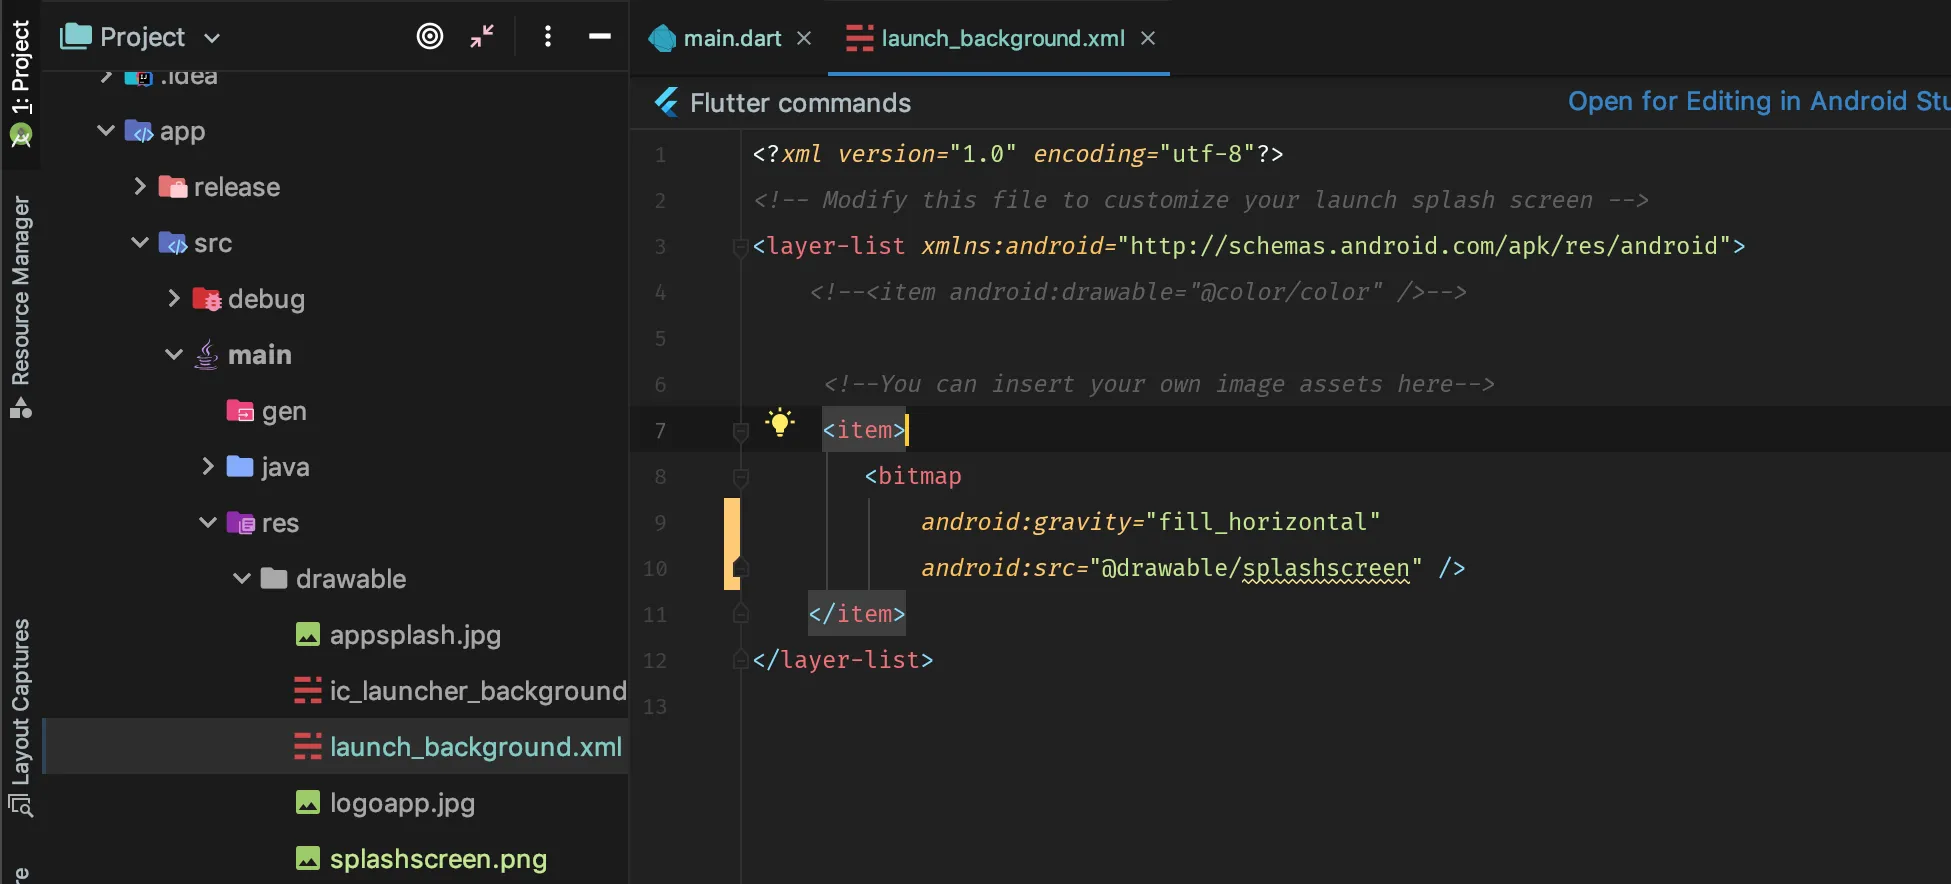
最后一步是调整Android中res文件夹中drawable文件夹中的launch_background.xml。
只需将您的代码更改为以下内容即可:
很少有开发人员将闪屏添加为drawable,我尝试过这样做,但在Flutter 1.0.0和Dart SDK 2.0+中构建失败。因此,我更喜欢将闪屏添加到位图部分。
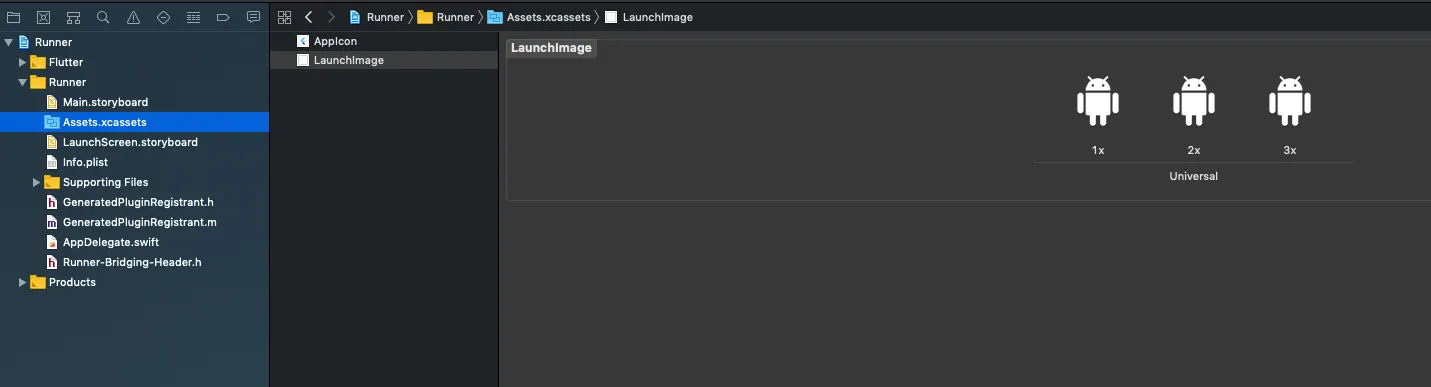
iOS启动画面的创建相对简单。在iOS的Runner文件夹中,只需使用与LaunchImage.png @2x、@3x、@4x相同名称的自定义Splash屏幕图像更新LaunchImage.png文件即可。
我觉得还是应该在LaunchImage.imageset中添加一张4倍大小的图片。只需在Content.json中更新以下代码,添加一个4倍缩放选项即可:
对于启动图标,我使用Flutter库Flutter Launcher Icon。
对于自定义闪屏界面,我创建不同的屏幕分辨率,然后根据Android的分辨率将闪屏图片添加到mipmap文件夹中。
最后一步是调整Android中res文件夹中drawable文件夹中的launch_background.xml。
只需将您的代码更改为以下内容即可:
<?xml version="1.0" encoding="utf-8"?>
<!-- Modify this file to customize your launch splash screen -->
<layer-list xmlns:android="http://schemas.android.com/apk/res/android">
    <!-- <item android:drawable="@android:color/white" />
    <item android:drawable="@drawable/<splashfilename>" />     --> -->

    <!-- You can insert your own image assets here -->
    <item>
        <bitmap
            android:gravity="center"
            android:src="@mipmap/<Your splash image name here as per the mipmap folder>"/>
    </item>
</layer-list>
很少有开发人员将闪屏添加为drawable,我尝试过这样做,但在Flutter 1.0.0和Dart SDK 2.0+中构建失败。因此,我更喜欢将闪屏添加到位图部分。
iOS启动画面的创建相对简单。在iOS的Runner文件夹中,只需使用与LaunchImage.png @2x、@3x、@4x相同名称的自定义Splash屏幕图像更新LaunchImage.png文件即可。
我觉得还是应该在LaunchImage.imageset中添加一张4倍大小的图片。只需在Content.json中更新以下代码,添加一个4倍缩放选项即可:
{
      "idiom" : "universal",
      "filename" : "LaunchImage@4x.png",
      "scale" : "4x"
    }
- Prashant Gupta
4
最简单的方法是使用flutter_native_splash包。
首先,将其添加到开发依赖项中:
dev_dependencies:
  flutter_native_splash: ^1.3.1 # make sure to us the latest version
现在,您可以根据自己的喜好配置启动画面:
     flutter_native_splash:

      android: true # show for android, you may set it to false
      ios: true # show for IOS, you may set it to false

      image: assets\logo.png # the default image for light and dark themes. Until now, images should be png images
      image_dark: aassets\logo_dark.png # It will override the 'image' in the dark mode

      color: "#ffffff" # the default color for light and dark themes
      color_dark: "#0a0a0a" # will override the 'color' in the dark mode

      android_gravity: fill # make the image fill the screen for android
      ios_content_mode: scaleAspectFill # make the image fill the screen for android
在执行完上述操作后,运行:
flutter clean && flutter pub get && flutter pub run flutter_native_splash:create
你会注意到 ".\android\app\src\main\res*" 已经改变并添加了新的启动画面。
- Mostafa Wael
4
Flutter提供了默认的启动屏幕,但是也有很多插件可以完成这个任务。如果你不想使用插件并担心添加新插件可能会影响应用程序的大小,则可以按照以下步骤进行操作。
对于Android
打开launch_background.xml,然后您可以放入您想要的闪屏图片或渐变颜色。这是用户打开应用程序时首先看到的东西。
对于IOS
使用Xcode打开您的应用程序,单击Runner > Assest.xcassets > LaunchImage,您可以在此处添加图像。如果您想编辑启动屏幕图像应该采取或看起来如何,您可以在LaunchScreen.storyboard上进行编辑。
- Abel Tilahun
4
添加以下类似的页面和路由可能会有所帮助。
如果你想跟进,请参见:
import 'dart:async';

import 'package:flutter/material.dart';
import 'package:flutkart/utils/flutkart.dart';
import 'package:flutkart/utils/my_navigator.dart';

class SplashScreen extends StatefulWidget {
  @override
  _SplashScreenState createState() => _SplashScreenState();
}

class _SplashScreenState extends State<SplashScreen> {
  @override
  void initState() {
    // TODO: implement initState
    super.initState();
    Timer(Duration(seconds: 5), () => MyNavigator.goToIntro(context));
  }

  @override
  Widget build(BuildContext context) {
    return Scaffold(
      body: Stack(
        fit: StackFit.expand,
        children: <Widget>[
          Container(
            decoration: BoxDecoration(color: Colors.redAccent),
          ),
          Column(
            mainAxisAlignment: MainAxisAlignment.start,
            children: <Widget>[
              Expanded(
                flex: 2,
                child: Container(
                  child: Column(
                    mainAxisAlignment: MainAxisAlignment.center,
                    children: <Widget>[
                      CircleAvatar(
                        backgroundColor: Colors.white,
                        radius: 50.0,
                        child: Icon(
                          Icons.shopping_cart,
                          color: Colors.greenAccent,
                          size: 50.0,
                        ),
                      ),
                      Padding(
                        padding: EdgeInsets.only(top: 10.0),
                      ),
                      Text(
                        Flutkart.name,
                        style: TextStyle(
                            color: Colors.white,
                            fontWeight: FontWeight.bold,
                            fontSize: 24.0),
                      )
                    ],
                  ),
                ),
              ),
              Expanded(
                flex: 1,
                child: Column(
                  mainAxisAlignment: MainAxisAlignment.center,
                  children: <Widget>[
                    CircularProgressIndicator(),
                    Padding(
                      padding: EdgeInsets.only(top: 20.0),
                    ),
                    Text(
                      Flutkart.store,
                      softWrap: true,
                      textAlign: TextAlign.center,
                      style: TextStyle(
                          fontWeight: FontWeight.bold,
                          fontSize: 18.0,
                          color: Colors.white),
                    )
                  ],
                ),
              )
            ],
          )
        ],
      ),
    );
  }
}
如果你想跟进,请参见:
- goops17
1
不是启动画面。这个页面上至少有5、6个答案显示了应用内的“第一个屏幕”,但是第一个屏幕是在实际的启动画面之后显示的,而问题是关于iOS和Android显示的启动(或加载)画面。 - n13
4
如果您想要一个次级闪屏(在原生闪屏之后),这里是一个简单的示例,可以使用:
class SplashPage extends StatelessWidget {
  SplashPage(BuildContext context) {
    Future.delayed(const Duration(seconds: 3), () {
      // Navigate here to next screen
    });
  }

  @override
  Widget build(BuildContext context) {
    return Text('Splash screen here');
  }
}
- david72
4
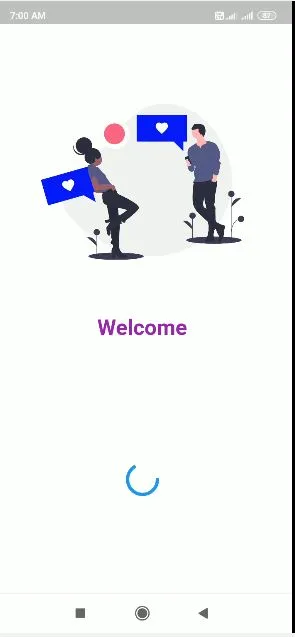
让你的App看起来像这样
=> 添加依赖
=> 导入 import 'package:splashscreen/splashscreen.dart';
import 'package:flutter/material.dart';
import 'package:splashscreen/splashscreen.dart';
import 'package:tic_tac_toe/HomePage.dart';
void main(){
  runApp(
    MaterialApp(
      darkTheme: ThemeData.dark(),
      debugShowCheckedModeBanner: false,
      home: new MyApp(),
    )
  );
}

class MyApp extends StatefulWidget {
  @override
  _MyAppState createState() => new _MyAppState();
}

class _MyAppState extends State<MyApp> {
  @override
  Widget build(BuildContext context) {
    return new SplashScreen(
      seconds: 6,
      navigateAfterSeconds: new HomePage(),
      title: new Text('Welcome',
      style: new TextStyle(
        fontWeight: FontWeight.bold,
        fontSize: 26.0,
        color: Colors.purple,
       ),
      ),
      image: Image.asset("images/pic9.png"),
      backgroundColor: Colors.white,
      photoSize: 150.0,
    );
  }
}
最终的屏幕输出将会是这样,您可以根据自己的需求更改第二个参数,圆圈将会是圆形的。
- Tushar Nikam
5
添加依赖项 => dynamic_theme: ^1.0.1 - Tushar Nikam
没有SplashScreen的导入。 - Tuss
是的,完全正确。有很多方法可以做到这一点,但在答案中,我将告诉您如何使用此软件包https://pub.dev/packages/dynamic_theme来添加启动画面。 - Tushar Nikam
但是您忘记写哪个依赖项必须在pubspec.yaml中。 - m123
添加依赖项 => dynamic_theme: ^1.0.1 - Tushar Nikam
3
Jaldhi Bhatt的代码对我无效。
Flutter报错'Navigator操作请求的上下文中不包含Navigator.'
我通过将Navigator consumer组件放在另一个使用路由初始化Navigator上下文的组件内来修复了代码,如这篇文章所述。
import 'dart:async';

import 'package:flutter/material.dart';
import 'package:my-app/view/main-view.dart';

class SplashView extends StatelessWidget {

  @override
  Widget build(BuildContext context) {
    return new MaterialApp(
        home: Builder(
          builder: (context) => new _SplashContent(),
        ),
        routes: <String, WidgetBuilder>{
          '/main': (BuildContext context) => new MainView()}
    );
  }
}

class _SplashContent extends StatefulWidget{

  @override
  _SplashContentState createState() => new _SplashContentState();
}

class _SplashContentState extends State<_SplashContent>
    with SingleTickerProviderStateMixin {

  var _iconAnimationController;
  var _iconAnimation;

  startTimeout() async {
    var duration = const Duration(seconds: 3);
    return new Timer(duration, handleTimeout);
  }

  void handleTimeout() {
    Navigator.pushReplacementNamed(context, "/main");
  }

  @override
  void initState() {
    super.initState();

    _iconAnimationController = new AnimationController(
        vsync: this, duration: new Duration(milliseconds: 2000));

    _iconAnimation = new CurvedAnimation(
        parent: _iconAnimationController, curve: Curves.easeIn);
    _iconAnimation.addListener(() => this.setState(() {}));

    _iconAnimationController.forward();

    startTimeout();
  }

  @override
  Widget build(BuildContext context) {
    return new Center(
        child: new Image(
          image: new AssetImage("images/logo.png"),
          width: _iconAnimation.value * 100,
          height: _iconAnimation.value * 100,
        )
    );
  }
}
- GiBi
1
3能否同时加上一些解释呢?单独的代码块并不是非常信息丰富。 - CertainPerformance
2
对于Android,请转到以下路径:
android > app > src > main > res > drawable > launcher_background.xml
默认代码是白色背景屏幕。像这样:
<!-- You can insert your own image assets here -->
 <item>
    <bitmap
        android:gravity="center"
        android:src="@mipmap/launch_image" />
</item>
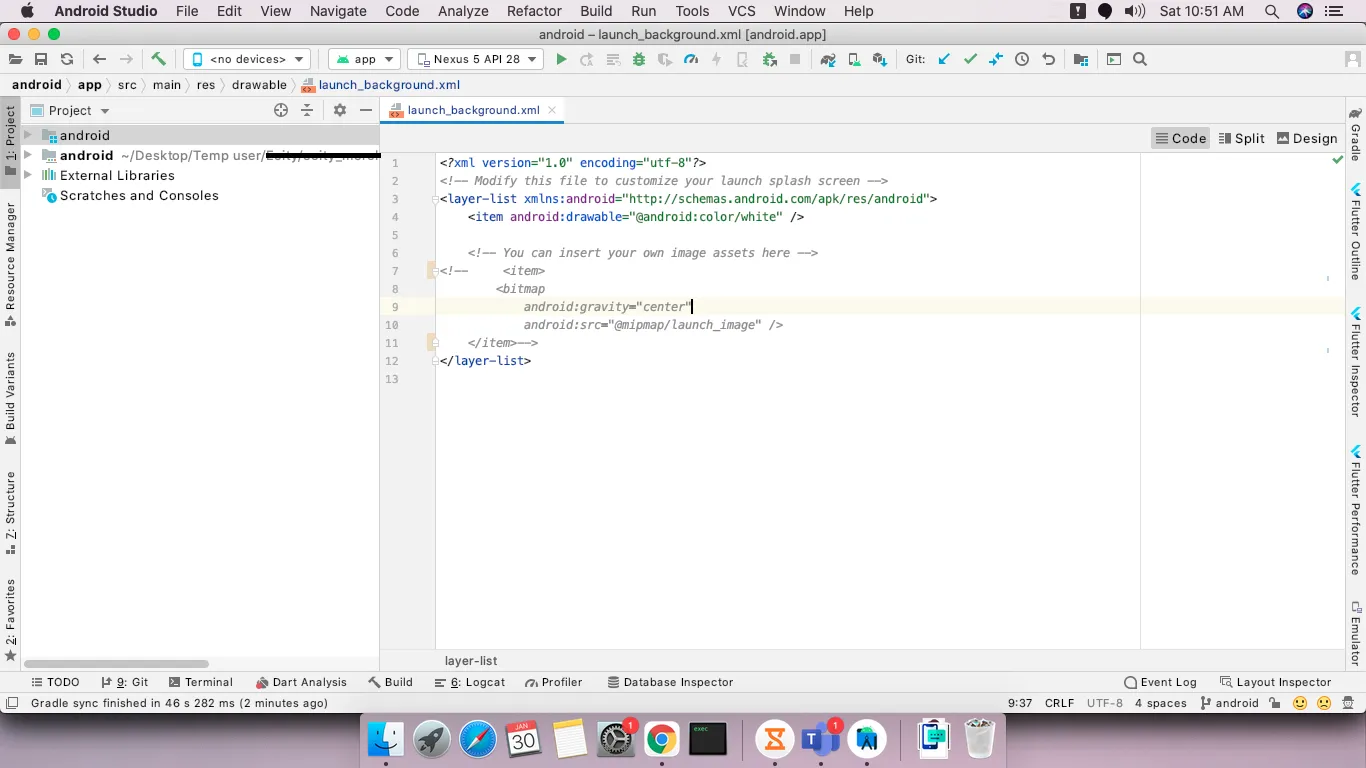 您可以更改其颜色或添加图标或任何自定义设计来修改它。有关更多自定义详细信息,请查看此Android页面。
针对iOS系统
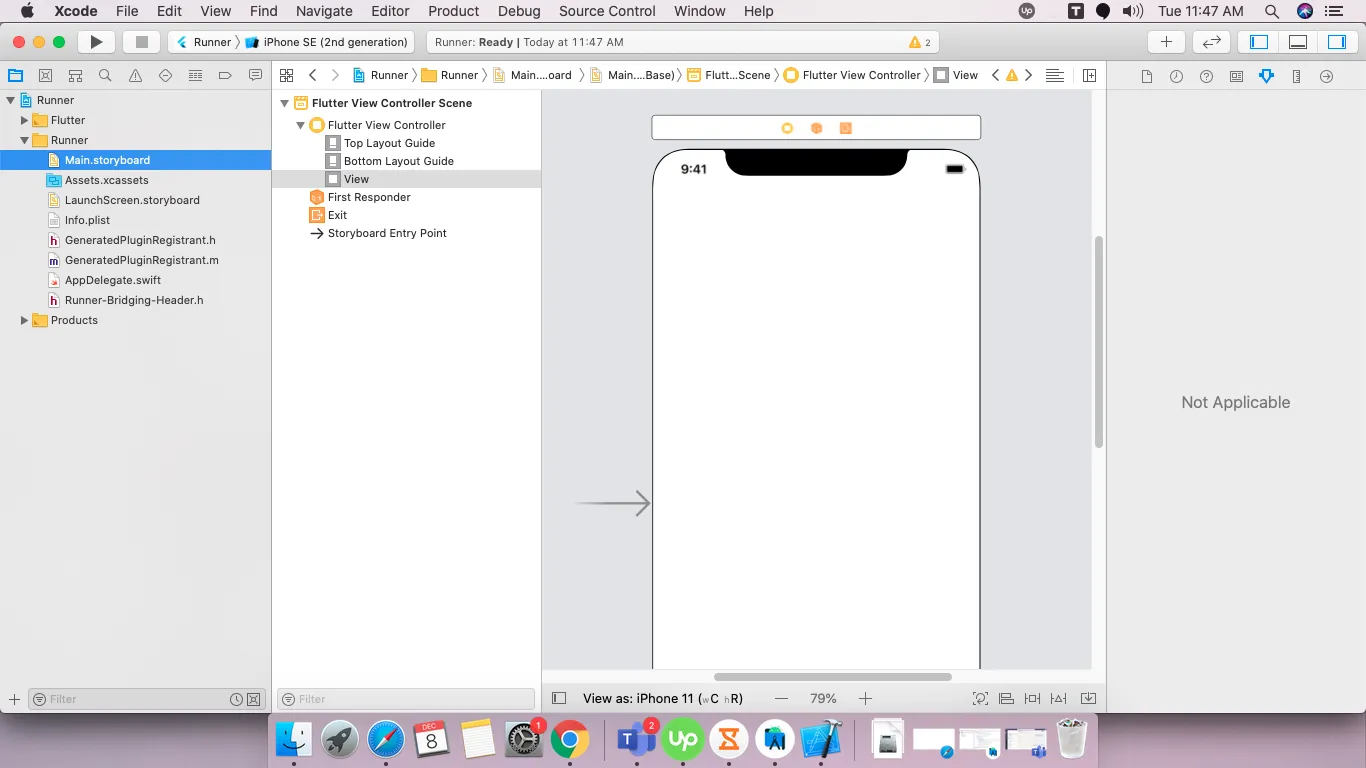
在Xcode中打开iOS项目。
选择Runner,然后进入Runner文件夹,你会看到Main.Storyboard文件,如下图所示:
默认情况下,它的颜色是白色,你可以根据自己的需求进行自定义或更改颜色。如果需要更多的自定义,请查看这个iOS链接。
- Shirsh Shukla
2
针对Android
应用程序 -> src -> main -> res -> drawble-> launch_background.xml
并取消注释像这样的注释块
<item>
  <bitmap
      android:gravity="center"
      android:src="@mipmap/launch_image" /></item>
是否有人在编写如下代码后遇到了错误:
在Android Studio中使用sync with system或invalidate cache and reset。这解决了我的问题。
在Flutter调试模式下,启动画面需要一些时间。构建后将会缩短,就像本机Android应用一样。
- lava
1
请更新您的答案以适用于v2和null-safety版本之前的代码。 - Esmaeil Ahmadipour
0
当我们需要在应用程序启动之前获取用户位置或其他数据时,我们可以在Flutter中使用自定义启动屏幕,这将使您的应用程序更加用户友好。
以下是代码示例:
import 'package:flutter/material.dart';
import 'package:bmi/HomePage.dart';
import 'dart:async';

main(){
  runApp(MyApp());
 }

 class MyApp extends StatelessWidget{
 @override
 Widget build(BuildContext context) {
    return SplashScreen();
 }
}

class SplashScreen extends StatefulWidget{
  @override
  State<StatefulWidget> createState() {
    return SplashScreenState();
  }
}

class SplashScreenState extends State<SplashScreen>{
  @override
  void initState() {
    super.initState();
    when we have to get data we can show splash
    Like this:-
    FutureMethodForData.then((value) {
       Navigator.push(
          context,
          MaterialPageRoute(
            builder: (context) => HomePage(),
          )
        );

    });
    Or we can show splash for fix duration like this:-
    Future.delayed(
      Duration(
        seconds: 4
      ),
      (){
        Navigator.push(
          context,
          MaterialPageRoute(
            builder: (context) => HomePage(),
          )
        );
      }
  );
}
@override
Widget build(BuildContext context) {
  return MaterialApp(
    home: Scaffold(
      backgroundColor: Colors.red,
      body: // add image text or whatever you want as splash
    ),
  );
}
}
- Dipak Ramoliya
网页内容由stack overflow 提供, 点击上面的可以查看英文原文,
原文链接
原文链接