安卓设计支持库次级抽屉菜单

12
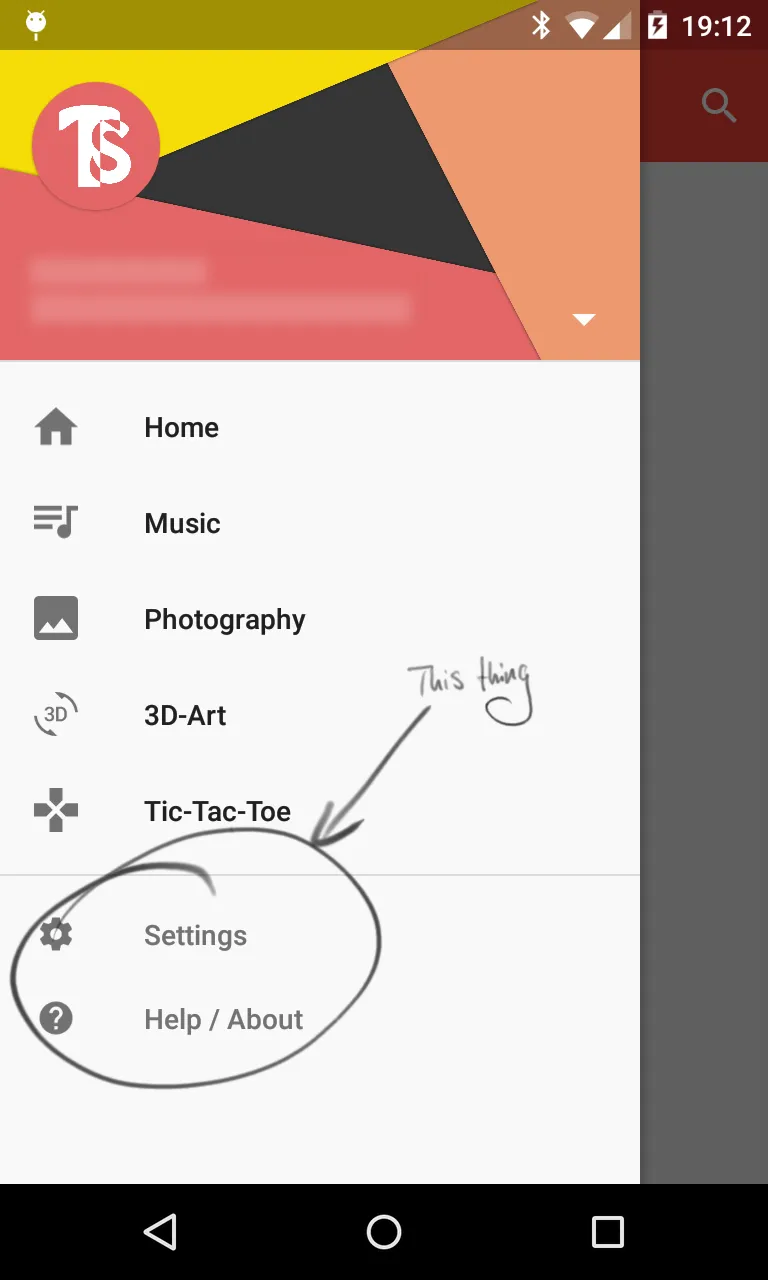
我已切换到官方的Google设计支持库。我想使用一个带有分隔符的次级菜单,就像这样:

Secondary Menu Screenshot

但是由于Android使用菜单充气器,现在我不知道该怎么做了。 我可以添加第二个组,但是这些项具有相同的大小且没有分隔符。

drawer.xml:

<?xml version="1.0" encoding="utf-8"?>
<menu xmlns:android="http://schemas.android.com/apk/res/android">

    <group android:checkableBehavior="single">

        <item
            android:id="@+id/overview"
            android:checked="true"
            android:icon="@drawable/ic_action_dashboard"
            android:title="@string/drawer_overview" />

        <item
            android:id="@+id/social_evening"
            android:checked="false"
            android:icon="@drawable/ic_action_brightness_3"
            android:title="@string/drawer_social_evening" />

        <item
            android:id="@+id/scouting_games"
            android:checked="false"
            android:icon="@drawable/ic_action_landscape"
            android:title="@string/drawer_scouting_games" />

        <item
            android:id="@+id/olympics"
            android:checked="false"
            android:icon="@drawable/ic_action_stars"
            android:title="@string/drawer_olympics" />


        <item
            android:id="@+id/quizzes"
            android:checked="false"
            android:icon="@drawable/ic_action_school"
            android:title="@string/drawer_quizzes" />

    </group>
</menu>

MainActivity.java:

package net.sutomaji.freizeitspiele;

import android.os.Bundle;
import android.support.design.widget.NavigationView;
import android.support.v4.app.FragmentTransaction;
import android.support.v4.widget.DrawerLayout;
import android.support.v7.app.ActionBarDrawerToggle;
import android.support.v7.app.AppCompatActivity;
import android.support.v7.widget.Toolbar;
import android.view.Menu;
import android.view.MenuItem;
import android.view.View;
import android.widget.Toast;

/**
 * Created by Tom Schneider on 18.06.15
 */

public class MainActivity extends AppCompatActivity {

    //Defining Variables
    private Toolbar toolbar;
    private NavigationView navigationView;
    private DrawerLayout drawerLayout;

    @Override
    protected void onCreate(Bundle savedInstanceState) {
        super.onCreate(savedInstanceState);
        setContentView(R.layout.activity_main);

        // Initializing Toolbar and setting it as the actionbar
        toolbar = (Toolbar) findViewById(R.id.toolbar);
        setSupportActionBar(toolbar);

        //Initializing NavigationView
        navigationView = (NavigationView) findViewById(R.id.navigation_view);

        //Setting Navigation View Item Selected Listener to handle the item click of the navigation menu
        navigationView.setNavigationItemSelectedListener(new NavigationView.OnNavigationItemSelectedListener() {

            // This method will trigger on item Click of navigation menu
            @Override
            public boolean onNavigationItemSelected(MenuItem menuItem) {


                //Checking if the item is in checked state or not, if not make it in checked state
                if(menuItem.isChecked()) menuItem.setChecked(false);
                else menuItem.setChecked(true);Q

                //Closing drawer on item click
                drawerLayout.closeDrawers();

                //Check to see which item was being clicked and perform appropriate action
                switch (menuItem.getItemId()){


                    //Replacing the main content with ContentFragment Which is our Inbox View;
                    case R.id.overview:
                        Toast.makeText(getApplicationContext(), "Overview Selected", Toast.LENGTH_SHORT).show();
                        ContentFragment fragment = new ContentFragment();
                        FragmentTransaction fragmentTransaction = getSupportFragmentManager().beginTransaction();
                        fragmentTransaction.replace(R.id.frame,fragment);
                        fragmentTransaction.commit();
                        return true;

                    // For rest of the options we just show a toast on click

                    case R.id.social_evening:
                        Toast.makeText(getApplicationContext(),"SE Selected",Toast.LENGTH_SHORT).show();
                        return true;
                    case R.id.scouting_games:
                        Toast.makeText(getApplicationContext(),"SG Selected",Toast.LENGTH_SHORT).show();
                        return true;
                    case R.id.olympics:
                        Toast.makeText(getApplicationContext(),"OL Selected",Toast.LENGTH_SHORT).show();
                        return true;
                    case R.id.quizzes:
                        Toast.makeText(getApplicationContext(),"QZ Selected",Toast.LENGTH_SHORT).show();
                        return true;
                    default:
                        Toast.makeText(getApplicationContext(),"Somethings Wrong",Toast.LENGTH_SHORT).show();
                        return true;

                }
            }
        });

        // Initializing Drawer Layout and ActionBarToggle
        drawerLayout = (DrawerLayout) findViewById(R.id.drawer);
        ActionBarDrawerToggle actionBarDrawerToggle = new ActionBarDrawerToggle(this,drawerLayout,toolbar,R.string.openDrawer, R.string.closeDrawer){

            @Override
            public void onDrawerClosed(View drawerView) {
                // Code here will be triggered once the drawer closes as we dont want anything to happen so we leave this blank
                super.onDrawerClosed(drawerView);
            }

            @Override
            public void onDrawerOpened(View drawerView) {
                // Code here will be triggered once the drawer open as we dont want anything to happen so we leave this blank

                super.onDrawerOpened(drawerView);
            }
        };

        //Setting the actionbarToggle to drawer layout
        drawerLayout.setDrawerListener(actionBarDrawerToggle);

        //calling sync state is necessay or else your hamburger icon wont show up
        actionBarDrawerToggle.syncState();


    }

    @Override
    public boolean onCreateOptionsMenu(Menu menu) {
        // Inflate the menu; this adds items to the action bar if it is present.
        getMenuInflater().inflate(R.menu.menu_main, menu);
        return true;
    }

    @Override
    public boolean onOptionsItemSelected(MenuItem item) {
        // Handle action bar item clicks here. The action bar will
        // automatically handle clicks on the Home/Up button, so long
        // as you specify a parent activity in AndroidManifest.xml.
        int id = item.getItemId();

        //noinspection SimplifiableIfStatement
        if (id == R.id.action_settings) {
            return true;
        }

        return super.onOptionsItemSelected(item);
    }
}

那么,我该如何创建类似这样的菜单?或者,我该如何在我的导航抽屉中添加分隔符(带有类别标题)?

4个回答

19
您可以使用标准的NavigationView来定义菜单,例如:
<menu xmlns:android="http://schemas.android.com/apk/res/android">

    <group android:id="@+id/group1" android:checkableBehavior="single" id>
       //items of group1
    </group>

    <group android:id="@+id/group2" android:checkableBehavior="single" id>
       //items of group2
    </group>

为每个组分配唯一的标识符非常重要。


2
教程:导航视图设计支持库 菜单项:
<?xml version="1.0" encoding="utf-8"?>
<menu xmlns:android="http://schemas.android.com/apk/res/android">

    <group android:checkableBehavior="single">
        <item
            android:id="@+id/navigation_item_attachment"
            android:checked="true"
            android:icon="@drawable/ic_attachment"
            android:title="@string/nav_item_attachment" />
        <item
            android:id="@+id/navigation_item_images"
            android:icon="@drawable/ic_image"
            android:title="@string/nav_item_images" />
        <item
            android:id="@+id/navigation_item_location"
            android:icon="@drawable/ic_place"
            android:title="@string/nav_item_location" />
    </group>

    <item android:title="@string/nav_sub_menu">
        <menu>
            <item
                android:icon="@drawable/ic_emoticon"
                android:title="@string/nav_sub_menu_item01" />
            <item
                android:icon="@drawable/ic_emoticon"
                android:title="@string/nav_sub_menu_item02" />
        </menu>
    </item>

</menu>

0

这就是你所寻找的正是:

<?xml version="1.0" encoding="utf-8"?>
<menu xmlns:android="http://schemas.android.com/apk/res/android">

    <group android:checkableBehavior="single">

        <item
            android:id="@+id/Home"
            android:checked="false"
            android:icon="@drawable/ic_home"
            android:title="@string/homestr" />
        <item
            android:id="@+id/myacc"
            android:checked="false"
            android:icon="@drawable/ic_account"
            android:title="@string/myaccstr" />
        <item
            android:id="@+id/popular"
            android:checked="false"
            android:icon="@drawable/ic_star"
            android:title="@string/Popularstr" />

        <item
            android:id="@+id/newsit"
            android:checked="false"
            android:icon="@drawable/ic_news"
            android:title="@string/newsstr" />


        <item android:title="@string/gn">
            <menu>
                <item
                    android:id="@+id/settings"
                    android:checked="false"
                    android:icon="@drawable/ic_setting"
                    android:title="@string/action_settings" />
                <item
                    android:id="@+id/help"
                    android:checked="false"
                    android:icon="@drawable/ic_help"
                    android:title="@string/helpstr" />

            </menu>
        </item>
    </group>
</menu>

-1

您可以使用任何ViewGroup,例如LinearLayout作为抽屉的容器。它不仅限于ListView和FrameLayout。因此,您可以像Activity的任何其他布局一样为Drawer View设置样式。唯一需要记住的是NavigationDrawer只能有两个子元素。第一个是Activity的布局,第二个是抽屉。请随意根据您的喜好进行样式设置!

<android.support.v4.widget.DrawerLayout
    xmlns:android="http://schemas.android.com/apk/res/android"
    android:id="@+id/drawer_layout"
    android:layout_width="match_parent"
    android:layout_height="match_parent">

<FrameLayout
    android:id="@+id/content_frame"
    android:layout_width="match_parent"
    android:layout_height="match_parent" />

<!-- YOUR DRAWER -->
<LinearLayout
    android:id="@+id/drawer_view"
    android:layout_width="240dp"
    android:layout_height="match_parent"
    android:orientation="vertical"
    android:layout_gravity="start">

    <!-- Use any Views you like -->
    <ListView
        android:id="@+id/left_drawer"
        android:layout_width="match_parent"
        android:layout_height="match_parent"
        android:choiceMode="singleChoice"
        android:divider="@android:color/transparent"
        android:dividerHeight="0dp"
        android:background="#ffffff"/>
</LinearLayout>
</android.support.v4.widget.DrawerLayout>

用于除数

android:divider="#FFFFFF"
android:dividerHeight="1dp"

这个问题针对使用NavigationView并从资源文件中填充菜单。 - akohout

网页内容由stack overflow 提供, 点击上面的
可以查看英文原文,
原文链接