Python/OpenCV中的对比度拉伸

9
通过在Google中搜索 Histogram Equalization PythonContrast Stretching Python ,我被引导到了Python文档中有关 OpenCv 的同一链接,实际上两者都与均衡化有关,而不是拉伸(在我看来)。
  1. http://docs.opencv.org/2.4/doc/tutorials/imgproc/histograms/histogram_equalization/histogram_equalization.html

  2. http://docs.opencv.org/3.2.0/d5/daf/tutorial_py_histogram_equalization.html

阅读文档,似乎文字上存在混淆,因为它将均衡化描述为一种拉伸操作:

直方图均衡化的作用是拉伸这个范围。

所以你需要将这个直方图拉伸到两端(如下图所示,来自维基百科),这就是直方图均衡化的作用(简单地说)

我认为这是错误的,因为在维基百科上并没有说直方图均衡化意味着拉伸,而阅读其他资料进行比较它们明确区分了这两个操作。
  1. http://homepages.inf.ed.ac.uk/rbf/HIPR2/histeq.htm
  2. http://homepages.inf.ed.ac.uk/rbf/HIPR2/stretch.htm
我的问题
  1. OpenCV文档是否实际上实现了直方图均衡化,并且有些解释不当?

    1. 在Python中是否存在对比度拉伸的实现?(OpenCV等)

我想你的意思是“对比度拉伸”。 - Jeru Luke
1
请查看此网页,了解这两个术语的含义... - Jeru Luke
@JeruLuke,非常感谢,我确实是指对比度拉伸!我会编辑问题。 - RMS
你可以使用Python的Wand或Python Skimage来完成。例如,请参见http://scikit-image.org/docs/dev/api/skimage.exposure.html#skimage.exposure.rescale_intensity,或者请参见http://docs.wand-py.org/en/0.5.1/wand/image.html中的contrast_stretch。 - fmw42
4个回答

14

OpenCV没有对比度拉伸的功能,使用谷歌搜索也得到相同的结果,因为直方图均衡化确实会水平扩展直方图,但只是转换函数的不同。两种方法都可以增加图像的对比度。转换函数将像素强度级从给定范围转移到所需范围。

直方图均衡化从给定图像的概率密度函数(PDF)自动导出转换函数(TF),而在对比度拉伸中,您根据应用程序的要求指定自己的TF。

一种简单的TF可以通过 min-max 对比度拉伸来实现:

((pixel – min) / (max – min))*255.

您需要对每个像素值执行此操作。其中min和max是最小和最大强度。


8
您还可以使用cv2.LUT通过创建自定义表格来进行对比度拉伸,使用np.interp。关于它们的文档链接分别是thisthis。下面是一个示例。
import cv2
import numpy as np

img = cv2.imread('messi.jpg')
original = img.copy()
xp = [0, 64, 128, 192, 255]
fp = [0, 16, 128, 240, 255]
x = np.arange(256)
table = np.interp(x, xp, fp).astype('uint8')
img = cv2.LUT(img, table)
cv2.imshow("original", original)
cv2.imshow("Output", img)
cv2.waitKey(0)
cv2.destroyAllWindows() 

创建的表

[  0   0   0   0   1   1   1   1   2   2   2   2   3   3   3   3   4   4
   4   4   5   5   5   5   6   6   6   6   7   7   7   7   8   8   8   8
   9   9   9   9  10  10  10  10  11  11  11  11  12  12  12  12  13  13
  13  13  14  14  14  14  15  15  15  15  16  17  19  21  23  24  26  28
  30  31  33  35  37  38  40  42  44  45  47  49  51  52  54  56  58  59
  61  63  65  66  68  70  72  73  75  77  79  80  82  84  86  87  89  91
  93  94  96  98 100 101 103 105 107 108 110 112 114 115 117 119 121 122
 124 126 128 129 131 133 135 136 138 140 142 143 145 147 149 150 152 154
 156 157 159 161 163 164 166 168 170 171 173 175 177 178 180 182 184 185
 187 189 191 192 194 196 198 199 201 203 205 206 208 210 212 213 215 217
 219 220 222 224 226 227 229 231 233 234 236 238 240 240 240 240 240 241
 241 241 241 242 242 242 242 243 243 243 243 244 244 244 244 245 245 245
 245 245 246 246 246 246 247 247 247 247 248 248 248 248 249 249 249 249
 250 250 250 250 250 251 251 251 251 252 252 252 252 253 253 253 253 254
 254 254 254 255]

现在,cv2.LUT将使用表格中的值替换原始图像的值。例如,所有值为1的像素将被0替换,而所有值为4的像素将被1替换。
原始图像

Original

对比度拉伸图像

enter image description here

可以变化xpfp的值来创建所需的自定义表格,即使最小和最大像素为0和255,也会拉伸对比度,这与hashcode55提供的答案不同。


4
Python/OpenCV可以通过使用min_max标准化的cv2.normalize()方法对图像进行对比度拉伸。例如:
输入:

enter image description here

#!/bin/python3.7

import cv2
import numpy as np

# read image
img = cv2.imread("zelda3_bm20_cm20.jpg", cv2.IMREAD_COLOR)

# normalize float versions
norm_img1 = cv2.normalize(img, None, alpha=0, beta=1, norm_type=cv2.NORM_MINMAX, dtype=cv2.CV_32F)
norm_img2 = cv2.normalize(img, None, alpha=0, beta=1.2, norm_type=cv2.NORM_MINMAX, dtype=cv2.CV_32F)

# scale to uint8
norm_img1 = (255*norm_img1).astype(np.uint8)
norm_img2 = np.clip(norm_img2, 0, 1)
norm_img2 = (255*norm_img2).astype(np.uint8)

# write normalized output images
cv2.imwrite("zelda1_bm20_cm20_normalize1.jpg",norm_img1)
cv2.imwrite("zelda1_bm20_cm20_normalize2.jpg",norm_img2)

# display input and both output images
cv2.imshow('original',img)
cv2.imshow('normalized1',norm_img1)
cv2.imshow('normalized2',norm_img2)
cv2.waitKey(0)
cv2.destroyAllWindows()


规范化1:

enter image description here

规范化2:

enter image description here

你也可以使用简单的线性方程进行自定义拉伸,使用形式为y=A*x+B的2对输入/输出值,并解决两个联立方程。请参见如何使一张图片的渐变外观与另一张相等?中展示的拉伸概念。

1

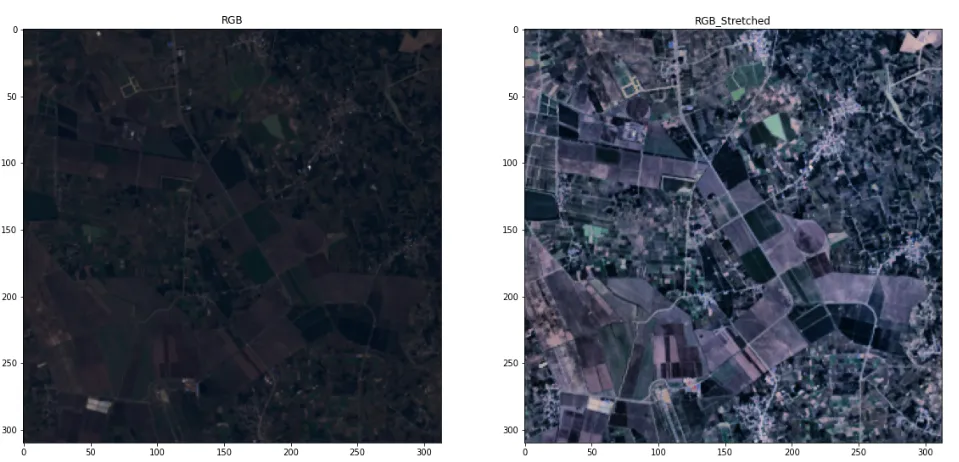
好的,我写了一个函数,它可以对图像的每个波段进行标准差对比度拉伸。

对于正态分布,68% 的观测值位于平均值的一倍标准差内,95.4% 的观测值位于两倍标准差内,99.73% 的观测值位于三倍标准差内。

这基本上是一个最小-最大拉伸,但最大值为 mean+sigma*std,最小值为 mean-sigma*std

def stretch(img,sigma =3,plot_hist=False):
    stretched = np.zeros(img.shape) 
    for i in range(img.shape[2]):  #looping through the bands
        band = img[:,:,i] # copiying each band into the variable `band`
        if np.min(band)<0: # if the min is less that zero, first we add min to all pixels so min becomes 0
            band = band + np.abs(np.min(band)) 
        band = band / np.max(band)
        band = band * 255 # convertaning values to 0-255 range
        if plot_hist:
            plt.hist(band.ravel(), bins=256) #calculating histogram
            plt.show()
        # plt.imshow(band)
        # plt.show()
        std = np.std(band)
        mean = np.mean(band)
        max = mean+(sigma*std)
        min = mean-(sigma*std)
        band = (band-min)/(max-min)
        band = band * 255
        # this streching cuases the values less than `mean-simga*std` to become negative
        # and values greater than `mean+simga*std` to become more than 255
        # so we clip the values ls 0 and gt 255
        band[band>255]=255  
        band[band<0]=0
        print('band',i,np.min(band),np.mean(band),np.std(band),np.max(band))
        if plot_hist:
            plt.hist(band.ravel(), bins=256) #calculating histogram
            plt.show()
        stretched[:,:,i] = band
    
    
stretched = stretched.astype('int')
return stretched

在上述情况下,我不需要保持波段比率不变,但对于RGB图像的最佳实践应该是这样的:https://docs.opencv.org/4.x/d5/daf/tutorial_py_histogram_equalization.html 不幸的是,这种CLAHE拉伸不适用于多波段图像,因此应分别应用于每个波段 - 这会导致对比度丢失并且图像倾向于灰色。我们需要做的是:将图像转换为HSV颜色空间并拉伸V(值 - 强度)并保留其余部分。这就是我们如何获得良好的拉伸效果(双关语)。
关于cv.COLOR_HSV2RGB的问题在于它实际上返回BGR而不是RGB,因此在HSV2RGB之后,我们需要反转波段。
以下是我编写的函数:
def stack_3_channel(r,g,b , clipLimit = 20 ,  tileGridSize=(16,16) ):
  
  img = np.stack([r,g,b], axis=2)
  img = cv.normalize(img, None, 0, 255, cv.NORM_MINMAX, dtype=cv.CV_8U)

  hsv_img = cv.cvtColor(img, cv.COLOR_BGR2HSV)
  h, s, v = hsv_img[:,:,0], hsv_img[:,:,1], hsv_img[:,:,2]


  clahe = cv.createCLAHE(clipLimit, tileGridSize)
  v = clahe.apply(v) #stretched histogram for showing the image with better contrast - its not ok to use it for scientific calculations

  hsv_img = np.dstack((h,s,v))

  # NOTE: HSV2RGB returns BGR instead of RGB
  bgr_stretched = cv.cvtColor(hsv_img, cv.COLOR_HSV2RGB)

  #reversing the bands back to RGB
  rgb_stretched = np.zeros(bgr_stretched.shape)
  rgb_stretched[:,:,0] = bgr_stretched[:,:,2]
  rgb_stretched[:,:,1] = bgr_stretched[:,:,1]
  rgb_stretched[:,:,2] = bgr_stretched[:,:,0]

  # if the valuse are float, plt will have problem showing them
  rgb_stretched = rgb_stretched.astype('uint8')

  return img , rgb_stretched

image after histogram stretching


摆脱那些代码。你的作业互相覆盖,使得某些数组创建完全没有意义。你不能像那样“将每个乐队复制到变量 `band`”请仔细查看 numpy 的工作原理。 - Christoph Rackwitz
1
@ChristophRackwitz 感谢您的评论,但我并没有完全理解您的观点。您是指有更Pythonic的方法来做这件事吗?还是说这是一个资源问题?因为我正在尝试的是将原始图像的一段复制到变量“band”中以进行拉伸和绘制其直方图,然后将其保存为变量“stretched”的一段,并且在下一个循环中覆盖“band”以在下一个波段上执行相同的操作。由于我是在高光谱图像的PCA产品上使用它,所以波段比例的变化对我来说不是问题。谢谢。 - moien rangzan
band = np.zeros...; band = img[:,:,1] np.zeros创建的数组立即被丢弃了。你明白吗? - Christoph Rackwitz
@ChristophRackwitz 谢谢,你说得对!这是因为在我的代码中我使用掩码来填充带band[mask]=img[:,:,i][mask],所以我需要先创建带变量,但是谢谢你,我会编辑代码。 - moien rangzan

网页内容由stack overflow 提供, 点击上面的
可以查看英文原文,
原文链接