如何在Material UI表格中悬停在行上时,在列单元格中显示编辑按钮?

6

目前我的表格视图如下: Mui Table 表中有一个名为'Action'的列,其中包含编辑图标按钮。 现在我想在用户悬停在表行上时仅显示(可见性)编辑图标来编辑每一行。 我尝试覆盖Material Table的MUITable主题,但以下代码无效。有谁能帮帮我吗?

const getMuiTheme = () => createMuiTheme({
  overrides: {
    MUIDataTableBodyCell: {
      root: {
        '&:last-child': {
          visibility: 'hidden'
        }
      }
    },
    MuiTableRow: {
      root: {
        '&$hover:hover': {
          '& .MUIDataTableBodyCell-root': {
            '&:last-child': {
              visibility: 'visible'
            }

          }
        }

      }
    }
  }
});
5个回答

4
我根据管理员的评论修改了我的原始答案:
我修改了ShinaBR2 答案,以便它只显示当前行中的文本:https://codesandbox.io/s/material-ui-table-onhover-action-zfloy?file=/demo.js 这个想法是在鼠标进入(或悬停)时使用行id与当前行进行比较,以显示行中的元素。
export default function SimpleTable() {
  const classes = useStyles();
  const [showActionId, setShowActionId] = useState(-1);

  return (
    <TableContainer component={Paper}>
      <Table className={classes.table} aria-label="simple table">
        <TableHead>
          <TableRow>
            <TableCell>Dessert (100g serving)</TableCell>
            <TableCell align="right">Calories</TableCell>
            <TableCell align="right">Fat&nbsp;(g)</TableCell>
            <TableCell align="right">Action</TableCell>
          </TableRow>
        </TableHead>
        <TableBody>
          {rows.map((row) => (
            <TableRow
              key={row.name}
              onMouseEnter={() => {
                setShowActionId(row.id);               // set id here
              }}
              onMouseLeave={() => setShowActionId(-1)}
            >
              <TableCell component="th" scope="row">
                {row.name}
              </TableCell>
              <TableCell align="right">{row.calories}</TableCell>
              <TableCell align="right">{row.fat}</TableCell>
              <TableCell align="right">
                {row.id === showActionId ? "Show me" : ""}       // check the id here and display the message
              </TableCell>
            </TableRow>
          ))}
        </TableBody>
      </Table>
    </TableContainer>
  );
}

3
这是一个示例:https://codesandbox.io/s/material-demo-hr3te?file=/demo.js,与此相关的内容如下:
基本上我做了以下几件事情:
  • 添加了新的状态以存储一个布尔变量,用于确定何时显示/隐藏组件。
  • TableRow组件添加了onMouseEnteronMouseLeave,用于悬停效果。
  • 然后根据上面的悬停事件设置状态。
就是这样!

2
你需要在列数组中添加一个动作列,像下面这样:
const columns = [
        {
            name: 'id',
            label: 'id',
            options: {
                sort: false,
                viewColumns: false,
                display: false,
                filter: false
            }
        },
        {
            name: 'transportationBranch',
            label: 'Transportation Branch',
            options: {
                sort: false,
                viewColumns: false
            }
        },
        {
            name: 'charge',
            label: 'Charge',
            options: {
                filter: false,
                sort: false
            }
        },
        {
            name: 'tax',
            label: 'Tax',
            options: {
                filter: false,
                sort: false
            }
        },
        {
            name: '',
            label: '',
            options: {
                filter: false,
                sort: false,
                viewColumns: false,
                customBodyRender: (value, tableMeta, updateValue) => {
                    return (
                        <IconButton
                            id={'Edit-' + tableMeta.rowIndex}
                            style={{display: 'none'}}
                            component="button"
                            variant="body2"
                            onClick={(event) => {
                                console.log(event);
                                alert(tableMeta.rowIndex);
                            }}
                        >
                            <EditIcon />
                        </IconButton>
                    );
                }
            }
        }
    ];

将以下选项添加到mui数据表选项中:
setRowProps: (row, dataIndex, rowIndex) => {
            return {
                onMouseEnter: (e) => handleRowHover(e, row, rowIndex),
                onMouseLeave: (e) => handleRowHoverLeave(e, row, rowIndex)
            };
        },

在你的组件中编写这两个事件:
function handleRowHover(event, row, rowIndex) {
        let control = document.getElementById('Edit-' + rowIndex);
        control.style.display = 'block';
    }

    function handleRowHoverLeave(event, row, rowIndex) {
        let control = document.getElementById('Edit-' + rowIndex);
        control.style.display = 'none';
    }

注意:我们在IconButton中使用了id={'Edit-' + tableMeta.rowIndex},以便我们可以在两个事件中使用getElementById。
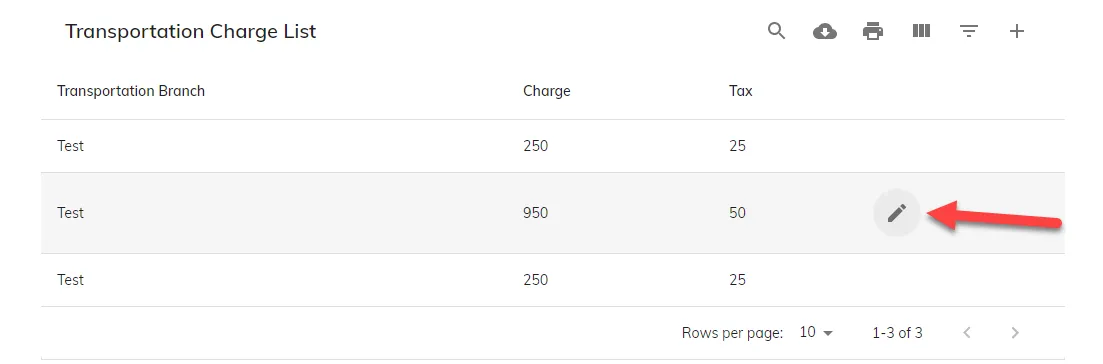
如果您能正确实现这一点,那么您将在浏览器上看到这种类型的用户界面:

enter image description here


1

其中一种方法是使用CSS in JS代码,我们默认将图标隐藏(在makeStyles中使用hiddePin),然后使用“&:hover $clearHidden”在悬停时将“hidden”更改为“visible”。

以下代码已经过验证。我的地方无法很好地使用CodeSandBox(网络问题),所以我只在这里展示代码。

  const useStyles = makeStyles({
  table: {
    minWidth: 350,
  },
  root: {
    "&:hover $clearHidden": {
      visibility: "visible"
    }
  },
  clearHidden: {},
  hiddePin: {
    visibility: "hidden"
  }

});

return (
    
      <Table className={classes.table} aria-label="simple table">
        <TableHead>
          <TableRow>
            <TableCell>name</TableCell>
            <TableCell align="center">desc</TableCell>
            <TableCell align="center">title2</TableCell>
          </TableRow>
        </TableHead>
        <TableBody>
          {rows.map((row) => (
            <TableRow key={row.name} hover={true}>
              <TableCell component="th" scope="row">
                {row.name}
              </TableCell>
              <TableCell align="center">{row.desc}</TableCell>

              <TableCell align="center" className={classes.root} >
                <IconButton size="small" className={clsx(classes.hiddePin, classes.clearHidden)} onClick={(event) => handlePinClick(event,row.stamp)}>
                    <SvgPinOutLine />
                </IconButton>
              </TableCell>
            </TableRow>
          ))}
        </TableBody>
      </Table>

  );

0
为了仅在鼠标悬停在行上时显示操作,我添加了以下useState对象。
  const [showAction, setShowAction] = React.useState(false);
  const [showId, setShowId] = React.useState(0);

然后在行对象中

 onMouseEnter={() => {
                     setShowAction(true);
                     setShowId(row.id);}
              }
 onMouseLeave={() => setShowAction(false)}

然后在显示操作的特定单元格中:

{row.id == showId && showAction ? (
<IconButton>
   <DeleteIcon/>
</IconButton>
) : (
<Box></Box>)}

希望这能帮到某个人!


网页内容由stack overflow 提供, 点击上面的
可以查看英文原文,
原文链接