使Recyclerview具有固定高度和滚动功能

9
解决方案请查看下面的答案...
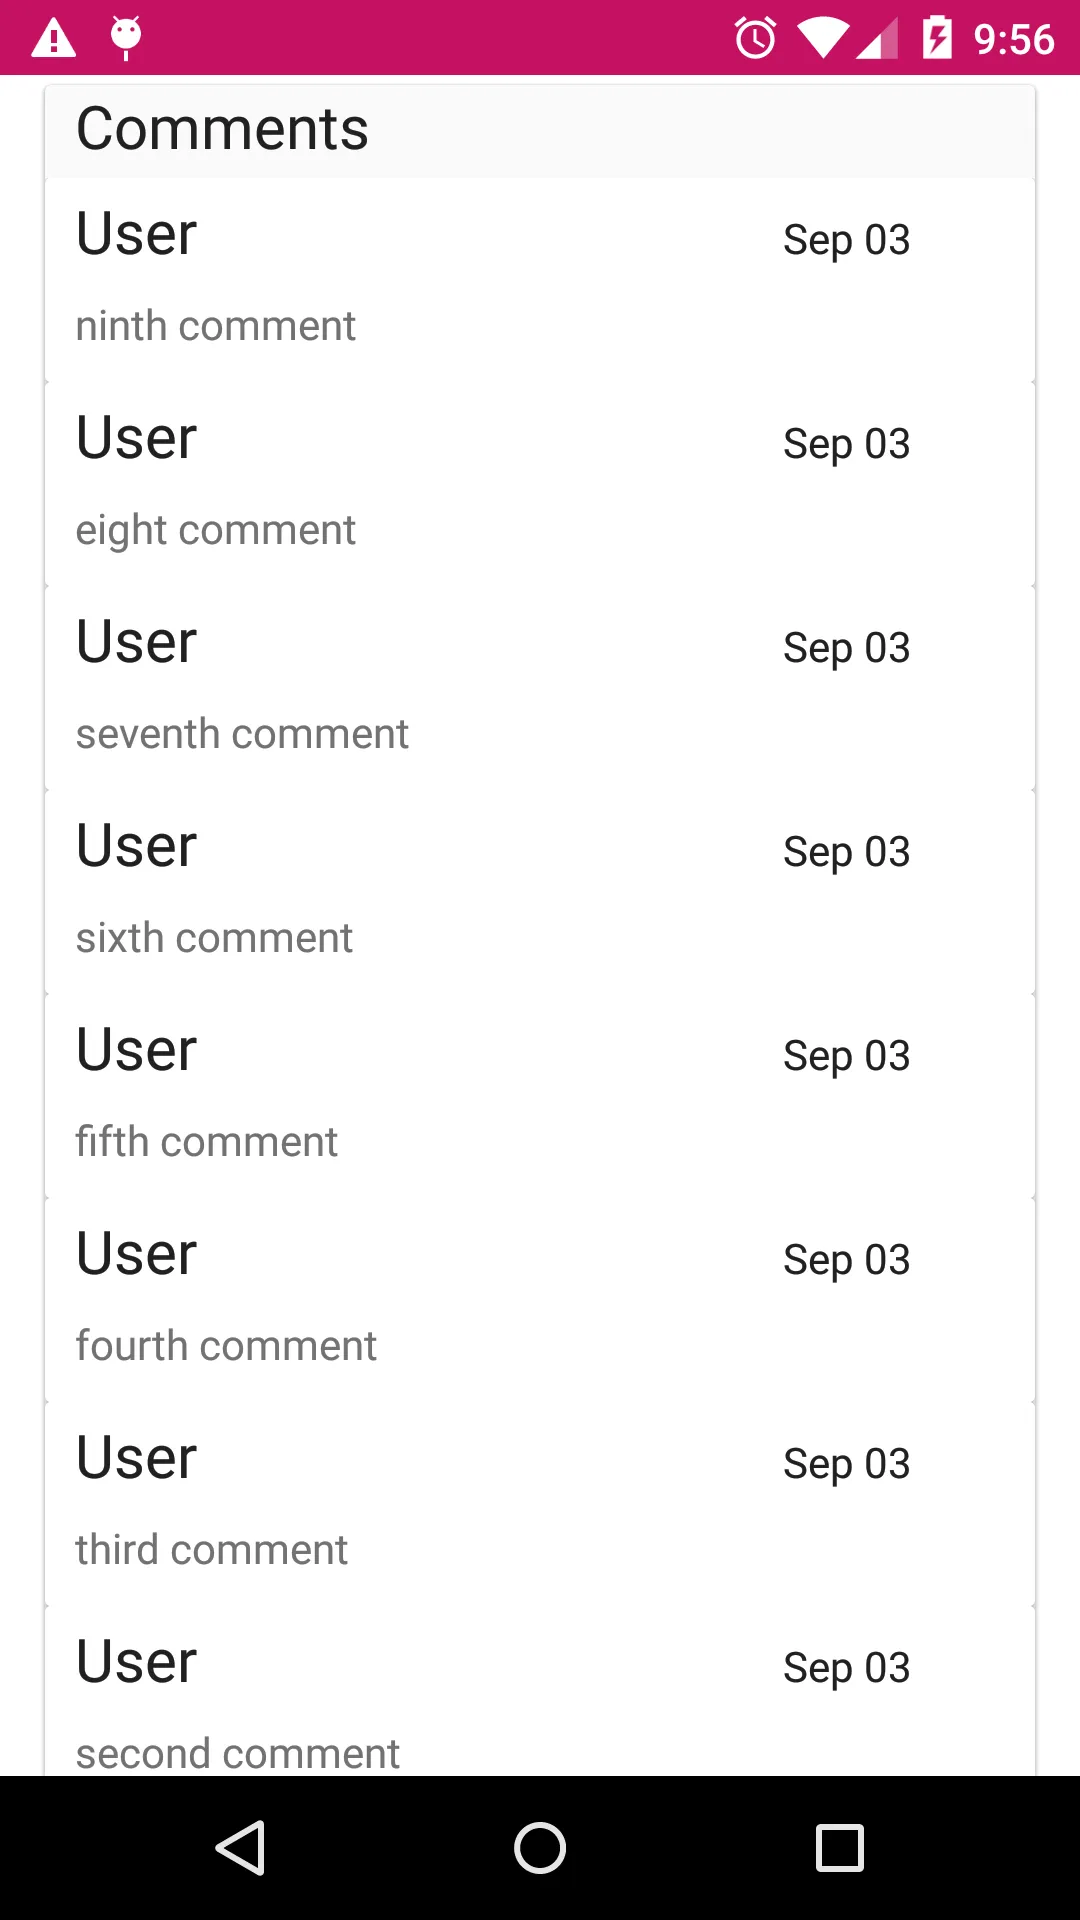
我正在尝试为我的Android应用程序创建评论功能,并希望在recyclerview中显示评论,然后在recyclerview下方放置一个按钮和文本视图以添加评论。我想要设置recyclerview的特定高度,并且如果有很多评论,让它可以滚动,因为我不希望用户必须向下滚动屏幕才能找到添加按钮。
我无法使其正常工作,所以我想知道是否有其他人遇到了同样的问题。
我已经设置好了所有的适配器和其他一切,只是recyclerview出了些问题。
谢谢。
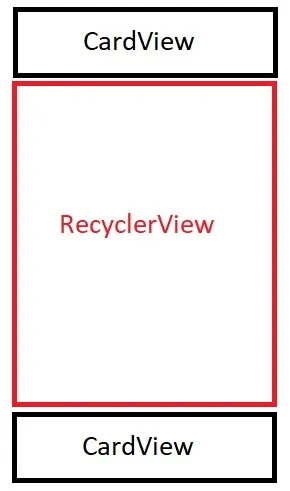
我可能没有清楚表达我的目标。我正在尝试创建一个卡片视图,其中将显示所有评论以及添加新评论的功能。recyclerview将占据大约80%的高度,然后剩下的20%用于编辑文本和按钮。
我的XML(滚动到recyclerview的最后一个卡片视图)。
<ScrollView xmlns:android="http://schemas.android.com/apk/res/android"
android:layout_width="fill_parent"
android:layout_height="fill_parent"
android:id="@+id/scrollview">
<RelativeLayout xmlns:android="http://schemas.android.com/apk/res/android"
    xmlns:tools="http://schemas.android.com/tools"
    xmlns:fab="http://schemas.android.com/apk/res-auto"
    android:layout_width="match_parent"
    android:layout_height="match_parent"
    tools:context=".ProfilePageActivity"
    >

    <android.support.v7.widget.Toolbar xmlns:android="http://schemas.android.com/apk/res/android"
        android:id="@+id/profilepagetoolbar"
        android:layout_width="match_parent"
        android:layout_height="wrap_content"
        android:background="?attr/colorPrimary"
        android:theme="@style/ThemeOverlay.AppCompat.Dark.ActionBar"
        android:popupTheme="@style/ThemeOverlay.AppCompat.Light"
        android:minHeight="?attr/actionBarSize">

    </android.support.v7.widget.Toolbar>
    <android.support.v7.widget.CardView xmlns:android="http://schemas.android.com/apk/res/android"
        android:layout_width="match_parent"
        android:layout_height="wrap_content"
        android:clickable="true"
        android:layout_marginTop="35dp"
        android:layout_below="@+id/profilepagetoolbar"
        android:layout_alignParentLeft="true"
        android:layout_alignParentStart="true"
        android:layout_marginLeft="15dp"
        android:layout_marginRight="15dp"
        android:id="@+id/aboutCard">

        <LinearLayout
            android:layout_width="match_parent"
            android:layout_height="300dp"
            android:gravity="center_vertical"
            android:orientation="vertical"
            android:layout_alignTop="@+id/aboutCard"
            android:focusable="true"
            android:focusableInTouchMode="true">

            <TextView
                android:layout_width="match_parent"
                android:layout_height="wrap_content"
                android:layout_marginBottom="4dp"
                android:layout_marginEnd="10dp"
                android:layout_marginStart="10dp"
                android:layout_marginTop="-60dp"
                android:gravity="center_vertical"
                android:maxLines="1"
                android:textColor="@color/text"
                android:textSize="20sp"
                android:text="ABOUT" />

            <View
                android:layout_width="match_parent"
                android:layout_height="1px"
                android:background="@color/dividers" />

            <LinearLayout
                android:layout_width="match_parent"
                android:layout_height="wrap_content"
                android:orientation="horizontal"
                android:paddingTop="10dp">

                <ImageView
                    android:id="@+id/nameicon"
                    android:layout_width="24dp"
                    android:layout_height="24dp"
                    android:layout_margin="8dp"
                    android:transitionName="appIcon"
                    android:background="@drawable/ic_account_circle_black_24dp"/>
                <TextView
                    android:id="@+id/Name"
                    android:layout_width="match_parent"
                    android:layout_height="wrap_content"
                    android:layout_marginBottom="4dp"
                    android:layout_marginEnd="10dp"
                    android:layout_marginStart="10dp"
                    android:layout_marginTop="8dp"
                    android:gravity="center_vertical"
                    android:maxLines="1"
                    android:textColor="@color/secondary"
                    android:textSize="20sp" />
            </LinearLayout>

            <LinearLayout
                android:layout_width="match_parent"
                android:layout_height="wrap_content"
                android:orientation="horizontal"
                android:paddingTop="10dp">

                <ImageView
                    android:id="@+id/locationicon"
                    android:layout_width="24dp"
                    android:layout_height="24dp"
                    android:layout_margin="8dp"
                    android:transitionName="appIcon"
                    android:background="@drawable/ic_map_black_24dp"/>
                <TextView
                    android:id="@+id/Location"
                    android:layout_width="match_parent"
                    android:layout_height="wrap_content"
                    android:layout_marginBottom="4dp"
                    android:layout_marginEnd="10dp"
                    android:layout_marginStart="10dp"
                    android:layout_marginTop="11dp"
                    android:gravity="center_vertical"
                    android:maxLines="1"
                    android:textColor="@color/secondary"
                    android:textSize="15sp" />
            </LinearLayout>

            <LinearLayout
                android:layout_width="match_parent"
                android:layout_height="wrap_content"
                android:orientation="horizontal"
                android:paddingTop="10dp">

                <ImageView
                    android:id="@+id/websiteIcon"
                    android:layout_width="24dp"
                    android:layout_height="24dp"
                    android:layout_margin="8dp"
                    android:transitionName="appIcon"
                    android:background="@drawable/ic_explore_black_24dp"/>
                <TextView
                    android:id="@+id/Website"
                    android:layout_width="match_parent"
                    android:layout_height="wrap_content"
                    android:layout_marginBottom="4dp"
                    android:layout_marginEnd="10dp"
                    android:layout_marginStart="10dp"
                    android:layout_marginTop="11dp"
                    android:gravity="center_vertical"
                    android:maxLines="1"
                    android:textColor="@color/secondary"
                    android:textSize="15sp" />
            </LinearLayout>

        </LinearLayout>
    </android.support.v7.widget.CardView>
    <android.support.v7.widget.CardView xmlns:android="http://schemas.android.com/apk/res/android"
        android:layout_width="match_parent"
        android:layout_height="wrap_content"
        android:clickable="true"
        android:layout_marginTop="35dp"
        android:layout_below="@+id/aboutCard"
        android:layout_alignParentLeft="true"
        android:layout_alignParentStart="true"
        android:layout_marginLeft="15dp"
        android:layout_marginRight="15dp"
        android:id="@+id/writeComment"
        android:layout_alignParentTop="false"
        android:layout_alignParentBottom="false">

        <LinearLayout
            android:layout_width="match_parent"
            android:layout_height="300dp"
            android:gravity="center_vertical"
            android:orientation="vertical"
            android:focusable="true"
            android:focusableInTouchMode="true">

            <TextView
                android:layout_width="match_parent"
                android:layout_height="wrap_content"
                android:layout_marginBottom="4dp"
                android:layout_marginEnd="10dp"
                android:layout_marginStart="10dp"
                android:layout_marginTop="-100dp"
                android:gravity="center_vertical"
                android:maxLines="1"
                android:textColor="@color/text"
                android:textSize="20sp"
                android:text="Comments" />

            <View
                android:layout_width="match_parent"
                android:layout_height="1px"
                android:background="@color/dividers"
                android:id="@+id/divider"/>

            <LinearLayout
                android:layout_width="match_parent"
                android:layout_height="wrap_content"
                android:orientation="horizontal"
                android:weightSum="1">

                <EditText
                    android:layout_width="244dp"
                    android:layout_height="wrap_content"
                    android:id="@+id/editComment"
                    android:layout_below="@+id/divider"
                    android:textColor="@color/text"
                    android:hint="Write a comment..."/>

                <Button
                    android:layout_width="match_parent"
                    android:layout_height="wrap_content"
                    android:text="Create"
                    android:id="@+id/btnComment"
                    android:layout_gravity="center_horizontal" />
            </LinearLayout>
        </LinearLayout>
    </android.support.v7.widget.CardView>
    <android.support.v7.widget.CardView xmlns:android="http://schemas.android.com/apk/res/android"
        android:layout_width="match_parent"
        android:layout_height="match_parent"
        android:clickable="true"
        android:layout_marginTop="20dp"
        android:layout_below="@+id/writeComment"
        android:layout_alignParentLeft="true"
        android:layout_alignParentStart="true"
        android:layout_marginLeft="15dp"
        android:layout_marginRight="15dp"
        android:id="@+id/commentsCard">

        <LinearLayout
            android:layout_alignParentTop="true"
            android:layout_width="match_parent"
            android:layout_height="match_parent"
            android:orientation="vertical">
            <TextView
                android:layout_width="match_parent"
                android:layout_height="wrap_content"
                android:layout_marginBottom="4dp"
                android:layout_marginEnd="10dp"
                android:layout_marginStart="10dp"
                android:layout_marginTop="0dp"
                android:gravity="center_vertical"
                android:maxLines="1"
                android:textColor="@color/text"
                android:textSize="20sp"
                android:text="Comments" />

            <android.support.v7.widget.RecyclerView
                android:id="@+id/commentsList"
                android:layout_width="match_parent"
                android:layout_height="match_parent"
                android:focusableInTouchMode="true" />

        </LinearLayout>
    </android.support.v7.widget.CardView>
</RelativeLayout>
</ScrollView>

第一和第二条评论被截断了。

enter image description here


为什么不使用FrameLayout - ashkhn
5个回答

12

我的问题是,某种原因下,Recyclerview没有包裹内容。我进行了一些研究(感谢stackoverflow),发现很多人都遇到了这个问题,并且他们发布了解决方案。

基本上,我需要使用自定义的LinearLayoutManager来解决这个问题。

我将发布他们提供的解决方案和他们提出的问题链接。感谢所有试图帮助我的人,我很感激。

这是我需要的额外文件。然后,我必须将我的RecyclerView设置为使用此布局而不是默认布局。

public class MyLinearLayoutManager extends LinearLayoutManager {

public MyLinearLayoutManager(Context context, int orientation, boolean reverseLayout)    {
    super(context, orientation, reverseLayout);
}

private int[] mMeasuredDimension = new int[2];

@Override
public void onMeasure(RecyclerView.Recycler recycler, RecyclerView.State state,
                      int widthSpec, int heightSpec) {
    final int widthMode = View.MeasureSpec.getMode(widthSpec);
    final int heightMode = View.MeasureSpec.getMode(heightSpec);
    final int widthSize = View.MeasureSpec.getSize(widthSpec);
    final int heightSize = View.MeasureSpec.getSize(heightSpec);
    int width = 0;
    int height = 0;
    for (int i = 0; i < getItemCount(); i++) {
        measureScrapChild(recycler, i,
                View.MeasureSpec.makeMeasureSpec(i, View.MeasureSpec.UNSPECIFIED),
                View.MeasureSpec.makeMeasureSpec(i, View.MeasureSpec.UNSPECIFIED),
                mMeasuredDimension);

        if (getOrientation() == HORIZONTAL) {
            width = width + mMeasuredDimension[0];
            if (i == 0) {
                height = mMeasuredDimension[1];
            }
        } else {
            height = height + mMeasuredDimension[1];
            if (i == 0) {
                width = mMeasuredDimension[0];
            }
        }
    }
    switch (widthMode) {
        case View.MeasureSpec.EXACTLY:
            width = widthSize;
        case View.MeasureSpec.AT_MOST:
        case View.MeasureSpec.UNSPECIFIED:
    }

    switch (heightMode) {
        case View.MeasureSpec.EXACTLY:
            height = heightSize;
        case View.MeasureSpec.AT_MOST:
        case View.MeasureSpec.UNSPECIFIED:
    }

    setMeasuredDimension(width, height);
}

private void measureScrapChild(RecyclerView.Recycler recycler, int position, int widthSpec,
                               int heightSpec, int[] measuredDimension) {
    View view = recycler.getViewForPosition(position);
    if (view != null) {
        RecyclerView.LayoutParams p = (RecyclerView.LayoutParams) view.getLayoutParams();
        int childWidthSpec = ViewGroup.getChildMeasureSpec(widthSpec,
                getPaddingLeft() + getPaddingRight(), p.width);
        int childHeightSpec = ViewGroup.getChildMeasureSpec(heightSpec,
                getPaddingTop() + getPaddingBottom(), p.height);
        view.measure(childWidthSpec, childHeightSpec);
        measuredDimension[0] = view.getMeasuredWidth() + p.leftMargin + p.rightMargin;
        measuredDimension[1] = view.getMeasuredHeight() + p.bottomMargin + p.topMargin;
        recycler.recycleView(view);
    }
}
}

之后,将此更改为:

 mProductsRecyclerView.setLayoutManager(new LinearLayoutManager(getApplicationContext()));

转换成这样:

mRecyclerView.setLayoutManager(new MyLinearLayoutManager(getApplicationContext(),1,false));

三个新参数(Context、int Orientation、boolean reverse); 基本上,我将方向设置为1,以使其垂直显示,并将reverse设置为false,以按照我的列表中的顺序显示。

其他人遇到了与我相同的问题的链接。 内部Recycler视图高度无法包裹其内容

内部Recycler视图高度无法包裹其内容

再次感谢大家。希望这对其他人有所帮助


6
在设置适配器后,我遇到了以下问题 - java.lang.IndexOutOfBoundsException: Invalid item position 0(0). Item count:0。有什么解决办法吗? - ketan
我也遇到了同样的问题,你有得到任何有效的解决方案吗? - Hitesh Dhamshaniya
@ketan 只需将崩溃的代码放入 postDelayed(for 1000 ms) 中即可。 - S. Alawadi

6

将以下代码添加到您的活动中,将会将您的Recycler View的高度设置为用户屏幕窗口的90%。

DisplayMetrics displaymetrics = new DisplayMetrics();
getWindowManager().getDefaultDisplay().getMetrics(displaymetrics);

int a =  (displaymetrics.heightPixels*90)/100;

recylcerView.getLayoutParams().height =a;

并在您的recyclerView下面布置您的评论

就像这样

<RelativeLayout xmlns:android="http://schemas.android.com/apk/res/android"
    android:layout_width="match_parent"
    android:layout_height="match_parent" >

    <LinearLayout
        android:layout_alignParentTop="true"
        android:layout_width="match_parent"
        android:layout_height="wrap_content" 
        android:id="@+id/mudit"
        >

        <android.support.v7.widget.RecyclerView
            android:id="@+id/my_recycler_view"
            android:layout_width="match_parent"
            android:layout_height="wrap_content"
            android:elevation="5dp"
            android:scrollbars="vertical" />
    </LinearLayout>

    <RelativeLayout
        android:layout_below="@+id/mudit"
        android:id="@+id/rl_commentWrap"
        android:layout_width="match_parent"
        android:layout_height="wrap_content"
        android:layout_alignParentBottom="true" >

        <EditText
            android:id="@+id/editText1"
            android:layout_width="wrap_content"
            android:layout_height="wrap_content"
            android:layout_alignParentBottom="true"
            android:layout_alignParentLeft="true"
            android:ems="10" />

        <Button
            android:id="@+id/plusButton"
            style="android:buttonStyleSmall"
            android:layout_width="wrap_content"
            android:layout_height="wrap_content"
            android:layout_alignParentBottom="true"
            android:layout_alignParentRight="true"
            android:text="Send"
            android:textColor="#FFFFFF"
            android:translationZ="5dp" />
    </RelativeLayout>

</RelativeLayout>

但是如果有更多的数据,我该如何让它滚动呢?现在它没有滚动,只是截断了。RecyclerView无法滚动。 - NewKidOnTheBlock
嗯,RecyclerView 是自动可滚动的,你应该向 RecyclerView 添加更多视图,然后检查; - mudit_sen
可能是因为所有内容都被包含在一个ScrollView中吗? - NewKidOnTheBlock
是的,ListView、GridView和RecyclerView都是自带滚动功能的,不需要将它们包裹在水平或垂直滚动视图中。 - mudit_sen
我已经发布了XML文件。感谢您抽出时间来帮助。 - NewKidOnTheBlock
显示剩余3条评论

2
在我的情况下,我有一个DialogFragment,在其中有2个可循环使用的视图和2个带有2个按钮的水平线性布局。
从上到下的对话框如下所示:
- RecyclerView A - 水平线性布局X,带有2个按钮 - RecyclerView B - 水平线性布局Y,带有2个按钮
此外,两个可循环使用的视图的大小都是动态的。 Recycler A的大小可以根据用户在两个可循环使用的视图中的滑动而改变。 Recycler B的大小可以根据其项目单击侦听器而更改。
我想要实现的是将对话框从上到下分割,并使这四个视图中的每一个都具有对话框高度的恒定部分。
有效的方法是首先将其分成两个单独的相对布局,称为lTOP和lBottom。设置lTOP alignParentTop,lBottom alignParentBottom并在lTOP下方布局。 它们两个的宽度都是match_parent,高度是wrap_content。
然后在它们各自创建1个相对布局(称为lINTop)和1个线性布局(称为lINBottom)。lINTop具有可循环使用的视图,lINBottom具有2个按钮。 将lINTop和lINBottom的宽度都设置为match_parent,高度设置为wrap_content。 设置lINTop alignParentTop,lINBottom alignParentBottom并在lINTop下方布局。 将lINTop的方向设置为垂直,将lINBottom的方向设置为水平。
设置可循环使用的视图的宽度为match_parent,高度为wrap_content。
然后将所有内容放入一个宽度/高度为wrap_content且方向为垂直的单个相对布局中。 然后将其放入宽度/高度为match_parent且方向为垂直的scrollview中。
然后需要一些代码魔法来在onCreateView中设置可循环使用的视图:
对于可循环使用的视图A:
private void setupRecyclerA() {
    // use a linear layout manager
    RecyclerView.LayoutManager layManUS = new LinearLayoutManager(setupActivity().get());
    recyclerA.setLayoutManager(layManUS);
    recyclerA.addItemDecoration(new DividerItemDecoration(
            setupActivity().get(), LinearLayoutManager.VERTICAL));
    recyclerA.setNestedScrollingEnabled(true);
    // use this setting to improve performance if you know that changes
    // in content do not change the layout size of the RecyclerView
    recyclerA.setHasFixedSize(true);
}

对于回收站 B:
最初的回答:
private void setupRecyclerB() {
    // use a linear layout manager
    RecyclerView.LayoutManager layManUS = new LinearLayoutManager(setupActivity().get());
    recyclerB.setLayoutManager(layManUS);
    recyclerB.addItemDecoration(new DividerItemDecoration(
            setupActivity().get(), LinearLayoutManager.VERTICAL));
    recyclerB.setNestedScrollingEnabled(true);
    // set fixed height
    DisplayMetrics displaymetrics = new DisplayMetrics();
    setupActivity().get().getWindowManager().getDefaultDisplay().getMetrics(displaymetrics);
    // set height to 30 percent of dialog
    int a =  (displaymetrics.heightPixels*30)/100;
    recyclerB.getLayoutParams().height =a;
    // use this setting to improve performance if you know that changes
    // in content do not change the layout size of the RecyclerView
    recyclerB.setHasFixedSize(true);
}

我并不是发明者,只是将许多不同的Stack Overflow问题的解决方案结合起来,现在甚至都记不得了,对不起并感谢这些创造者。

最初的回答

0

我曾经遇到过类似的问题,使用RelativeLayout解决了它。我有这个布局:

enter image description here

我希望在滚动中央的recyclerView时,顶部和底部的cardview保持不动。 尝试使用LinearLayout和ConstraintLayout但都没有起作用,当我滚动到recycler的末尾时,只有底部的CardView才会显示。

这是我的代码,请注意layout_abovelayout_belowlayout_alignParentBottom属性:

<RelativeLayout
    android:layout_width="match_parent"
    android:layout_height="match_parent"
    android:background="@color/grisMasOscuro">

    <androidx.cardview.widget.CardView
        android:id="@+id/cv1"
        android:layout_width="match_parent"
        android:layout_height="50dp" >
        
        <!-- cardview content -->
        
    </androidx.cardview.widget.CardView>
    
    <androidx.cardview.widget.CardView
        android:layout_width="match_parent"
        android:layout_height="match_parent"
        android:layout_above="@id/cv3"
        android:layout_below="@id/cv1">

        <androidx.recyclerview.widget.RecyclerView
            android:id="@+id/myRecyclerView"
            android:layout_width="match_parent"
            android:layout_height="wrap_content" />
            
    </androidx.cardview.widget.CardView>
            
    
    <androidx.cardview.widget.CardView
        android:id="@+id/cv3"
        android:layout_width="match_parent"
        android:layout_height="100dp"
        android:layout_alignParentBottom="true">
        
        <!-- cardview content -->
        
    </androidx.cardview.widget.CardView>

</RelativeLayout>

-3
我找到了另一个解决方案。 如果你将RecyclerView包裹在RelativeLayout中,问题就会很容易地得到解决。 谢谢。

3
可以提供更多细节吗?我认为这会让你的回答更好。 - Absent

网页内容由stack overflow 提供, 点击上面的
可以查看英文原文,
原文链接