当向右滑动时,如何像Instagram iPhone应用程序一样导航弹出视图?我该如何实现这个功能?

20

当在屏幕上向右滑动时,我希望弹出一个视图或者像导航栏的返回按钮一样工作。

我正在使用:

self.navigationController.interactivePopGestureRecognizer.delegate = (id<UIGestureRecognizerDelegate>)self;

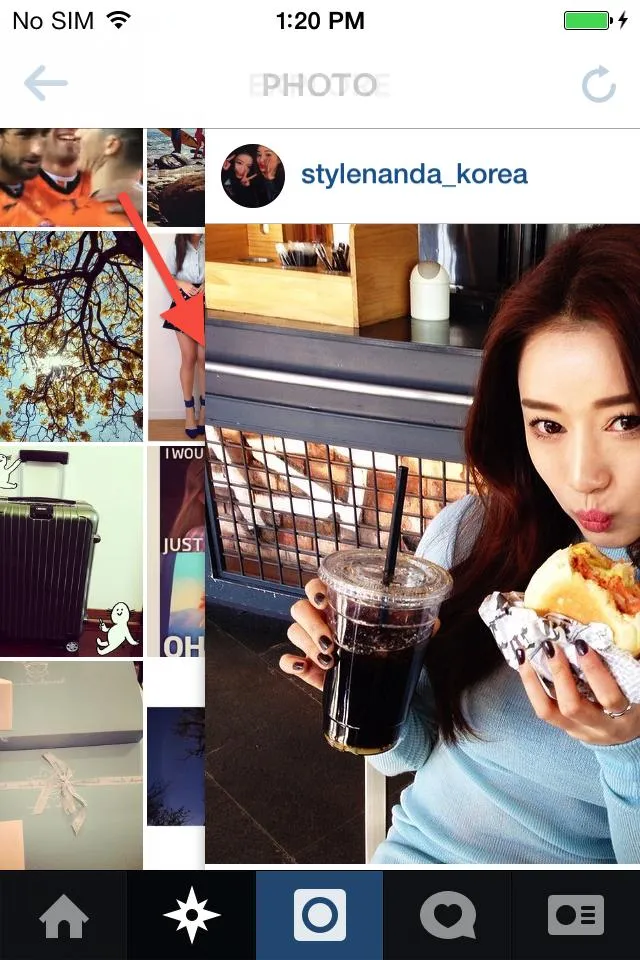
这一行代码可以用于弹出导航视图,它对我很有用,但当我从屏幕中间滑动时,它不能像Instagram iPhone应用程序那样工作。

这里我提供了Instagram应用程序的一个屏幕截图,在其中您可以看到向右滑动弹出导航视图的示例:

输入图像描述


你应该关注这个问题(它还没有答案,但是它是一个重复的问题):https://dev59.com/mHrZa4cB1Zd3GeqP3IPp - rdurand
完美的解决方案,包括代码和解释:- https://dev59.com/5I_ea4cB1Zd3GeqPR7fi#32990248 - pkc456
请检查以下代码库:https://github.com/rishi420/SwipeRightToPopController/blob/master/SwipeRightToPopController/SwipeRightToPopViewController.swift 和 https://github.com/fastred/SloppySwiper/blob/master/Classes/SSWDirectionalPanGestureRecognizer.m - Nike Kov
5个回答

13

苹果自动实现的“向右滑动以弹出视图控制器”只适用于屏幕左侧约20个点。这样,他们可以确保不会干扰您应用程序的功能。想象一下你的屏幕上有一个UIScrollView,但你无法向右滑动,因为它一直在弹出视图控制器。这不好。

苹果在这里说:

interactivePopGestureRecognizer

负责从导航堆栈中弹出顶部视图控制器的手势识别器。 (只读)

@property(nonatomic, readonly) UIGestureRecognizer *interactivePopGestureRecognizer

导航控制器将此手势识别器安装在其视图上,并使用它来将最上面的视图控制器弹出导航堆栈。 您可以使用此属性检索手势识别器,并将其与用户界面中的其他手势识别器的行为关联起来。 将您的手势识别器绑定在一起时,请确保它们同时识别其手势,以确保您的手势识别器有机会处理事件。

因此,您将需要实现自己的UIGestureRecognizer,并将其行为与您的UIViewControllerinteractivePopGestureRecognizer相结合。


编辑:

这是我构建的解决方案。您可以实现符合UIViewControllerAnimatedTransitioning代理的自定义过渡。 这个解决方案有效,但尚未经过彻底测试。

您将获得一个交互式滑动转换以弹出您的视图控制器。 您可以从视图中的任何位置向右滑动。

已知问题:如果您启动pan并在视图的一半之前停止,则转换将被取消(预期行为)。 在此过程中,视图将重置为其原始框架。 在此动画期间存在视觉故障。

示例的类如下:

UINavigationController> ViewController> SecondViewController

CustomPopTransition.h

#import <Foundation/Foundation.h>

@interface CustomPopTransition : NSObject <UIViewControllerAnimatedTransitioning>

@end

CustomPopTransition.m :

#import "CustomPopTransition.h"
#import "SecondViewController.h"
#import "ViewController.h"

@implementation CustomPopTransition

- (NSTimeInterval)transitionDuration:(id<UIViewControllerContextTransitioning>)transitionContext {
    return 0.3;
}

- (void)animateTransition:(id<UIViewControllerContextTransitioning>)transitionContext {

    SecondViewController *fromViewController = (SecondViewController*)[transitionContext viewControllerForKey:UITransitionContextFromViewControllerKey];
    ViewController *toViewController = (ViewController*)[transitionContext viewControllerForKey:UITransitionContextToViewControllerKey];

    UIView *containerView = [transitionContext containerView];
    [containerView addSubview:toViewController.view];
    [containerView bringSubviewToFront:fromViewController.view];

    // Setup the initial view states
    toViewController.view.frame = [transitionContext finalFrameForViewController:toViewController];

    [UIView animateWithDuration:0.3 animations:^{

        fromViewController.view.frame = CGRectMake(toViewController.view.frame.size.width, fromViewController.view.frame.origin.y, fromViewController.view.frame.size.width, fromViewController.view.frame.size.height);

    } completion:^(BOOL finished) {

        // Declare that we've finished
        [transitionContext completeTransition:!transitionContext.transitionWasCancelled];
    }];

}

@end

SecondViewController.h :

#import <UIKit/UIKit.h>

@interface SecondViewController : UIViewController <UINavigationControllerDelegate>

@end

SecondViewController.m :

#import "SecondViewController.h"
#import "ViewController.h"
#import "CustomPopTransition.h"

@interface SecondViewController ()

@property (nonatomic, strong) UIPercentDrivenInteractiveTransition *interactivePopTransition;

@end

@implementation SecondViewController

- (void)viewDidLoad
{
    [super viewDidLoad];

    self.navigationController.delegate = self;

    UIPanGestureRecognizer *popRecognizer = [[UIPanGestureRecognizer alloc] initWithTarget:self action:@selector(handlePopRecognizer:)];
    [self.view addGestureRecognizer:popRecognizer];
}

-(void)viewDidDisappear:(BOOL)animated {

    [super viewDidDisappear:animated];

    // Stop being the navigation controller's delegate
    if (self.navigationController.delegate == self) {
        self.navigationController.delegate = nil;
    }
}

- (id<UIViewControllerAnimatedTransitioning>)navigationController:(UINavigationController *)navigationController animationControllerForOperation:(UINavigationControllerOperation)operation fromViewController:(UIViewController *)fromVC toViewController:(UIViewController *)toVC {

    // Check if we're transitioning from this view controller to a DSLSecondViewController
    if (fromVC == self && [toVC isKindOfClass:[ViewController class]]) {
        return [[CustomPopTransition alloc] init];
    }
    else {
        return nil;
    }
}

- (id<UIViewControllerInteractiveTransitioning>)navigationController:(UINavigationController *)navigationController interactionControllerForAnimationController:(id<UIViewControllerAnimatedTransitioning>)animationController {

    // Check if this is for our custom transition
    if ([animationController isKindOfClass:[CustomPopTransition class]]) {
        return self.interactivePopTransition;
    }
    else {
        return nil;
    }
}

- (void)handlePopRecognizer:(UIPanGestureRecognizer*)recognizer {

    // Calculate how far the user has dragged across the view
    CGFloat progress = [recognizer translationInView:self.view].x / (self.view.bounds.size.width * 1.0);
    progress = MIN(1.0, MAX(0.0, progress));

    if (recognizer.state == UIGestureRecognizerStateBegan) {
        NSLog(@"began");
        // Create a interactive transition and pop the view controller
        self.interactivePopTransition = [[UIPercentDrivenInteractiveTransition alloc] init];
        [self.navigationController popViewControllerAnimated:YES];
    }
    else if (recognizer.state == UIGestureRecognizerStateChanged) {
        NSLog(@"changed");
        // Update the interactive transition's progress
        [self.interactivePopTransition updateInteractiveTransition:progress];
    }
    else if (recognizer.state == UIGestureRecognizerStateEnded || recognizer.state == UIGestureRecognizerStateCancelled) {
        NSLog(@"ended/cancelled");
        // Finish or cancel the interactive transition
        if (progress > 0.5) {
            [self.interactivePopTransition finishInteractiveTransition];
        }
        else {
            [self.interactivePopTransition cancelInteractiveTransition];
        }

        self.interactivePopTransition = nil;
    }
}

@end

有什么想法,我该怎么做? - Chetu
@chetu: 不好意思,我会告诉你如果我找到了办法。但是最好的选择是你自己尝试。 - rdurand
1
这个会起作用,但是限制在于,当我们使用一个滑动视图控制器时它不起作用。例如,pop(后退)无法工作。@dipang - Chetu
非常感谢,chetu。解决方案太棒了!(MultiLayerNavigation) - heximal
@ Alec:这个问题可能已经在iOS 8/9中得到解决,因为这篇文章已经有将近两年的时间了 :) 很高兴能帮到您! - rdurand
显示剩余5条评论

7
创建一个平移手势识别器,并将交互式弹出手势识别器的目标移到其他位置。
在推送的视图控制器的viewDidLoad中添加您的识别器,然后就可以使用了!
let popGestureRecognizer = self.navigationController!.interactivePopGestureRecognizer!
if let targets = popGestureRecognizer.value(forKey: "targets") as? NSMutableArray {
  let gestureRecognizer = UIPanGestureRecognizer()
  gestureRecognizer.setValue(targets, forKey: "targets")
  self.view.addGestureRecognizer(gestureRecognizer)
}

2
当这个程序成功运行时,我笑了。太棒了!非常好的答案。 - Clay Ellis
谢谢,这里是一个详细的解决方案 https://dev59.com/tVsW5IYBdhLWcg3wHEDZ#57487724 - Kugutsumen

5
这是Spynet答案的Swift版本,经过一些修改。首先,我为UIView动画定义了一个线性曲线。其次,在视图下方添加了半透明黑色背景,以获得更好的效果。第三,我继承了UINavigationController。这允许在UINavigationController中应用转换到任何“Pop”转换。以下是代码:

CustomPopTransition.swift

import UIKit

class CustomPopTransition: NSObject, UIViewControllerAnimatedTransitioning {

    func transitionDuration(using transitionContext: UIViewControllerContextTransitioning?) -> TimeInterval {
        return 0.3
    }

    func animateTransition(using transitionContext: UIViewControllerContextTransitioning) {
        guard let fromViewController = transitionContext.viewController(forKey: UITransitionContextViewControllerKey.from),
            let toViewController = transitionContext.viewController(forKey: UITransitionContextViewControllerKey.to)
            else {
                return
        }

        let containerView = transitionContext.containerView
        containerView.insertSubview(toViewController.view, belowSubview: fromViewController.view)

        // Setup the initial view states
        toViewController.view.frame = CGRect(x: -100, y: toViewController.view.frame.origin.y, width: fromViewController.view.frame.size.width, height: fromViewController.view.frame.size.height)

        let dimmingView = UIView(frame: CGRect(x: 0,y: 0, width: toViewController.view.frame.width, height: toViewController.view.frame.height))
        dimmingView.backgroundColor = UIColor.black
        dimmingView.alpha = 0.5

        toViewController.view.addSubview(dimmingView)

        UIView.animate(withDuration: transitionDuration(using: transitionContext),
                       delay: 0,
                       options: UIView.AnimationOptions.curveLinear,
                       animations: {
                        dimmingView.alpha = 0
                        toViewController.view.frame = transitionContext.finalFrame(for: toViewController)
                        fromViewController.view.frame = CGRect(x: toViewController.view.frame.size.width, y: fromViewController.view.frame.origin.y, width: fromViewController.view.frame.size.width, height: fromViewController.view.frame.size.height)
        },
                       completion: { finished in
                        dimmingView.removeFromSuperview()
                        transitionContext.completeTransition(!transitionContext.transitionWasCancelled)
        }
        )
    }
}

PoppingNavigationController.swift

import UIKit

class PoppingNavigationController : UINavigationController, UINavigationControllerDelegate {
    var interactivePopTransition: UIPercentDrivenInteractiveTransition!

    override func viewDidLoad() {
        self.delegate = self
    }

    func navigationController(_ navigationController: UINavigationController, willShow viewController: UIViewController, animated: Bool) {
        addPanGesture(viewController: viewController)
    }

    func navigationController(_ navigationController: UINavigationController, animationControllerFor operation: UINavigationController.Operation, from fromVC: UIViewController, to toVC: UIViewController) -> UIViewControllerAnimatedTransitioning? {
        if (operation == .pop) {
            return CustomPopTransition()
        }
        else {
            return nil
        }
    }

    func navigationController(navigationController: UINavigationController, interactionControllerForAnimationController animationController: UIViewControllerAnimatedTransitioning) -> UIViewControllerInteractiveTransitioning? {
        if animationController.isKind(of: CustomPopTransition.self) {
            return interactivePopTransition
        }
        else {
            return nil
        }
    }

    func addPanGesture(viewController: UIViewController) {
        let popRecognizer = UIPanGestureRecognizer(target: self, action: #selector(handlePanRecognizer(recognizer:)))
        viewController.view.addGestureRecognizer(popRecognizer)
    }

    @objc
    func handlePanRecognizer(recognizer: UIPanGestureRecognizer) {
        // Calculate how far the user has dragged across the view
        var progress = recognizer.translation(in: self.view).x / self.view.bounds.size.width
        progress = min(1, max(0, progress))
        if (recognizer.state == .began) {
            // Create a interactive transition and pop the view controller
            self.interactivePopTransition = UIPercentDrivenInteractiveTransition()
            self.popViewController(animated: true)
        }
        else if (recognizer.state == .changed) {
            // Update the interactive transition's progress
            interactivePopTransition.update(progress)
        }
        else if (recognizer.state == .ended || recognizer.state == .cancelled) {
            // Finish or cancel the interactive transition
            if (progress > 0.5) {
                interactivePopTransition.finish()
            }
            else {
                interactivePopTransition.cancel()
            }
            interactivePopTransition = nil
        }
    }
}

以下是结果样例:enter image description here


1
@Spynet 没有问题!我刚刚更新了CustomPopTransition.swift代码,因为我注意到这里的其他代码存在一个bug,与你拖动然后在提交滑动回来之前多次释放时会发生什么相关... - Tometoyou
干得好,继续保持。 - Arun

2

这个问题其实不需要自己造轮子,只需要继承UINavigationController并引用内置的手势即可。在这里有详细的解释:http://liudanyun.com/blog/?p=452

同样的解决方案也适用于Swift:

public final class MyNavigationController: UINavigationController {

  public override func viewDidLoad() {
    super.viewDidLoad()


    self.view.addGestureRecognizer(self.fullScreenPanGestureRecognizer)
  }

  private lazy var fullScreenPanGestureRecognizer: UIPanGestureRecognizer = {
    let gestureRecognizer = UIPanGestureRecognizer()

    if let cachedInteractionController = self.value(forKey: "_cachedInteractionController") as? NSObject {
      let string = "handleNavigationTransition:"
      let selector = Selector(string)
      if cachedInteractionController.responds(to: selector) {
        gestureRecognizer.addTarget(cachedInteractionController, action: selector)
      }
    }

    return gestureRecognizer
  }()
}

如果您这样做,请同时实现以下UINavigationControllerDelegate函数,以避免根视图控制器出现奇怪的行为:

public func navigationController(_: UINavigationController,
                                 didShow _: UIViewController, animated _: Bool) {
  self.fullScreenPanGestureRecognizer.isEnabled = self.viewControllers.count > 1
}

不错!但是动画有点奇怪。看起来你拖动的视图控制器会直接到达最终位置而没有动画效果。例如在Instagram或Telegram的iOS应用程序中,它更加平滑,从大约20-30pt开始动画到最终位置,并且还会检查滑动方向是否改变,然后平稳地将视图动画到初始位置。另外,我也不喜欢的是 - 看起来你的代码有点hacky;似乎你正在调用苹果可以删除的私有方法。但我投了赞成票 :) - Serj Rubens
你实现了答案的第二部分吗?我不得不这样做以避免动画出现任何奇怪的行为。我理解你对于私有方法的看法,但是我已经使用这段代码提交了一个应用到商店,并且它完美地工作了。此外,请查看答案中提供的链接以获取此解决方案的原始描述(这不是我的想法:))。 - jwswart
啊,我看到链接已经失效了,无法获取解决方案的源代码。 - jwswart
谢谢!这个解决方案是最佳的,也很简洁和通用,因为它使用导航控制器而不是UIViewController。 - Serj Rubens

2

通过子类化 UINavigationController,您可以添加一个 UISwipeGestureRecognizer 来触发弹出操作:

.h 文件:

#import <UIKit/UIKit.h>

@interface CNavigationController : UINavigationController

@end

.m file:

#import "CNavigationController.h"

@interface CNavigationController ()<UIGestureRecognizerDelegate, UINavigationControllerDelegate>

@property (nonatomic, retain) UISwipeGestureRecognizer *swipeGesture;

@end

@implementation CNavigationController

#pragma mark - View cycles

- (void)viewDidLoad {
    [super viewDidLoad];

    __weak CNavigationController *weakSelf = self;
    self.delegate = weakSelf;

    self.swipeGesture = [[UISwipeGestureRecognizer alloc]initWithTarget:self action:@selector(gestureFired:)];
    [self.view addGestureRecognizer:self.swipeGesture]; }

#pragma mark - gesture method

-(void)gestureFired:(UISwipeGestureRecognizer *)gesture {
    if (gesture.direction == UISwipeGestureRecognizerDirectionRight)
    {
        [self popViewControllerAnimated:YES];
    } }

#pragma mark - UINavigation Controller delegate

- (void)pushViewController:(UIViewController *)viewController animated:(BOOL)animated {
    self.swipeGesture.enabled = NO;
    [super pushViewController:viewController animated:animated]; }

#pragma mark UINavigationControllerDelegate

- (void)navigationController:(UINavigationController *)navigationController
       didShowViewController:(UIViewController *)viewController
                    animated:(BOOL)animate {
    self.swipeGesture.enabled = YES; }

@end

将您的代码粘贴到答案中。如果您的链接失效,您的答案将无用。 - rdurand
这个解决方案使用了滑动,因此您无法控制过渡。它不会是交互式的,而苹果的实现则是。 - rdurand
@rdurand 我需要支持iOS6设备,所以我才这样做。 - Arun
这在这种情况下是一个可接受的解决方案。我在我的答案中添加了一个可行的iOS7+解决方案。 - rdurand
@rdurand 现在可以了吗? - Arun

网页内容由stack overflow 提供, 点击上面的
可以查看英文原文,
原文链接