这里有一张图片,说明了我想做的所有事情:
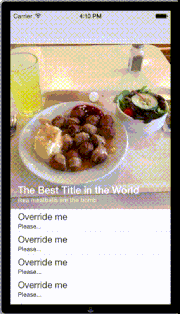
我的问题是,如何构建我的视图结构。表格视图的标题应该固定在表格顶部。但是关于最上面的图片,在表格视图标题上面的那个图片,我需要怎么处理呢?我需要把表格视图放在UIScrollView中吗?
可以通过CATransform3D实现视差效果,但我想要实现的是什么,这就是我的问题。有很多演示文稿,但我想自己制作。
这里有一张图片,说明了我想做的所有事情:
我的问题是,如何构建我的视图结构。表格视图的标题应该固定在表格顶部。但是关于最上面的图片,在表格视图标题上面的那个图片,我需要怎么处理呢?我需要把表格视图放在UIScrollView中吗?
可以通过CATransform3D实现视差效果,但我想要实现的是什么,这就是我的问题。有很多演示文稿,但我想自己制作。
let imageView = UIImageView()
let lblName = UILabel()

imageView.frame = CGRect(x: 0, y: 0, width: UIScreen.main.bounds.size.width, height: 300)
imageView.image = UIImage.init(named: "poster")
imageView.contentMode = .scaleAspectFill
imageView.clipsToBounds = true
view.addSubview(imageView)

lblName.frame = CGRect(x: 20, y: 100, width: 200, height: 22)
lblName.text = "Steve Jobs"
lblName.textColor = UIColor.white
lblName.font = UIFont.systemFont(ofSize: 26)
lblName.clipsToBounds = true
imageView.addSubview(lblName)
然后在tableview的代理方法中可以添加scrollviewDidScroll方法,如下所示 -
let y = 300 - (scrollView.contentOffset.y + 300)
let height = min(max(y, 60), 400)
imageView.frame = CGRect(x: 0, y: 0, width: UIScreen.main.bounds.size.width, height: height)
lblName.frame = CGRect(x: 20, y: height - 30, width: 200, height: 22)

Swift 5
按照我的需求,我使用了https://github.com/maxep/MXParallaxHeader。
我会逐步向您解释事情的步骤。
您需要使用以下pod命令安装上述提到的第三方库:
1.)

pod "MXParallaxHeader"
2.)

pod install
.xib 文件作为视差标头。3.)
Add new file choose a (User Interface) View as a new template and name the
file. eg.. ParallaxView and tap on the create.
你已经创建了UIView,现在需要为你的自定义视图添加Cocoa Touch类文件。
4.)

Add new file choose a (Cocoa Touch Class) View as a new template and name the file. eg.. ParallaxView and tap on the Next.
现在您有一对类文件和其自定义的UIView例如(ParallaxView.xib 和 ParallaxView.swift)
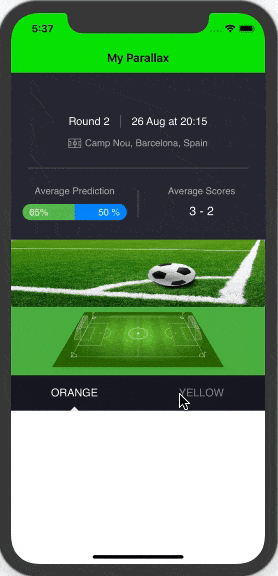
根据我的项目要求,我需要在视差标题底部添加一个页面菜单,因此我使用另一个第三方库CAPSPageMenu
5.)

just visit this https://github.com/PageMenu/PageMenu/blob/master/Classes/CAPSPageMenu.swift and download the CAPSPageMenu.swift file and drag from your downloads and drop to your project destination folder.
现在我们准备开始编写代码部分。
进入您的ViewController文件并导入框架。
6.)

import MXParallaxHeader
委托方法
 7.)

 class MyParralax: UIViewController, MXScrollViewDelegate, CAPSPageMenuDelegate
 {// Parant Controller Code }
为控制器(页面菜单)和 MXParallaxHeader 定义类 (MyParallax.swift) 变量的方法如下:
var scrollView      : MXScrollView!
let Parallax        = Bundle.main.loadNibNamed("ParallaxView", owner: nil, options: nil)?.first as? ParallaxView
let controller1     : VC1 = VC1.instantiateFromStoryboard()
let controller2     : VC2 = VC2.instantiateFromStoryboard()
var controllerArray : [UIViewController] = []
var pageMenu        : CAPSPageMenu?
作为Pagemenu的子视图控制器,您需要创建两个视图控制器文件,并在故事板中进行设置。这两个控制器(VC1和VC2)应该长成这个样子。
import UIKit

class VC1: UIViewController {
    override func viewDidLoad() {
        super.viewDidLoad()
       // child conroller
    }

    class func instantiateFromStoryboard() -> VC1
    {
        let storyboard = UIStoryboard(name: "Main", bundle: nil)
        return storyboard.instantiateViewController(withIdentifier: "VC1") as! VC1
    }
}
func setParallaxMenu(){
        self.scrollView = MXScrollView()
        self.scrollView.backgroundColor  = UIColor.green
        self.scrollView.delegate = self
        self.scrollView.parallaxHeader.view = Parallax // You can set the parallax header view from a nib.
        self.scrollView.parallaxHeader.height = 446.0 // desired hieght or hight of the xib file
        self.scrollView.parallaxHeader.mode = MXParallaxHeaderMode.fill
        self.scrollView.parallaxHeader.minimumHeight = UIApplication.shared.statusBarFrame.size.height + (self.navigationController?.navigationBar.frame.height)!
        let newFrame = CGRect(x: 0,y: UIApplication.shared.statusBarFrame.size.height + (self.navigationController?.navigationBar.frame.height)!, width: self.view.frame.size.width, height: self.view.frame.size.height - (UIApplication.shared.statusBarFrame.size.height + (self.navigationController?.navigationBar.frame.height)!)) // scrollview's frame calculation
        scrollView.frame = newFrame
        scrollView.contentSize = newFrame.size
        self.scrollView.delegate = self
        view.addSubview(scrollView)
        self.pagemenuSetup()
    }


func pagemenuSetup()
    {
        controllerArray.removeAll()
        controllerArray.append(controller1)
        controllerArray.append(controller2)

        controller1.title = "ORANGE"
        controller2.title = "YELLOW"


        // Customize menu (Optional)
        let parameters: [CAPSPageMenuOption] = [
            .menuItemSeparatorWidth(4.3),
            .scrollMenuBackgroundColor(UIColor(red: 25.0/255.0, green: 26.0/255.0, blue: 36.0/255.0, alpha: 1.0)),
            .viewBackgroundColor(UIColor.clear),
            .selectionIndicatorColor(UIColor.white),
            .bottomMenuHairlineColor(UIColor.clear),
            .unselectedMenuItemLabelColor(UIColor(red: 255.0/255.0, green: 255.0/255.0, blue: 255.0/255.0, alpha: 0.5)),
            .menuItemFont(UIFont(name: "Helvetica", size: 16.0)!),
            .enableHorizontalBounce(false),
            .menuHeight(52.0),
            .menuMargin(0.0),
            .menuItemWidth(self.view.bounds.width/2),
            .selectionIndicatorHeight(15.0),
            .menuItemSeparatorPercentageHeight(0.1),
            .iconIndicator(true),
            .iconIndicatorView(self.getIndicatorView())
        ]
        // Initialize scroll menu
        var frame = view.frame
        scrollView.frame = frame
        scrollView.contentSize = frame.size
        let Height = self.view.frame.size.height - (UIApplication.shared.statusBarFrame.size.height + (self.navigationController?.navigationBar.frame.height)!)
        frame.size.height = Height
        self.pageMenu = CAPSPageMenu(viewControllers: controllerArray, frame: frame, pageMenuOptions: parameters)
        pageMenu!.delegate = self
        self.scrollView.addSubview(pageMenu!.view)
        view.addSubview(scrollView)
    }


private func getIndicatorView()->UIView
    {
        let imgView = UIImageView(frame: CGRect(x: 0, y: 0, width: self.view.bounds.width/2, height: 15.0))
        imgView.image = UIImage(named: "Indicator")
        imgView.contentMode = .scaleAspectFit
        return imgView
    }
import UIKit

class CustomHeaderView: UIView {

    //MARK:- Variables
    //MARK: Constants


    //MARK: Variables
    var imageView:UIImageView!
    var colorView:UIView!
    var bgColor = UIColor(red: 235/255, green: 96/255, blue: 91/255, alpha: 1)
    var titleLabel = UILabel()
    var articleIcon:UIImageView!


    //MARK:- Constructor
    init(frame:CGRect, title: String) {

        self.titleLabel.text = title.uppercased()
        super.init(frame: frame)

        setUpView()

    }

    required init?(coder aDecoder: NSCoder) {

        fatalError("init(coder:) has not been implemented")

    }


    //MARK:- Private methods
    private func setUpView() {
        backgroundColor = UIColor.white

        imageView = UIImageView()
        imageView.translatesAutoresizingMaskIntoConstraints = false
        addSubview(imageView)

        colorView = UIView()
        colorView.translatesAutoresizingMaskIntoConstraints = false
        addSubview(colorView)

        let constraints:[NSLayoutConstraint] = [
            imageView.topAnchor.constraint(equalTo: self.topAnchor),
            imageView.leadingAnchor.constraint(equalTo: self.leadingAnchor),
            imageView.trailingAnchor.constraint(equalTo: self.trailingAnchor),
            imageView.bottomAnchor.constraint(equalTo: self.bottomAnchor),
            colorView.topAnchor.constraint(equalTo: self.topAnchor),
            colorView.leadingAnchor.constraint(equalTo: self.leadingAnchor),
            colorView.trailingAnchor.constraint(equalTo: self.trailingAnchor),
            colorView.bottomAnchor.constraint(equalTo: self.bottomAnchor)
        ]
        NSLayoutConstraint.activate(constraints)


        imageView.image = UIImage(named: "bg-header")
        imageView.contentMode = .scaleAspectFill

        colorView.backgroundColor = bgColor
        colorView.alpha = 0.6

        titleLabel.translatesAutoresizingMaskIntoConstraints = false
        self.addSubview(titleLabel)
        let titlesConstraints:[NSLayoutConstraint] = [
            titleLabel.centerXAnchor.constraint(equalTo: self.centerXAnchor),
            titleLabel.topAnchor.constraint(equalTo: self.topAnchor, constant: 28),
            ]
        NSLayoutConstraint.activate(titlesConstraints)

        titleLabel.font = UIFont.systemFont(ofSize: 15)
        titleLabel.textAlignment = .center

        articleIcon = UIImageView()
        articleIcon.translatesAutoresizingMaskIntoConstraints = false
        addSubview(articleIcon)
        let imageConstraints:[NSLayoutConstraint] = [
            articleIcon.centerXAnchor.constraint(equalTo: self.centerXAnchor),
            articleIcon.centerYAnchor.constraint(equalTo: self.centerYAnchor, constant: 6),
            articleIcon.widthAnchor.constraint(equalToConstant: 40),
            articleIcon.heightAnchor.constraint(equalToConstant: 40)
        ]

        NSLayoutConstraint.activate(imageConstraints)
        articleIcon.image = UIImage(named: "article")
    }


    //MARK:- Public methods
    func decrementColorAlpha(offset: CGFloat) {

        if self.colorView.alpha <= 1 {

            let alphaOffset = (offset/500)/85
            self.colorView.alpha += alphaOffset

        }
    }

    func decrementArticleAlpha(offset: CGFloat) {

        if self.articleIcon.alpha >= 0 {

            let alphaOffset = max((offset - 65)/85.0, 0)
            self.articleIcon.alpha = alphaOffset

        }

    }

    func incrementColorAlpha(offset: CGFloat) {

        if self.colorView.alpha >= 0.6 {

            let alphaOffset = (offset/200)/85
            self.colorView.alpha -= alphaOffset

        }

    }

    func incrementArticleAlpha(offset: CGFloat) {

        if self.articleIcon.alpha <= 1 {

            let alphaOffset = max((offset - 65)/85, 0)
            self.articleIcon.alpha = alphaOffset

        }

    }

}
然后是VieController
import UIKit

class ViewController: UIViewController, UITableViewDataSource, UITableViewDelegate {

    //MARK:- Variables
    //MARK: Constants


    //MARK: Variables
    var tableView:UITableView!
    var headerView:CustomHeaderView!
    var headerHeightConstraint:NSLayoutConstraint!


    //MARK: - Lifecycle methods
    override func viewDidLoad() {
        super.viewDidLoad()

        setUpHeader()
        setUpTableView()

    }


    //MARK: - Private methods
    private func setUpHeader() {

        headerView = CustomHeaderView(frame: CGRect.zero, title: "Articles")
        headerView.translatesAutoresizingMaskIntoConstraints = false
        view.addSubview(headerView)

        headerHeightConstraint = headerView.heightAnchor.constraint(equalToConstant: 150)
        headerHeightConstraint.isActive = true

        let constraints:[NSLayoutConstraint] = [
            headerView.topAnchor.constraint(equalTo: view.topAnchor),
            headerView.leadingAnchor.constraint(equalTo: view.leadingAnchor),
            headerView.trailingAnchor.constraint(equalTo: view.trailingAnchor)
        ]

        NSLayoutConstraint.activate(constraints)

    }

    private func setUpTableView() {

        tableView = UITableView()
        tableView.translatesAutoresizingMaskIntoConstraints = false
        view.addSubview(tableView)

        let constraints:[NSLayoutConstraint] = [
            tableView.topAnchor.constraint(equalTo: headerView.bottomAnchor),
            tableView.leadingAnchor.constraint(equalTo: view.leadingAnchor),
            tableView.trailingAnchor.constraint(equalTo: view.trailingAnchor),
            tableView.bottomAnchor.constraint(equalTo: view.bottomAnchor)
        ]

        NSLayoutConstraint.activate(constraints)
        tableView.register(UITableViewCell.self,forCellReuseIdentifier: "cell")

        tableView.dataSource = self
        tableView.delegate = self

    }

    private func animateHeader() {

        self.headerHeightConstraint.constant = 150
        UIView.animate(withDuration: 0.4, delay: 0.0, usingSpringWithDamping: 0.7, initialSpringVelocity: 0.5, options: [.curveEaseInOut], animations: {
            self.view.layoutIfNeeded()
        }, completion: nil)

    }


    //MARK: - UITableView implementation
    //MARK: UITableViewDataSource implementation
    func numberOfSections(in tableView: UITableView) -> Int {
        return 1
    }

    func tableView(_ tableView: UITableView, numberOfRowsInSection section: Int) -> Int {
        return 100
    }

    func tableView(_ tableView: UITableView, cellForRowAt indexPath: IndexPath) -> UITableViewCell {

        let cell = tableView.dequeueReusableCell(withIdentifier: "cell",   for: indexPath)
        cell.textLabel?.text = "Article \(indexPath.row)"
        return cell

    }


    //MARK: UITableViewDelegate implementation
    func scrollViewDidScroll(_ scrollView: UIScrollView) {

        if scrollView.contentOffset.y < 0 {

            self.headerHeightConstraint.constant += abs(scrollView.contentOffset.y)
            headerView.incrementColorAlpha(offset: self.headerHeightConstraint.constant)
            headerView.incrementArticleAlpha(offset: self.headerHeightConstraint.constant)

        }
        else if scrollView.contentOffset.y > 0 && self.headerHeightConstraint.constant >= 65 {

            self.headerHeightConstraint.constant -= scrollView.contentOffset.y/100
            headerView.decrementColorAlpha(offset: scrollView.contentOffset.y)
            headerView.decrementArticleAlpha(offset: self.headerHeightConstraint.constant)

            if self.headerHeightConstraint.constant < 65 {
                self.headerHeightConstraint.constant = 65
            }

        }

    }

    func scrollViewDidEndDragging(_ scrollView: UIScrollView, willDecelerate decelerate: Bool) {

        if self.headerHeightConstraint.constant > 150 {
            animateHeader()
        }

    }

    func scrollViewDidEndDecelerating(_ scrollView: UIScrollView) {

        if self.headerHeightConstraint.constant > 150 {
            animateHeader()
        }

    }

}
根据视频显示的链接结果,接下来的步骤将添加安全区域约束,并可能将nib添加到标题中,但完全取决于您。