我搜索过了,但似乎没有这样的函数。我应该自己使用像素迭代器编写该函数吗?
2个回答
8
ImageMagick提供“compare”函数来正确比较图像。
检查两个图像的md5校验和并不是正确的方法,因为某些图像格式(例如带有EXIF的PNG和JPEG)包含文件创建的日期和时间(见下面的示例1),有些文件可能在视觉上完全相同,但内部表示完全不同(见示例2),或具有不同的位深度(见示例3)。 示例1
为什么这两个MD5值不同?因为它们包含日期...
检查两个图像的md5校验和并不是正确的方法,因为某些图像格式(例如带有EXIF的PNG和JPEG)包含文件创建的日期和时间(见下面的示例1),有些文件可能在视觉上完全相同,但内部表示完全不同(见示例2),或具有不同的位深度(见示例3)。 示例1
# Create two identical images (100x100 pixels, bright red) but with different file contents
convert -size 100x100 xc:red r1.png
convert -size 100x100 xc:red r2.png

# MD5 checksum them
md5 r?.png
MD5 (r1.png) = 9f6d612615efd88c3fd8521d717e9811
MD5 (r2.png) = 996911bec0e0da75af46a1e78c052998      # Mmmm different

# Ask IM to tell us absolute error between the two (number of differing pixels)
compare -metric AE r1.png r2.png null:
0                                                    # No difference - that's better
为什么这两个MD5值不同?因为它们包含日期...
identify -verbose r[12].png | grep -i date
date:create: 2015-03-03T14:57:26+00:00
date:modify: 2015-03-03T14:57:26+00:00
date:create: 2015-03-03T14:57:43+00:00
date:modify: 2015-03-03T14:57:43+00:00
例子2
# Create PNG and identical GIF
convert -size 100x100 xc:red r.png
convert -size 100x100 xc:red r.gif

# Compare with MD5 sums
md5 r.png r.gif
MD5 (r.png) = 692ef06b62a15b799d5dc549b0dd3737
MD5 (r.gif) = 549feea78dc438924fbb3e0ef97dc0b3         # Ooops

# Compare properly
compare -metric AE r.gif r.png null:
0                                                      # Identical
例子3
# Create 8-bit PNG and 16-bit PNG
convert -size 100x100 xc:red PNG8:8.png
convert -size 100x100 xc:red PNG48:48.png

# MD5 sum them
md5 8.png 48.png
MD5 (8.png) = eb3fc9a06e1632c3b41ebb986b81a816
MD5 (48.png) = 32fdf1c30793a4fed941c91d27084e0a   # Ooops

# Let ImageMagick compare them
compare -metric AE 8.png 48.png  null:
0
图像的模糊比较
正如Kurt所提到的,这也引出了对图像进行模糊比较的可能性。我们可以通过以下方式来探索:
# Create a grey image, 100x100 and put some noise in it
convert -size 100x100 xc:gray +noise gaussian noise.png
现在将所有像素乘以 1.01,使它们变得微不可见地更亮1%:
# Make pixels 1% brighter
convert noise.png -evaluate multiply 1.01 brighternoise.png

# ... and compare the statistics of the two images
identify -verbose *noise* | grep -E "^Image|mean"

Image: brighternoise.png
  mean: 127.235 (0.498959)       <--- The brighter image is, well, brighter
Image: noise.png
  mean: 126.175 (0.494805)
现在我们来用几种不同的方式进行比较:
# Pixels may differ by up to 2% before being considered different
compare -fuzz 2% -metric AE noise.png brighternoise.png null:
0        # All pixel values within 2% between the 2 images

# Pixels may only differ by 0.5% before being considered different
compare -fuzz 0.5% -metric AE noise.png brighternoise.png null:
594      # 594 of the 10,000 pixels differ by more than 0.5%

# Calculate Root Mean Square Error (RMSE) to see how much pixels tend to differ
compare -metric RMSE noise.png brighternoise.png null:
278.96 (0.00425666)    # On average, the pixels differ by 0.4% - i.e. hardly at all
- Mark Setchell
1
3
Mark的答案很准确。不过,他忘了提到compare还可以返回一个“差异图像”,其中任何有差异的像素会被标记为红色,而相同的像素则会是白色。
# Create a PNG and a JPEG from the builtin 'wizard:' image:
convert wizard: wizard.png
convert wizard: wizard.jpg
现在比较这两个:
compare wizard.png wizard.jpg delta.png
这是“delta.png”:
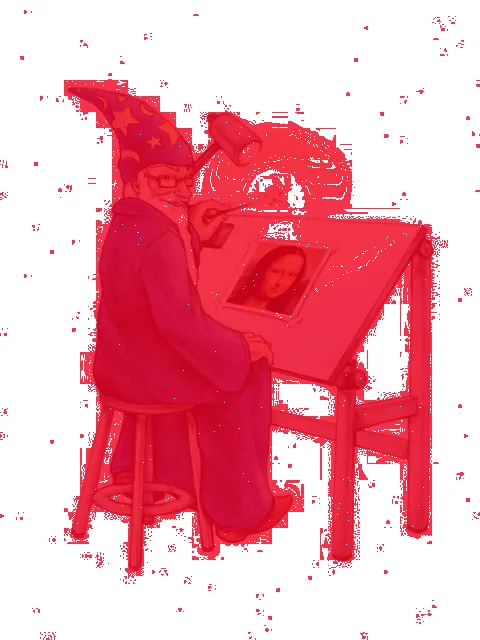
PNG和JPEG之间有很多差异!这是因为JPEG是一种有损图像格式所解释的...
正如您所看到的,“delta.png”具有淡色背景。如果您不想要这个背景,而只想要红/白色像素,请修改compare命令:
compare wizard.png wizard.jpg -compose src delta.png
此外,您可能希望忽略低于某个阈值的差异。这里 -fuzz N% 参数非常有用。
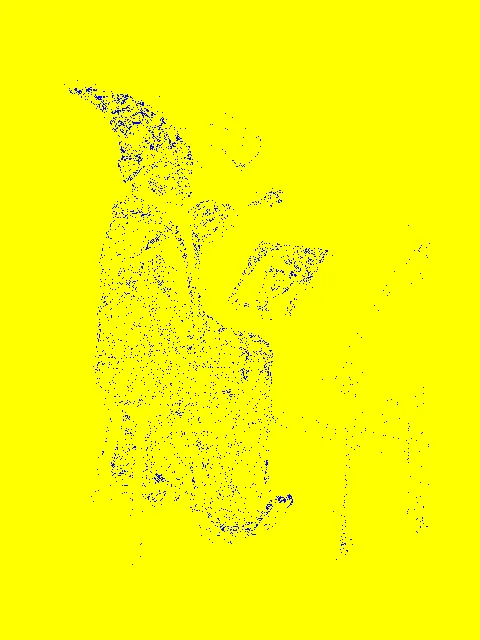
您想要蓝色像素而不是红色的吗?还想要黄色的而不是白色的吗?这里是:
compare                  \
  -highlight-color blue  \
  -lowlight-color yellow \
  -fuzz 3%               \
   wizard.png            \
   wizard.jpg            \
   delta2.png
您想要一个文本描述所有像素以及它们各自坐标之间的差异吗?使用特殊输出格式*.txt可能是不错的选择。
可以尝试以下方法:
compare                  \
  -fuzz 6%               \
   wizard.png            \
   wizard.jpg            \
  -compose src           \
   delta3.txt
“delta3.txt” 文件会非常大,因为它按照以下方式包含每个像素的一行内容:
# ImageMagick pixel enumeration: 480,640,255,srgba
0,0: (255,255,255,0.8)  #FFFFFFCC  srgba(255,255,255,0.8)
1,0: (255,255,255,0.8)  #FFFFFFCC  srgba(255,255,255,0.8)
2,0: (255,255,255,0.8)  #FFFFFFCC  srgba(255,255,255,0.8)
[....]
77,80: (241,0,30,0.8)  #F1001ECC  srgba(241,0,30,0.8)
[....]
第一列给出了相应像素的 (行,列) 对(计数从零开始,最顶端、最左边的像素的地址为 (0,0))。
接下来的三列以3种常见的格式返回相应的像素颜色。
顺便说一句,ImageMagick可以毫无问题地将 delta3.txt 文件转换回真实图像:
convert delta3.txt delta3.png
如果要将所有不同的像素(红色)存入文本文件,可以按照以下步骤进行:
compare                  \
  -fuzz 6%               \
   wizard.png            \
   wizard.jpg            \
  -compose src           \
   txt:-                 \
| grep -v '#FFFFFFCC'
统计不同像素的数量:
compare                  \
  -fuzz 6%               \
   wizard.png            \
   wizard.jpg            \
  -compose src           \
   txt:-                 \
| grep -v '#FFFFFFCC'    \
| wc -l
使用-fuzz 6%时,我有2269个不同的像素。当使用-fuzz 0%时,我得到了122474个不同的像素。(这些图像中的像素总数为307200。)
- Kurt Pfeifle
网页内容由stack overflow 提供, 点击上面的可以查看英文原文,
原文链接
原文链接
compare -metric MAE 8.png 48.png。在新版本中,他们更改了参数名称。 - Paul Jurczak