最佳解决方案是使用RxJava/RxAndroid并通过它执行后台任务,但我无法在看到您的代码之前发布使用rx的解决方案,而且@user27799已经提供了一个示例,此外@Manas Chaudhari也提供了对逻辑的很好的解释(在下面)。
import static android.view.ViewGroup.LayoutParams.WRAP_CONTENT;
public class MapsActivity extends AppCompatActivity implements OnMapReadyCallback
{
private GoogleMap mGoogleMap;
private FrameLayout frameLayout, circleFrameLayout;
private ProgressBar progress;
private TextView textView;
private int circleRadius;
private boolean isMoving = false;
private SupportMapFragment mapFragment;
@Override
protected void onCreate(Bundle savedInstanceState) {
super.onCreate(savedInstanceState);
setContentView(R.layout.activity_maps);
initViews();
}
private void initViews() {
frameLayout = (FrameLayout) findViewById(R.id.map_container);
circleFrameLayout = (FrameLayout) frameLayout.findViewById(R.id.pin_view_circle);
textView = (TextView) circleFrameLayout.findViewById(R.id.textView);
progress = (ProgressBar) circleFrameLayout.findViewById(R.id.profile_loader);
mapFragment = (SupportMapFragment) getSupportFragmentManager().findFragmentById(R.id.map);
mapFragment.getMapAsync(this);
}
private void moveMapCamera() {
if (mGoogleMap == null) {
return;
}
CameraUpdate center = CameraUpdateFactory
.newLatLng(new LatLng(40.76793169992044, -73.98180484771729));
CameraUpdate zoom = CameraUpdateFactory.zoomTo(15);
mGoogleMap.moveCamera(center);
mGoogleMap.animateCamera(zoom);
}
@Override
public void onMapReady(GoogleMap googleMap) {
mGoogleMap = googleMap;
mGoogleMap.setOnCameraMoveStartedListener(new GoogleMap.OnCameraMoveStartedListener() {
@Override
public void onCameraMoveStarted(int i) {
isMoving = true;
textView.setVisibility(View.GONE);
progress.setVisibility(View.GONE);
Drawable mDrawable;
if (Build.VERSION.SDK_INT >= 21)
mDrawable = getApplicationContext().getResources().getDrawable(R.drawable.circle_background_moving, null);
else
mDrawable = getApplicationContext().getResources().getDrawable(R.drawable.circle_background_moving);
circleFrameLayout.setBackground(mDrawable);
resizeLayout(false);
}
});
mGoogleMap.setOnCameraIdleListener(new GoogleMap.OnCameraIdleListener() {
@Override
public void onCameraIdle() {
isMoving = false;
textView.setVisibility(View.INVISIBLE);
progress.setVisibility(View.VISIBLE);
resizeLayout(true);
new Handler().postDelayed(new Runnable() {
public void run() {
Drawable mDrawable;
if (Build.VERSION.SDK_INT >= 21)
mDrawable = getApplicationContext().getResources().getDrawable(R.drawable.circle_background, null);
else
mDrawable = getApplicationContext().getResources().getDrawable(R.drawable.circle_background);
if (!isMoving) {
circleFrameLayout.setBackground(mDrawable);
textView.setVisibility(View.VISIBLE);
progress.setVisibility(View.GONE);
}
}
}, 1500);
}
});
MapsInitializer.initialize(this);
moveMapCamera();
}
private void resizeLayout(boolean backToNormalSize){
FrameLayout.LayoutParams params = (FrameLayout.LayoutParams) circleFrameLayout.getLayoutParams();
ViewTreeObserver vto = circleFrameLayout.getViewTreeObserver();
vto.addOnGlobalLayoutListener(new ViewTreeObserver.OnGlobalLayoutListener() {
@Override
public void onGlobalLayout() {
circleFrameLayout.getViewTreeObserver().removeGlobalOnLayoutListener(this);
circleRadius = circleFrameLayout.getMeasuredWidth();
}
});
if (backToNormalSize) {
params.width = WRAP_CONTENT;
params.height = WRAP_CONTENT;
params.topMargin = 0;
} else {
params.topMargin = (int) (circleRadius * 0.3);
params.height = circleRadius - circleRadius / 3;
params.width = circleRadius - circleRadius / 3;
}
circleFrameLayout.setLayoutParams(params);
}
}
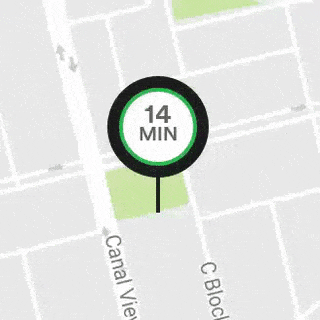
居中屏幕的布局文件:
<?xml version="1.0" encoding="utf-8"?>
<FrameLayout xmlns:android="http://schemas.android.com/apk/res/android"
         android:id="@+id/map_container"
         android:layout_width="match_parent"
         android:layout_height="match_parent">

<fragment xmlns:tools="http://schemas.android.com/tools"
          android:id="@+id/map"
          android:name="com.google.android.gms.maps.SupportMapFragment"
          android:layout_width="match_parent"
          android:layout_height="match_parent"
          tools:context="com.example.mapstest.MapsActivity" />

<FrameLayout
    android:id="@+id/pin_view_line"
    android:layout_width="wrap_content"
    android:layout_height="wrap_content"
    android:layout_gravity="center"
    android:layout_marginTop="@dimen/line_top_margin"
    android:background="@drawable/line_background"/>

<FrameLayout
    android:id="@+id/pin_view_circle"
    android:layout_gravity="center"
    android:layout_width="wrap_content"
    android:layout_height="wrap_content"
    android:background="@drawable/circle_background">

    <TextView
        android:id="@+id/textView"
        android:layout_margin="@dimen/inner_circle_margin"
        android:layout_width="@dimen/inner_circle_radius"
        android:layout_height="@dimen/inner_circle_radius"
        android:layout_gravity="top|center_horizontal"
        android:gravity="center"
        android:text="12 min"
        android:textSize="@dimen/text_size"
        android:textColor="@android:color/white"/>

    <ProgressBar
        android:id="@+id/profile_loader"
        android:layout_margin="@dimen/inner_circle_margin"
        android:layout_width="@dimen/inner_circle_radius"
        android:layout_height="@dimen/inner_circle_radius"
        android:indeterminate="true"
        android:layout_gravity="top|center_horizontal"
        android:visibility="gone"
        android:contentDescription="@null"/>

</FrameLayout>
不移动时的圆形背景:
<?xml version="1.0" encoding="utf-8"?>
<shape xmlns:android="http://schemas.android.com/apk/res/android"
   android:shape="oval">
<solid android:color="@android:color/holo_green_dark"/>
<stroke
    android:width="@dimen/stroke_width"
    android:color="@android:color/black"/>
<size
    android:width="@dimen/circle_radius"
    android:height="@dimen/circle_radius"/>
</shape>
当地图移动时,圆形背景:
<?xml version="1.0" encoding="utf-8"?>
<shape xmlns:android="http://schemas.android.com/apk/res/android"
   android:shape="oval">
<solid android:color="@android:color/black"/>
<size
    android:width="@dimen/circle_radius"
    android:height="@dimen/circle_radius"/>
</shape>
行背景文件:
<?xml version="1.0" encoding="utf-8"?>
<shape xmlns:android="http://schemas.android.com/apk/res/android"
   android:shape="rectangle">
<solid android:color="@android:color/black"/>
<size
    android:width="@dimen/line_width"
    android:height="@dimen/line_height"/>
</shape>
尺寸:
<?xml version="1.0" encoding="utf-8"?>
<resources>
  <dimen name="circle_radius">48dp</dimen>
  <dimen name="line_width">4dp</dimen>
  <dimen name="line_height">40dp</dimen>
  <dimen name="stroke_width">4dp</dimen>
  <dimen name="text_size">10sp</dimen>
  <dimen name="inner_circle_radius">40dp</dimen>
  <dimen name="inner_circle_margin">4dp</dimen>
  <dimen name="line_top_margin">20dp</dimen>
</resources>
希望这篇文章对您有所帮助,如果您有任何问题,请随时提出。如果您觉得有需要改进的地方,也欢迎编辑我的解决方案。
祝好。