最佳方式管理具有不同设置和名称的开发、测试和生产构建。

15

我有三个带有不同API Key和一些不同设置的API

  • 用于开发或内部测试构建 - iOS应用商店之外的开发分发

    • Host - devapi.project-name.com
    • API Key - development_key
    • FLEX[1] - 启用
  • 用于客户端测试构建 - iOS应用商店之外的企业级分发

    • Host - stgapi.project-name.com
    • API Key - enterprise_key
    • FLEX - 启用
  • 用于生产构建 - 在iOS应用商店中分发

    • Host - API.project-name.com
    • API key - app_store_key
    • FLEX - 禁用

我可以通过使用DEBUG来管理两个设置

#if DEBUG
    #define API_BASE_URL @"http://devapi.project-name.com/api/v1"
    #define API_KEY @"development_key"
#else
    #define API_BASE_URL @"http://stgapi.project-name.com/api/v1"
    #define API_KEY @"enterprise_key"
#endif

// In AppDelegate.m 
#if DEBUG
    [[FLEXManager sharedManager] showExplorer];
#endif

但首要问题是企业分发(用于客户测试)和 iOS 应用商店分发(生产)版本,每次需要更改代码才能进行企业或应用商店的分发。

  • 对于企业分发:

    #if DEBUG
        //debug setting
    #else
        //enterprise setting
        #define API_BASE_URL @"http://stgapi.project-name.com/api/v1"
        #define API_KEY @"enterprise_key"
    #endif
    
  • 用于App Store发布

  • #if DEBUG
        //debug setting
    #else
        //app store setting
        #define API_BASE_URL @"http://api.project-name.com/api/v1"
        #define API_KEY @"app_store_key"
    #endif
    

我正在寻找类似这样的东西

#ifdef DEVELOPMENT
    #define API_BASE_URL @"http://devapi.project-name.com/api/v1"
    #define API_KEY @"development_key"
#elif ENTERPRISE
    #define API_BASE_URL @"http://stgapi.project-name.com/api/v1"
    #define API_KEY @"enterprise_key"
#elif APP_STORE
    #define API_BASE_URL @"http://api.project-name.com/api/v1"
    #define API_KEY @"app_store_key"
#endif

还是其他什么?


第二个问题

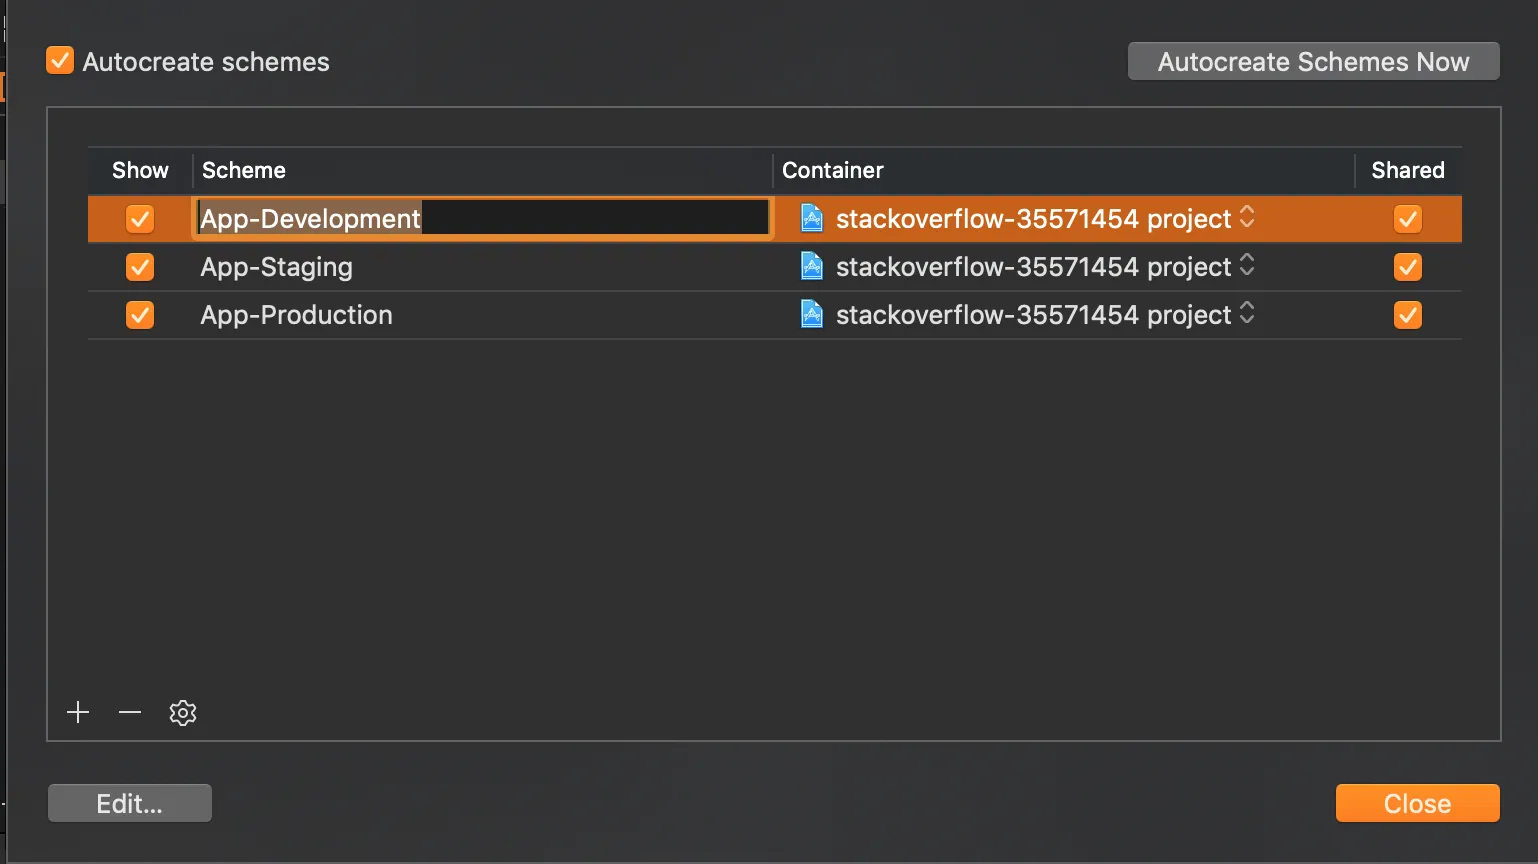
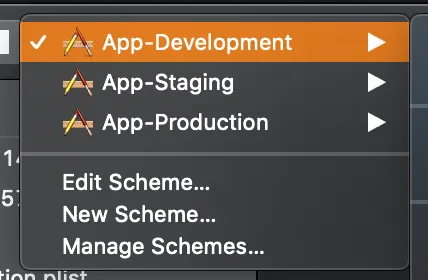
是否有一种方法可以创建三个不同名称的构建,而不需要创建不同的目标?

  • ProductName - 用于App Store
  • ProductName-Dev - 用于内部开发构建
  • ProductName-Stg - 用于客户测试(企业)构建

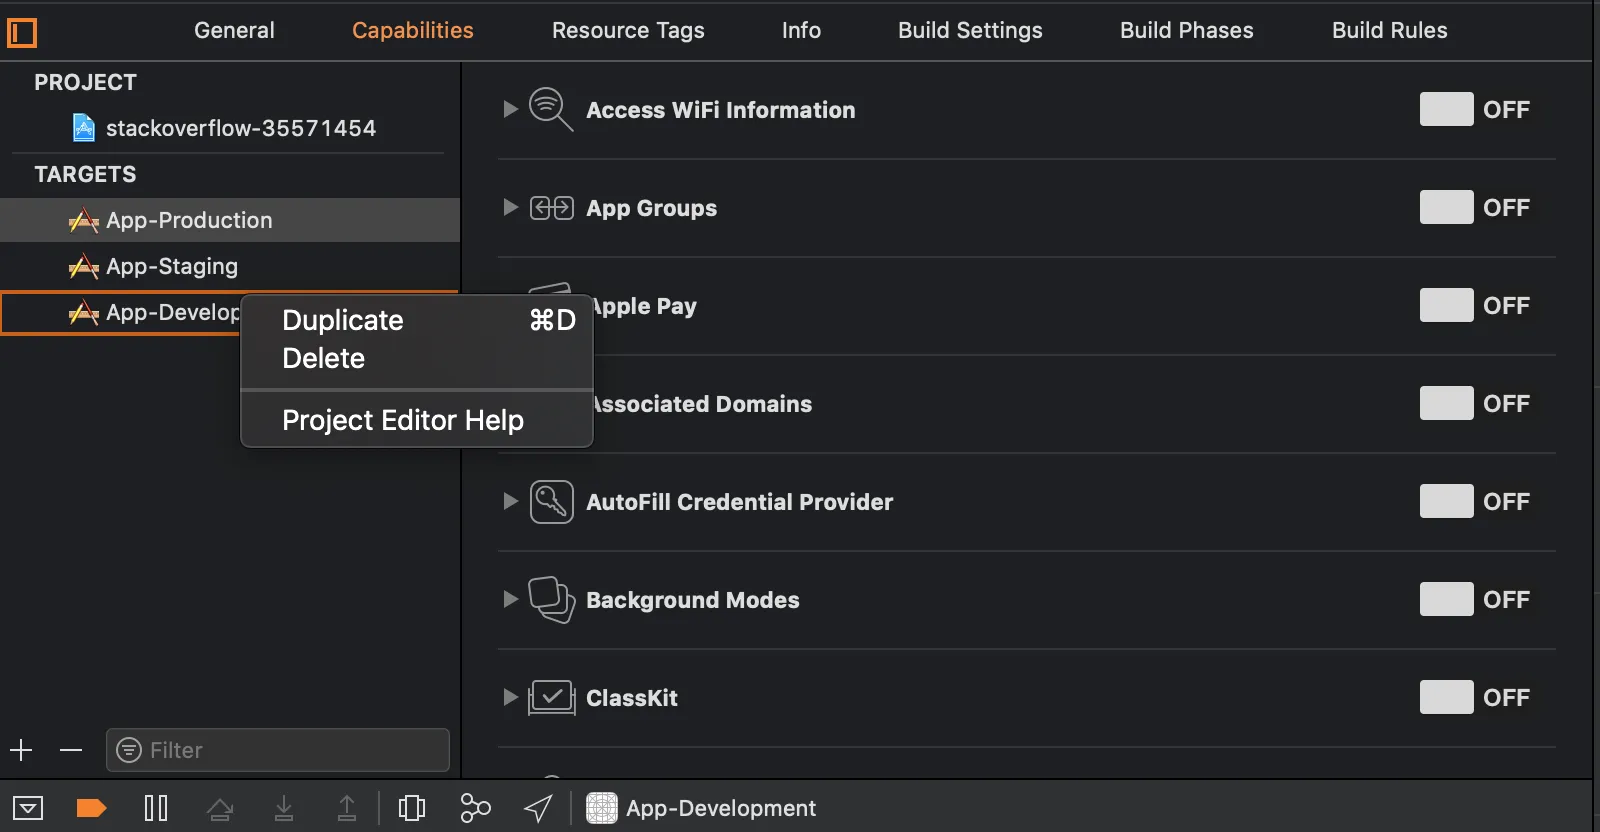
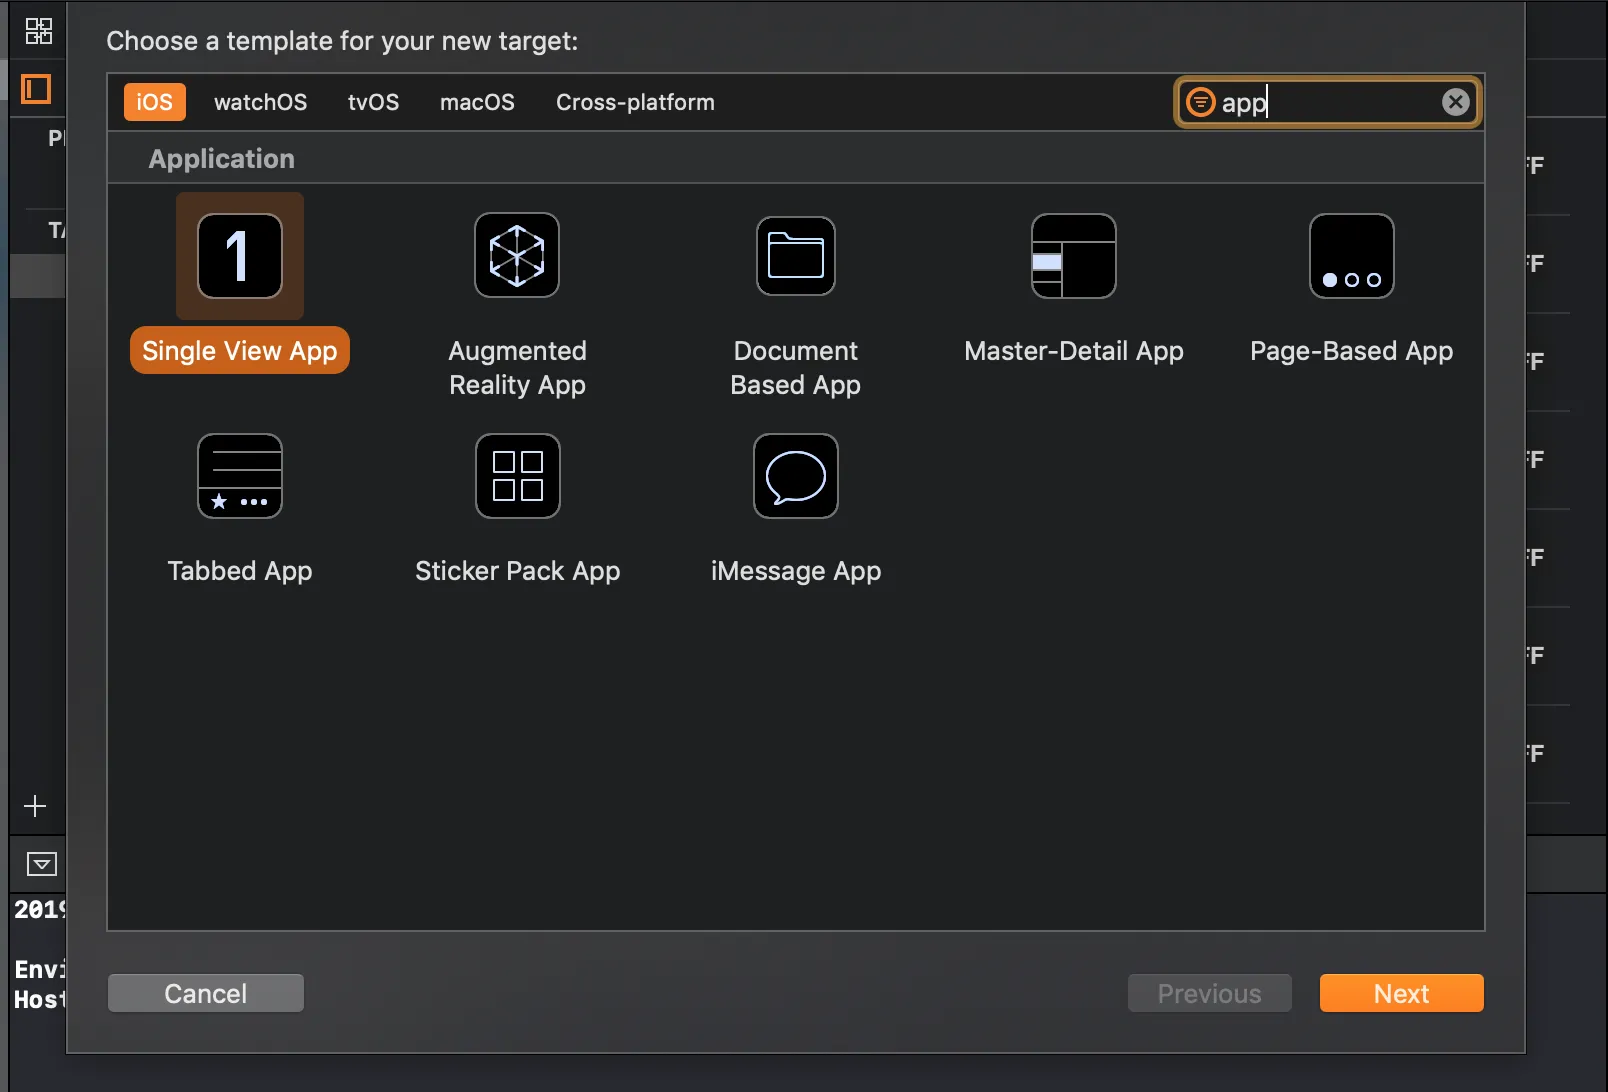
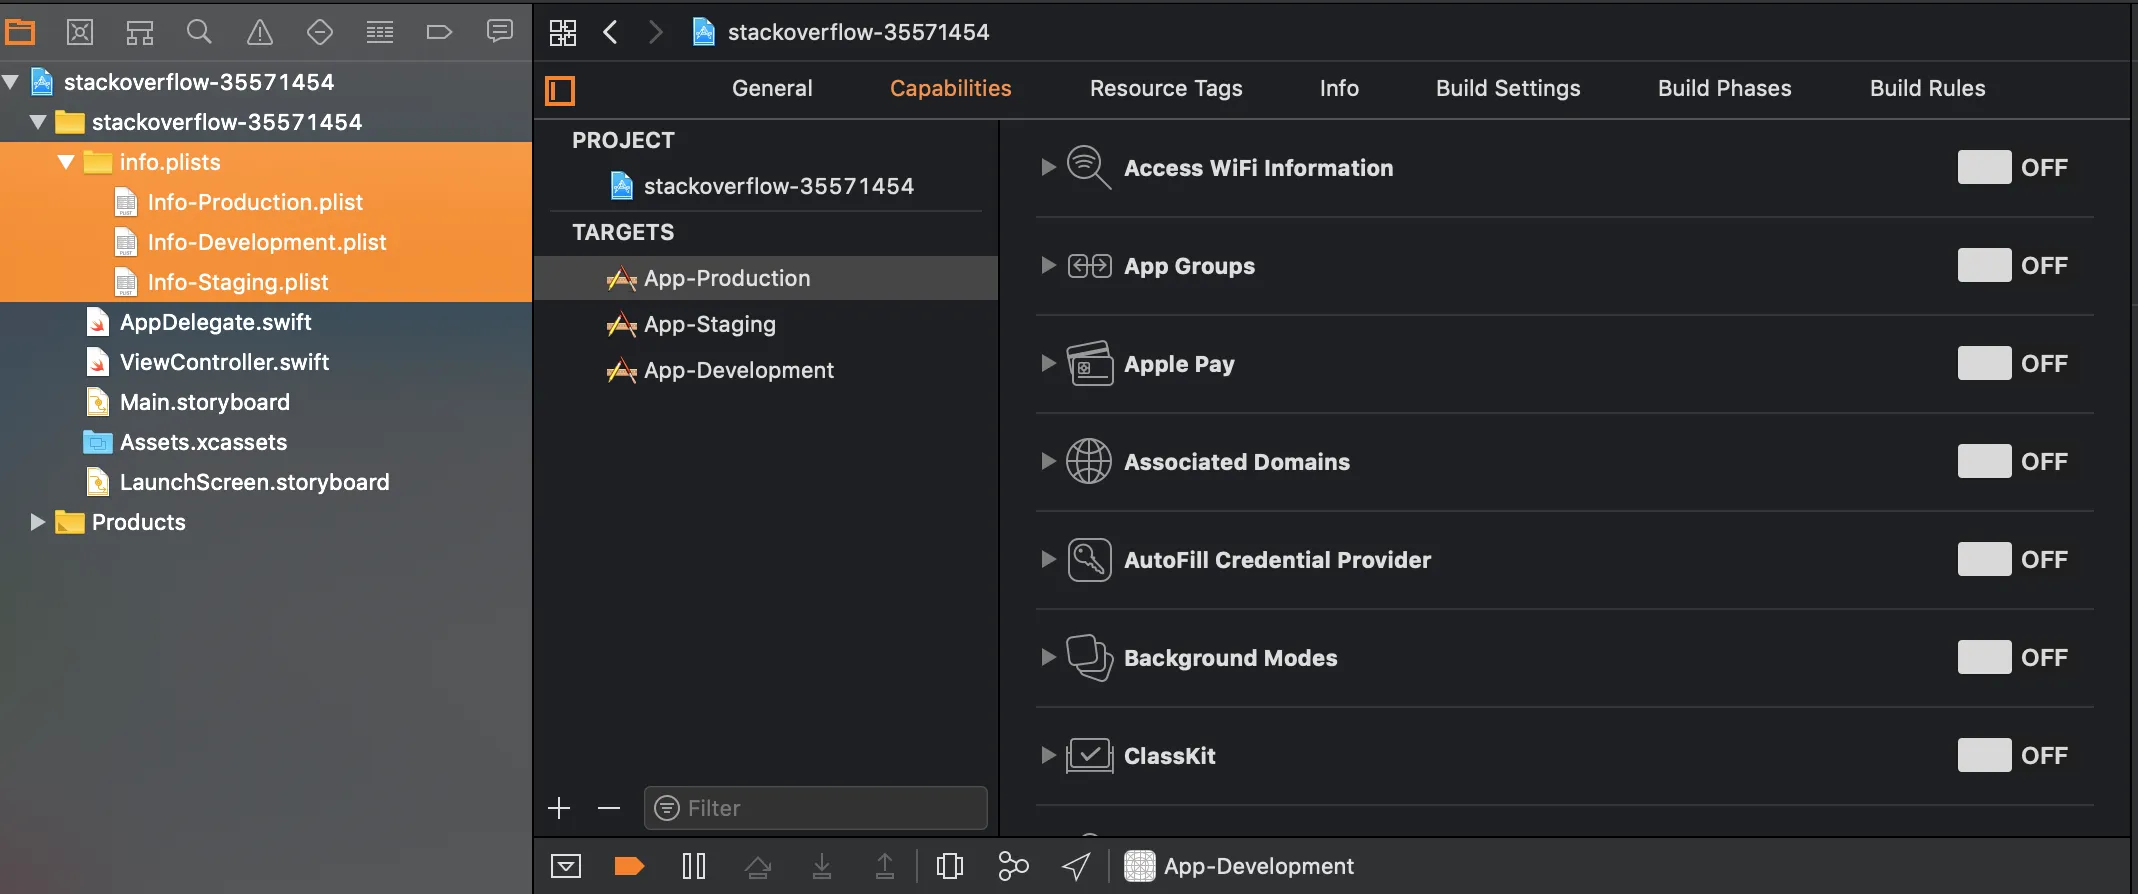
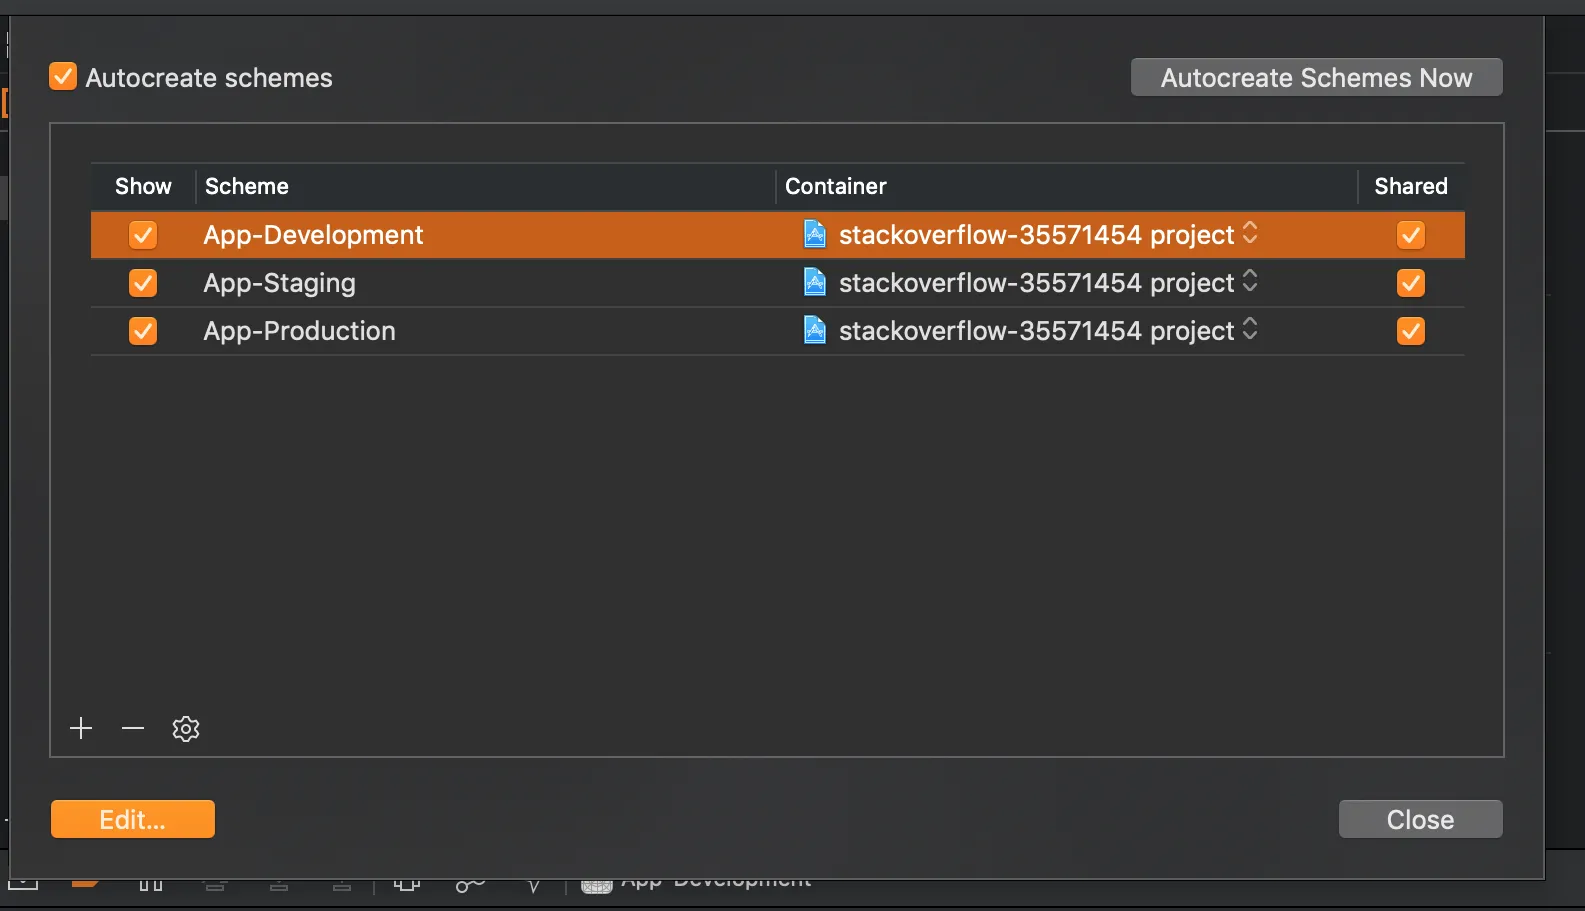
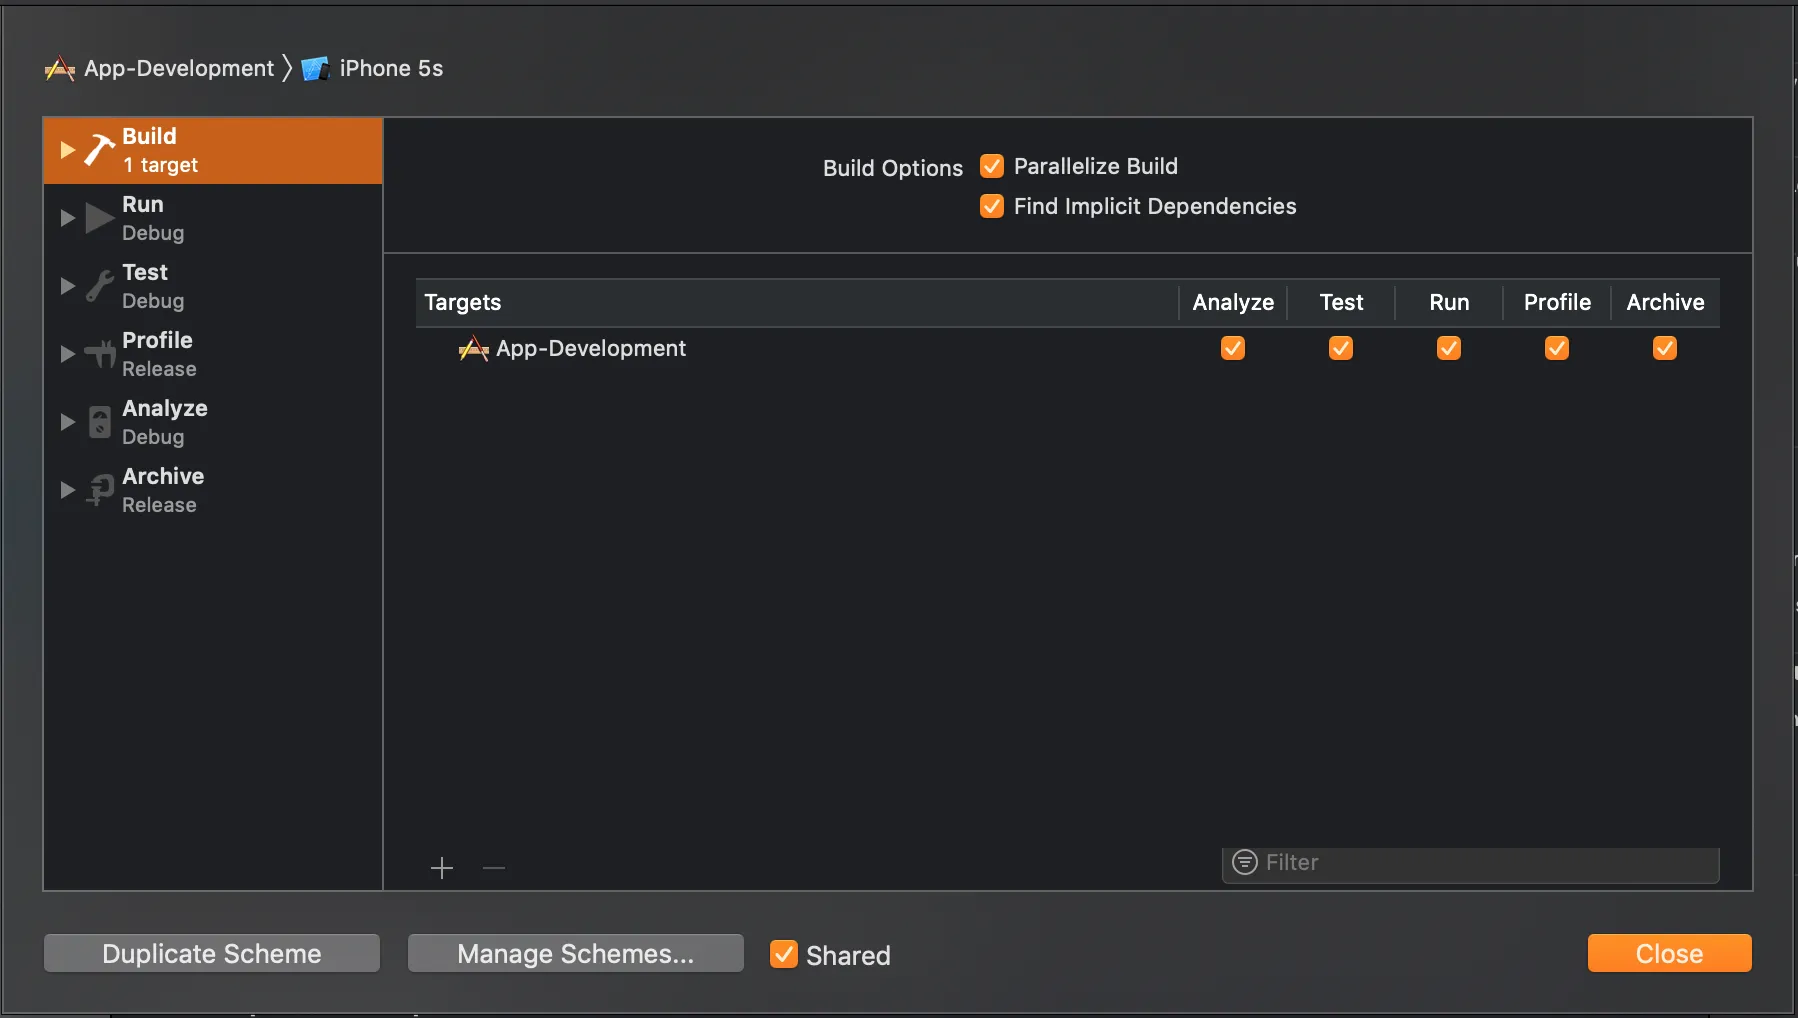
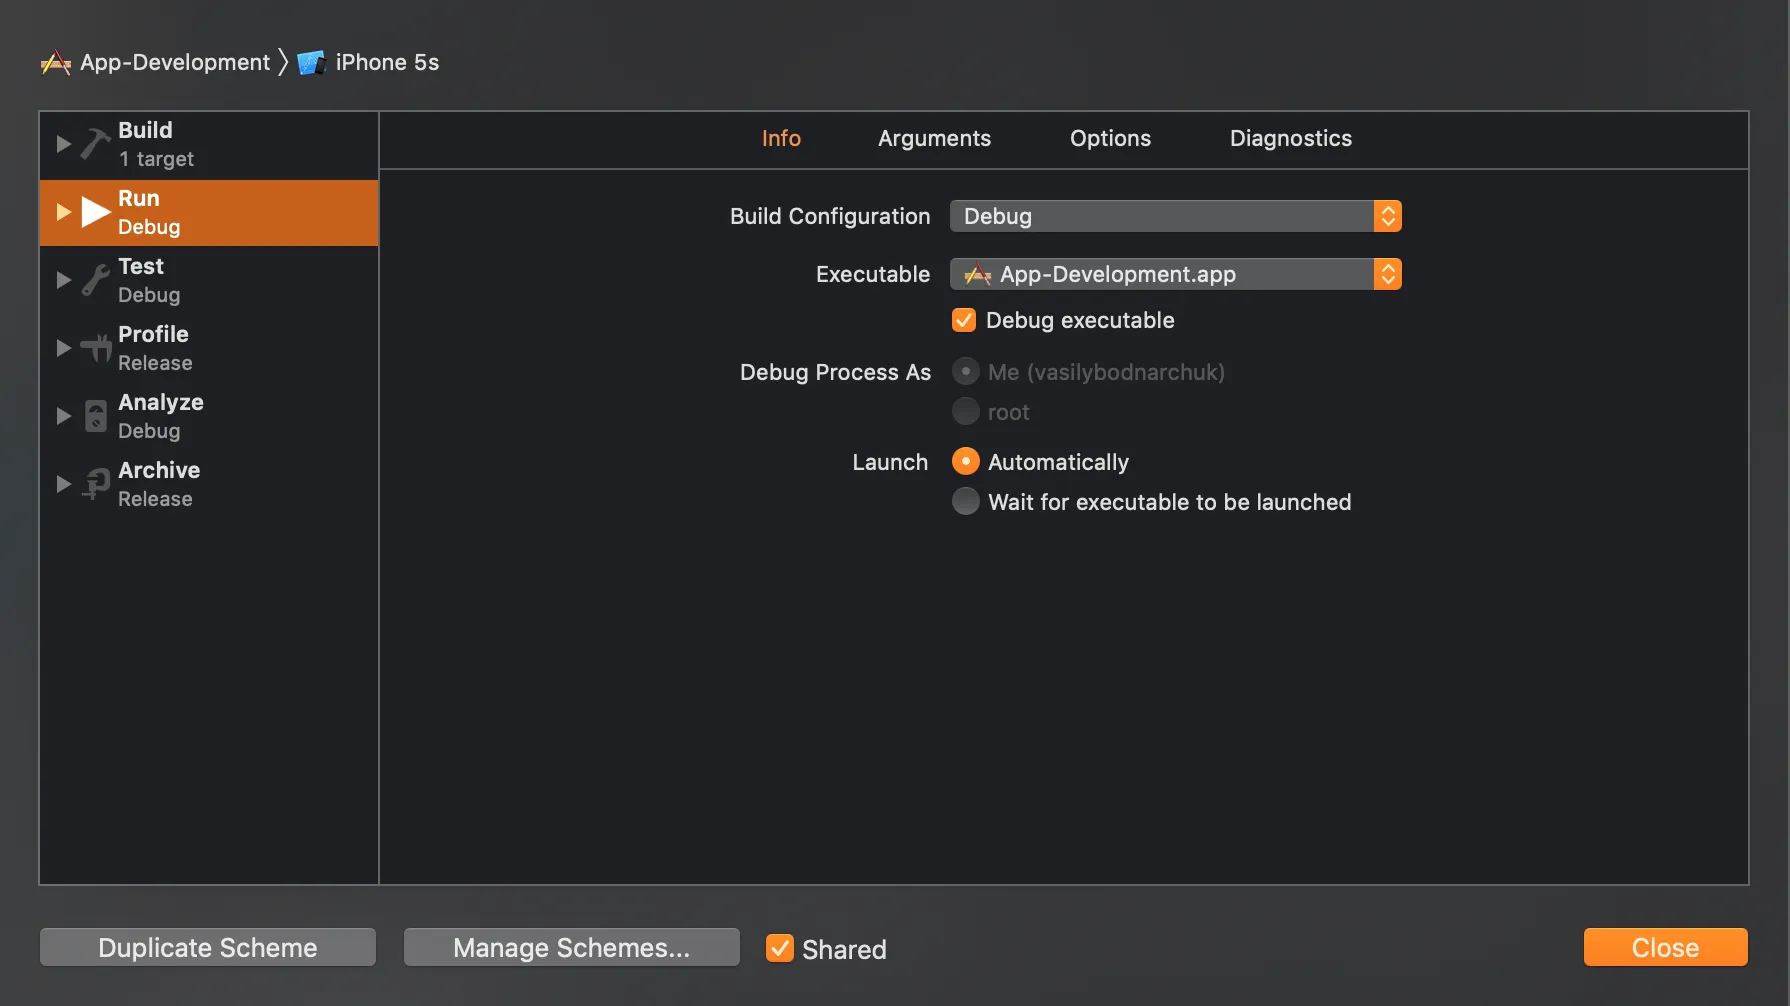
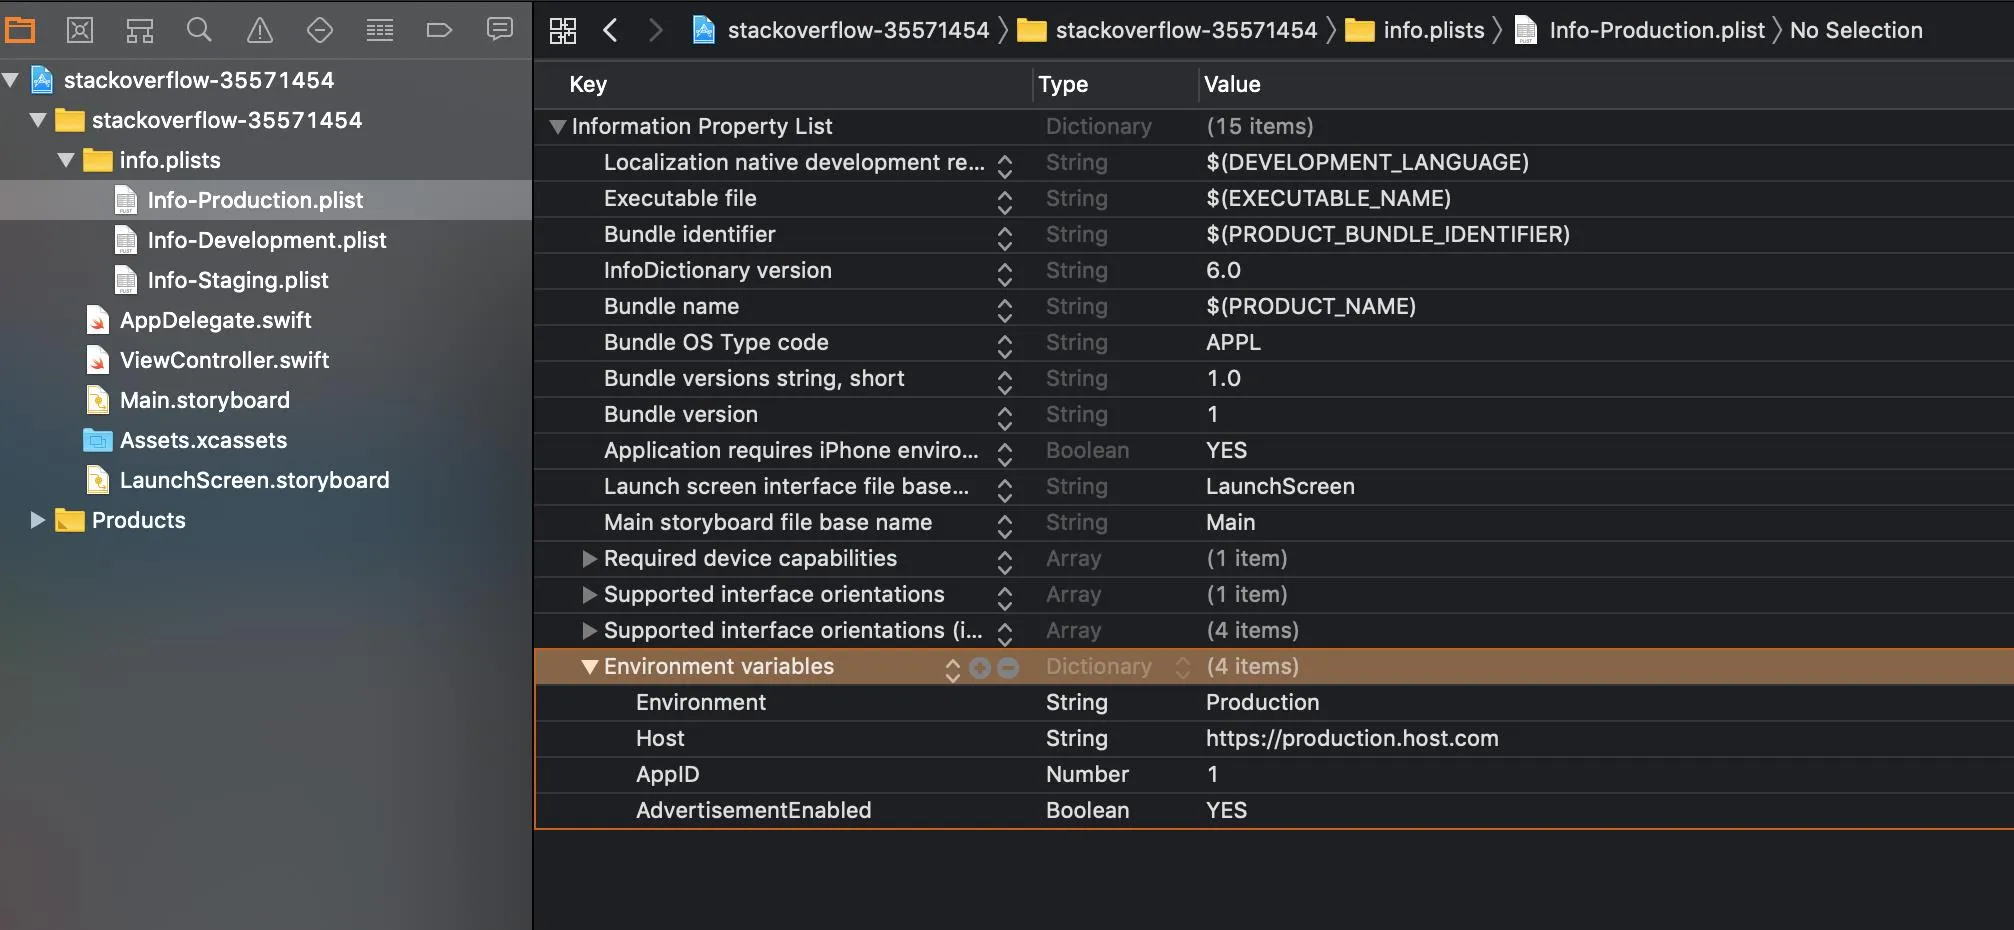
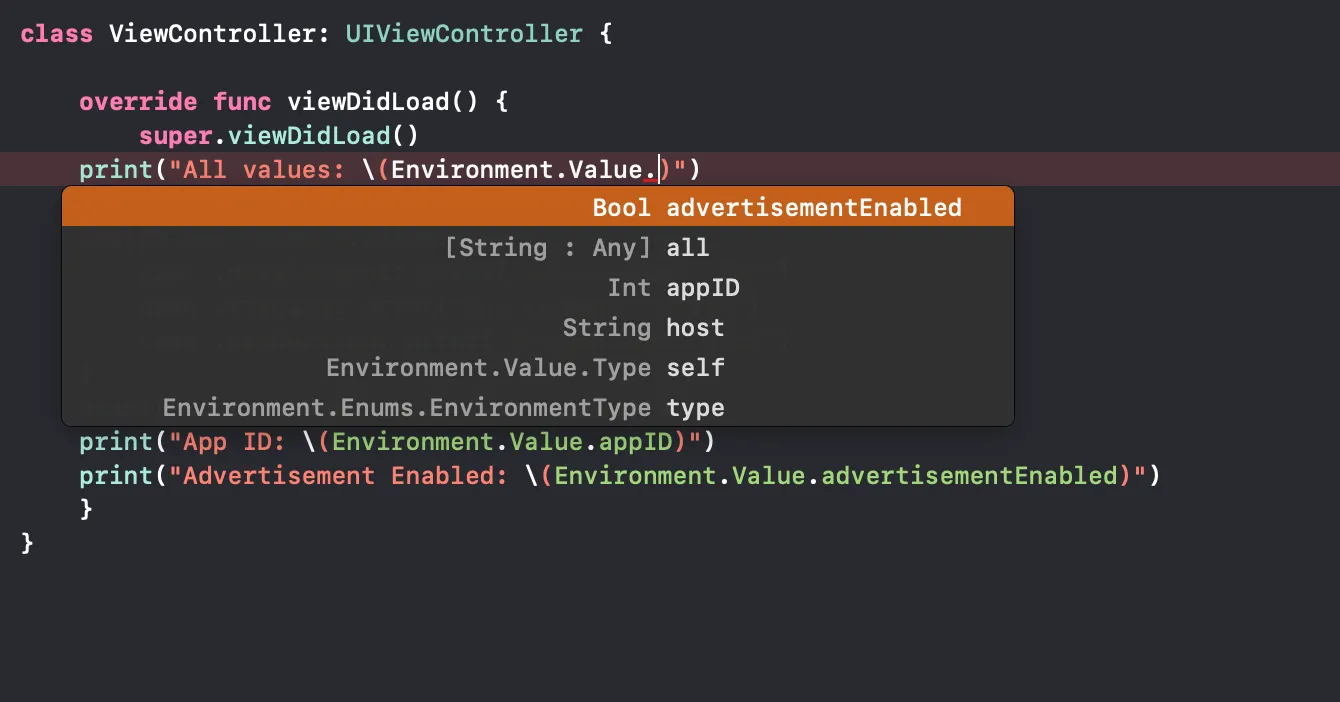
我刚刚创建了演示项目和完整的可视化指南,基于 iamnichols 给出的解决方案

3个回答

17
调试版和发布版的不同在于一个被归档并导出,而另一个是通过Xcode在调试器中本地运行。你可能会发现有时也想在调试器中运行生产或暂存版本,但通过#ifdef DEBUG将它们分开后,可能会遇到问题。
以下是我所做的简化版:

创建个人配置

在项目(而非目标)设置中,创建以下配置(从原始配置进行复制):
  • Debug_Dev
  • Debug_Staging
  • Debug_Prod
  • Release_Dev
  • Release_Staging
  • Release_Prod
请注意,如果使用Cocoapods,则需要将配置设置回无状态,在项目中删除Pods文件夹的内容(而不是Pods项目),然后重新运行pod install

为每个环境创建方案

不只是MyApp方案,还要创建以下方案(将原始方案重复):
  • MyApp_Dev
  • MyApp_Staging
  • MyApp_Prod
在每个方案中,根据需要使用关联的Debug_*和Release_*配置。

添加预处理宏以识别环境

添加附加的预处理宏以识别正在构建的环境。
在项目构建设置中,单击+并添加用户定义的构建设置,将其命名为MYAPP_ENVIRONMENT。然后,对于每个不同的环境组,在每个组中添加不同的预处理宏。例如:ENV_DEV=1ENV_STAGING=1ENV_PROD=1
然后,在c预处理器宏(再次在项目级别而不是目标级别)中使用此新的MYAPP_ENVIRONMENT设置,使用$(MYAPP_ENVIRONMENT)
这样,您就可以确定正在构建哪个环境,如下所示:
#ifdef ENV_DEV
    NSString * const MyAppAPIBaseURL = @"https://api-dev.myapp.com/";
#elif ENV_SAGING
    NSString * const MyAppAPIBaseURL = @"https://api-staging.myapp.com/";
#elif ENV_PROD
    NSString * const MyAppAPIBaseURL = @"https://api.myapp.com/";
#endif

这可能需要消化一下,但请告诉我你的进展。


然后您还可以创建不同的用户定义构建设置来执行不同的操作,例如更改应用程序的显示名称。

您可以通过创建一个名为MYAPP_DISPLAY_NAME的新设置来实现这一点,为每个配置设置正确的名称,然后在您的info.plist中将Bundle Display Name的值设置为$(MYAPP_DISPLAY_NAME)


完美的答案!!谢谢!! - Vineet Choudhary
这里的一切都正常运作,除了我没有看到那些预处理宏起作用。在开发环境中,开发并不是真实的。 - undefined

3

详情

  • Xcode 版本 10.2.1 (10E1001),Swift 5

解决方案

1) 创建(或复制)目标

enter image description here

或者

enter image description here

我的样例:

我复制了现有的目标并将它们重命名。我的目标名称如下:

  • App-Production(生产环境)
  • App-Staging(预发布环境)
  • App-Development(开发环境)

2)组织和重命名 info plists

我把所有的plist文件都放在一个文件夹里:info.plists

enter image description here

3) 重命名构建方案

enter image description here


enter image description here

4) 检查构建方案参数

点击编辑按钮

enter image description here


检查您的构建方案是否连接到正确的目标。

我的示例:

App-Development构建方案(请看下面图像左上角)连接到App-Development目标(请看下面图像中央的目标)。

  • App-Development构建方案中,选择的目标是App-Development
  • App-Staging构建方案中,选择的目标是App-Staging
  • App-Production构建方案中,选择的目标是App-Production

enter image description here


同时检查可执行应用程序。

我的示例:

  • App-Development构建方案中,可执行应用程序为App-Development.app
  • App-Staging构建方案中,可执行应用程序为App-Staging.app
  • App-Production构建方案中,可执行应用程序为App-Production.app

enter image description here

5)向信息属性列表中添加值。

enter image description here

我的例子:

Info-Production.plist

<key>LSEnvironment</key>
<dict>
    <key>Environment</key>
    <string>Production</string>
    <key>Host</key>
    <string>https://production.host.com</string>
    <key>AppID</key>
    <integer>1</integer>
    <key>AdvertisementEnabled</key>
    <true/>
</dict>

Info-Development.plist

<key>LSEnvironment</key>
<dict>
    <key>Environment</key>
    <string>Development</string>
    <key>Host</key>
    <string>https://development.host.com</string>
    <key>AppID</key>
    <integer>2</integer>
    <key>AdvertisementEnabled</key>
    <false/>
</dict>

Info-Staging.plist

<key>LSEnvironment</key>
<dict>
    <key>Environment</key>
    <string>Staging</string>
    <key>Host</key>
    <string>https://staging.host.com</string>
    <key>AppID</key>
    <integer>3</integer>
    <key>AdvertisementEnabled</key>
    <false/>
</dict>

Environment.swift

import Foundation

// MARK: - Environment main class

class Environment {

    class Value { private init(){} }
    class Enums { private init(){} }
}

extension Environment.Value {
    static var all: [String: Any] {
        return Bundle.main.infoDictionary?["LSEnvironment"] as? [String: Any] ?? [:]
    }
}

extension Environment.Value {

    private enum Keys: String {
        case environment = "Environment"
        case host = "Host"
        case appID = "AppID"
        case advertisementEnabled = "AdvertisementEnabled"
    }

    private static func get<T>(value key: Keys, type: T.Type) -> T? {
        return all[key.rawValue] as? T
    }
}

// MARK: - Environment type value

extension Environment.Enums {
    enum EnvironmentType: String {
        case production = "Production"
        case staging = "Staging"
        case development = "Development"
    }
}

extension Environment.Value {
    static var type: Environment.Enums.EnvironmentType {
        let environment = get(value: .environment, type: String.self)!
        return Environment.Enums.EnvironmentType(rawValue: environment)!
    }
}

// MARK: - Host (sample with string)

extension Environment.Value {
    static var host: String { return get(value: .host, type: String.self)! }
}

// MARK: - App ID (sample with number)

extension Environment.Value {
    static var appID: Int { return get(value: .appID, type: Int.self)! }
}

// MARK: - Advertisement Enabled (sample with bool)

extension Environment.Value {
    static var advertisementEnabled: Bool { return get(value: .advertisementEnabled, type: Bool.self)! }
}

使用方法

print("All values: \(Environment.Value.all)")

switch Environment.Value.type {
    case .development: print("Environment: dev")
    case .staging: print("Environment: stage")
    case .production: print("Environment: prod")
}
print("Host: \(Environment.Value.host)")
print("App ID: \(Environment.Value.appID)")
print("Advertisement Enabled: \(Environment.Value.advertisementEnabled)")

enter image description here

当您运行其中一个构建方案时,您将获得不同的值。

选择构建方案

enter image description here

Run

enter image description here


0
一个更简单、不那么复杂的解决方案是为每个配置使用不同的头文件,并且只导入其中一个。这并不是自动的,但相当简单:
// You only need to switch the following lines when passing from qa 2 production and back:
#import "Mode_QA.h"
//#import "Mode_Production.h"

网页内容由stack overflow 提供, 点击上面的
可以查看英文原文,
原文链接