Android: NavigationDrawer/多个活动/相同菜单

15

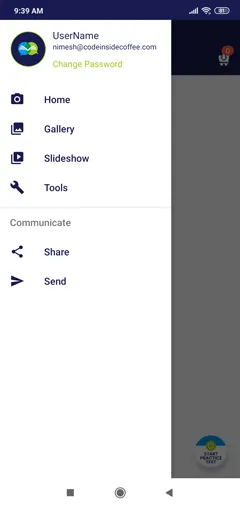
我想要实现的是像这样的一个导航抽屉菜单: NavigationDrawer

我已经知道如何在菜单项被点击时更改布局,但是如何在不失去菜单的情况下加载新活动呢?

我的主要问题是:

例如,假设我的其中一个菜单选项将您带到一个布局,其中有一些按钮可以执行某些操作。我需要加载一个相应的活动/类,来处理应用程序中特定“页面”的操作和功能。如果另一个菜单选项带您进入仅包含图像的布局,则会有另一个活动,没有处理按钮功能的所有代码,因为在此屏幕上没有按钮。

我希望这讲得清楚!我按照许多在线教程/视频使用了几种方法(片段等),但没有一种方法完全回答了我的问题。


顺便说一下,我现在正在做的是有一个BaseActivity,它放置了NavigationDrawer并加载了主布局。我知道我可以在每个活动中重复此代码,但我试图避免重复代码。我尝试让我的其他类扩展这个BaseActivity,但是我不知道如何加载新布局而不失去菜单。 - Lambros
4个回答

50
感谢上面的回答,我成功地做到了我想做的事情,以下是我为任何未来寻找此功能的人所做的准确步骤:
我的activity_main.xml如下:
<!--When the DrawerLayout is the root layout, the first child-->
<!--of that layout is the contents of the main screen, and the-->
<!--second child is the contents of the menu-->

<!--First child layout-->

<LinearLayout
    android:layout_width="match_parent"
    android:layout_height="match_parent"
    android:orientation="vertical">

    <include
        layout="@layout/toolbar_layout"
        android:layout_width="match_parent"
        android:layout_height="wrap_content" />

    <FrameLayout
        android:layout_width="match_parent"
        android:layout_height="match_parent"
        android:id="@+id/content_frame"/>

</LinearLayout>

<!--Second child layout-->
<android.support.design.widget.NavigationView
    android:id="@+id/navigation_view"
    android:layout_width="match_parent"
    android:layout_height="wrap_content"
    android:layout_gravity="start"
    app:headerLayout="@layout/navigation_drawer_header"
    app:menu="@menu/drawer_menu">

</android.support.design.widget.NavigationView>

这是标准的DrawerLayout,它汇集了所有NavigationDrawer菜单所需的组件和元素。重要的补充是FrameLayout...需要给它一个ID叫做content_frame。其他活动所使用的所有布局都将被推送/添加/填充到此处。

我的BaseActivity.java如下:

package com.example.test;
import android.content.Intent;
import android.os.Bundle;
import android.support.design.widget.NavigationView;
import android.support.v4.widget.DrawerLayout;
import android.support.v7.app.ActionBarDrawerToggle;
import android.support.v7.app.AppCompatActivity;
import android.support.v7.widget.Toolbar;
import android.view.MenuItem;

public class BaseActivity extends AppCompatActivity {

    DrawerLayout drawerLayout;
    ActionBarDrawerToggle actionBarDrawerToggle;
    Toolbar toolbar;

    @Override
    protected void onCreate(Bundle savedInstanceState) {
        super.onCreate(savedInstanceState);
        setContentView(R.layout.activity_main);

        NavigationView navigationView = (NavigationView) findViewById(R.id.navigation_view);

        toolbar = (Toolbar) findViewById(R.id.toolbar);
        setSupportActionBar(toolbar);
        drawerLayout = (DrawerLayout) findViewById(R.id.drawer_layout);
        actionBarDrawerToggle = new ActionBarDrawerToggle(this, drawerLayout, toolbar, R.string.drawer_open, R.string.drawer_closed);
        drawerLayout.setDrawerListener(actionBarDrawerToggle);

        navigationView.setNavigationItemSelectedListener(new NavigationView.OnNavigationItemSelectedListener() {
            @Override
            public boolean onNavigationItemSelected(MenuItem item) {
                switch (item.getItemId()) {

                    case R.id.menu_home:
                        Intent anIntent = new Intent(getApplicationContext(), TheClassYouWantToLoad.class);
                        startActivity(loadPlayer);
                        drawerLayout.closeDrawers();
                        break;

                }
                return false;
            }
        });

    }

    @Override
    protected void onPostCreate(Bundle savedInstanceState) {
        super.onPostCreate(savedInstanceState);

        actionBarDrawerToggle.syncState();
    }

}

现在,在onNavigationItemSelected方法内部,有一个switch语句来处理每个菜单项被选中时会发生什么。这是重要的部分:

Intent anIntent = new Intent(getApplicationContext(), TheClassYouWantToLoad.class);
startActivity(anIntent);
drawerLayout.closeDrawers(); 

您需要将"TheClassYouWantToLoad"替换为您自己的类名。 现在,在这个新类中(它可能需要加载一些新的UI元素),您需要以下内容:

public class TheClassYouWantToLoad extends BaseActivity {

@Override
protected void onCreate(Bundle savedInstanceState) {

super.onCreate(savedInstanceState);

FrameLayout contentFrameLayout = (FrameLayout) findViewById(R.id.content_frame); //Remember this is the FrameLayout area within your activity_main.xml
getLayoutInflater().inflate(R.layout.the_layout_you_want_to_load, contentFrameLayout);
    }
}

并将 "the_layout_you_want_to_load" 替换为您想要加载的布局名称。

非常好用,易于理解,谢谢! - Benjamin Vison
6
通过导航抽屉进行导航操作时,总是会将任务添加到任务栈中。为了避免浪费内存并简化导航(如果导航到相同的主Activity,则会重新加载上一状态),建议在每个<activity>参数中将android:launchMode="singleTask"添加到您的 AndroidManifests.xml 文件中。这将防止任务栈不断增长... 参见:API Guides Back Stack - Vit Bernatik
@VitBernatik,你的评论救了我的一天。 - Tejas Pandya

24
据我所知,您希望导航抽屉在每个活动中都存在。有两种方法:
  1. 使用@Russell的答案。 创建一个主活动,其中包含通常称为content_frame的framelayout,覆盖整个活动。这个活动有导航抽屉的代码。单击按钮时,您可以替换此布局的内容为所需片段的布局(即具有多个按钮的片段或图像)。因此,抽屉中的元素都是片段。在教程中,片段是通过getFragmentManager()调用的。请查看这位名为slidenerd的人制作的导航抽屉视频系列:https://www.youtube.com/watch?v=K8hSIP2ha-g。尝试按照视频逐步实现它。

  2. 我个人更喜欢这种方法,但它有其局限性。创建一个BaseActivity,在其中编写导航抽屉的代码。这有一个通常称为content_frame的framelayout,覆盖整个活动。需要拥有抽屉的活动扩展此baseactivity而不是appcompatactivity或activity。在oncreate中,布局膨胀如下:getLayoutInflater().inflate(R.layout.activity_this, contentFrameLayout);而不是setContentView。这里的活动是通过startActivity启动的。

第二种方法的缺点:

a) BaseActivity每次用户更改活动时都会被销毁和重新创建。

b) 活动只能扩展一个类,该类默认成为baseActivity。

第二种方法的优点:

a) 您可以维护一个活动堆栈

b) 每个活动都可以拥有自己的配置更改规则和onsaveInstance规则。

c) 这些活动可以具有单独的片段,这些片段使用此活动进行通信。在第一种方法中尝试这样做将不必要地涉及主活动实现大量接口(您将了解有关接口的内容)。


3
如果您启动一个新的活动,您将失去菜单,因为新的活动将覆盖旧的活动。您需要使用片段来解决这个问题。将片段视为可以存在于另一个活动中的活动。
使用片段,但将UI元素添加到FrameLayout(id:content_frame)之外的活动布局中,然后当您单击菜单项时,您的片段转换将仅影响content_frame FrameLayout,使所有其他布局项目保持不变。
挺住,伙计,从这里开始它只会变得更清晰... 直到你碰到下一个难题:D
我建议您参考以下教程: https://www.udacity.com/course/viewer#!/c-ud853/l-1395568821 以及以下材料: http://developer.android.com/training/implementing-navigation/nav-drawer.html

1

你需要将BaseActivity与带有导航抽屉的普通活动结合起来。然后,将此BaseActivity扩展到所有其他活动中。

注意:在BaseActivity中,您需要使用Framelayout而不是像下面这样的Include文件。 GitHub代码在这里可用

<com.google.android.material.appbar.AppBarLayout
    android:layout_width="match_parent"
    android:layout_height="wrap_content"
    android:theme="@style/FullscreenTheme.AppBarOverlay">

    <androidx.appcompat.widget.Toolbar
        android:id="@+id/toolbar"
        android:layout_width="match_parent"
        android:layout_height="90dp"
        android:background="@color/colorPrimary"
        app:popupTheme="@style/FullscreenTheme.PopupOverlay"
        >

    </androidx.appcompat.widget.Toolbar>

</com.google.android.material.appbar.AppBarLayout>

<FrameLayout
    android:id="@+id/container"
    android:layout_width="match_parent"
    android:layout_height="match_parent"
    android:background="@android:color/transparent" />

<com.google.android.material.floatingactionbutton.FloatingActionButton
    android:id="@+id/img_menu_prac_test"
    android:layout_width="wrap_content"
    android:layout_height="wrap_content"
    android:layout_gravity="bottom|end"
    android:layout_marginRight="@dimen/fab_margin"
    android:layout_marginBottom="16dp"
    app:srcCompat="@drawable/ic_practice_test"
    tools:ignore="VectorDrawableCompat"
    app:borderWidth="0dp"
    android:backgroundTint="@color/white"
    app:maxImageSize="58dp"
    />

完整代码请访问Github项目 点击此处下载完整项目 这是常见的导航抽屉

All activity Design


网页内容由stack overflow 提供, 点击上面的
可以查看英文原文,
原文链接