以编程方式访问启动屏幕XIB或故事板

11
一个应用程序怎么访问它的启动屏所使用的XIB或故事板?XIB文件不在主bundle中(例如:NSBundle.mainBundle().pathsForResourcesOfType(nil, inDirectory: ""))。这尤其令人意外,因为“Launch Screen.xib”在“Copy Bundle Resources”构建阶段中被列出,但在bundle中没有显示出来,因此Xcode必须对其进行特殊处理。
4个回答

16

如果 LaunchScreen 是 storyboard 而不是 xib,请使用以下代码。

let launchScreen = UIStoryboard(name: "LaunchScreen", bundle: nil).instantiateInitialViewController()
if let launchView = launchScreen?.view {
  view.addSubview(launchView)
}

10

由于Xib不在主bundle中,获取路径会返回nil。但是你可以使用方法来获取启动屏幕的XIB,而无需路径的帮助。

  let launchScreenNib = UINib(nibName: "LaunchScreen", bundle: nil)

或者

您可以从XIB加载视图作为

// Swift
let objects = NSBundle.mainBundle().loadNibNamed("LaunchScreen", owner: self, options: nil)
let view = objects[0] as UIView

// Obj C
NSArray *objects = [[NSBundle mainBundle] loadNibNamed:@"LaunchScreen" owner:self options:nil];
UIView *view = [objects objectAtIndex:0];

1
Xcode没有为启动屏幕生成NIB,因此此代码会崩溃。如果NIB不在bundle中,则
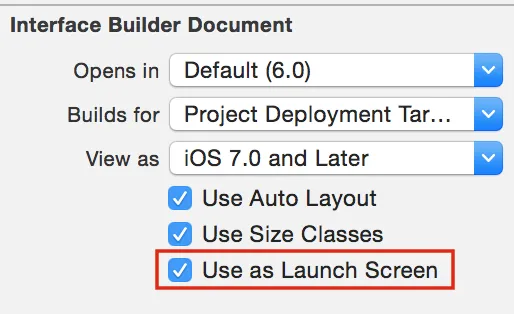
bundle.loadNibNamed(...)无法工作。通过在Interface Builder中调整“用作启动屏幕”选项,我成功让它工作,并使Xcode生成了NIB。 - ide
@ide 更新 Xcode,它在项目创建期间默认创建 LaunchScreen.xib。 - Yatheesha
我的意思是,我有LaunchScreen.xib文件,并且在启动应用程序时它被显示出来...只是Xcode没有将其转换为NIB文件并复制到包中。 - ide

0

针对我的问题,我发现切换“用作启动屏幕”的开关会导致Xcode为启动屏幕构建一个NIB文件。

  1. 在进行完整的清理(删除DerivedData)并从设备中删除应用程序后,我在LaunchScreen.xib中的主视图控制器中切换了“用作启动屏幕”的选项。运行应用程序将导致它在没有启动屏幕的情况下启动,但是现在的构建正在创建LaunchScreen.nib。
  2. 再次进行完整的清理并从设备中删除应用程序。切换“用作启动屏幕”的选项并重新构建。在新的DerivedData文件夹下的应用程序包中,LaunchScreen.nib仍然存在。
  3. bundle.loadNibNamed(...)现在可以正常工作。


0

这是一个Swift 5的SceneDelegate实现

该实现还可以从info.plist文件中检测到LaunchScreen的配置名称。

//
//  SceneDelegate.swift
//  Extended Launch Screen Example
//
//  Created by Leslie Godwin on 2020/04/24.
//

import UIKit

class SceneDelegate: UIResponder, UIWindowSceneDelegate
{
    var window:       UIWindow?
    var splashWindow: UIWindow?

    func scene(_ scene: UIScene, willConnectTo session: UISceneSession, options connectionOptions: UIScene.ConnectionOptions)
    {
        // Use this method to optionally configure and attach the UIWindow `window` to the provided UIWindowScene `scene`.
        // If using a storyboard, the `window` property will automatically be initialized and attached to the scene.
        // This delegate does not imply the connecting scene or session are new (see `application:configurationForConnectingSceneSession` instead).
        guard let _ = (scene as? UIWindowScene) else { return }
    }

    func sceneDidDisconnect(_ scene: UIScene)
    {
        // Called as the scene is being released by the system.
        // This occurs shortly after the scene enters the background, or when its session is discarded.
        // Release any resources associated with this scene that can be re-created the next time the scene connects.
        // The scene may re-connect later, as its session was not neccessarily discarded (see `application:didDiscardSceneSessions` instead).
    }

    func sceneDidBecomeActive(_ scene: UIScene)
    {
        // ⏳Extend Splash screen only if `splashWindow` is `nil` otherwise it is already shown.
        //
        if let launchStoryboardName = InfoPList.launchStoryboardName,
           let windowScene          = self.window?.windowScene
        {
            splashWindow = splashWindow ??
            {
                let window = UIWindow(windowScene: windowScene)
                    window.windowLevel = .statusBar

                let storyboard = UIStoryboard(name: launchStoryboardName, bundle: nil)

                window.rootViewController = storyboard.instantiateInitialViewController()
                window.isHidden           = false

                // ⏳Wait for 5 seconds, then remove.
                //
                DispatchQueue.main.asyncAfter(deadline: .now() + .seconds(5))
                {
                    UIView.animate(withDuration: -1, // system default
                        animations:
                        {
                            self.splashWindow?.alpha = 0
                        },
                        completion:
                        { _ in
                            self.splashWindow?.isHidden = true
                            self.splashWindow = nil
                        }
                    )
                }

                return window
            }()
        }

        // Called when the scene has moved from an inactive state to an active state.
        // Use this method to restart any tasks that were paused (or not yet started) when the scene was inactive.
    }

    func sceneWillResignActive(_ scene: UIScene) {
        // Called when the scene will move from an active state to an inactive state.
        // This may occur due to temporary interruptions (ex. an incoming phone call).
    }

    func sceneWillEnterForeground(_ scene: UIScene) {
        // Called as the scene transitions from the background to the foreground.
        // Use this method to undo the changes made on entering the background.
    }

    func sceneDidEnterBackground(_ scene: UIScene) {
        // Called as the scene transitions from the foreground to the background.
        // Use this method to save data, release shared resources, and store enough scene-specific state information
        // to restore the scene back to its current state.
    }
}

//
// PList Helper
//

struct InfoPList
{
    private static func value(for name: String) -> String? { Bundle.main.object(forInfoDictionaryKey: name) as? String }

    static var bundleIdentifier:         String? { self.value(for: "CFBundleIdentifier") }
    static var bundleDisplayName:        String? { self.value(for: "CFBundleDisplayName") }
    static var bundleShortVersionString: String? { self.value(for: "CFBundleShortVersionString") }
    static var bundleVersion:            String? { self.value(for: "CFBundleVersion") }

    static var launchStoryboardName: String? { self.value(for: "UILaunchStoryboardName") }
    static var mainStoryboardName:   String? { self.value(for: "UIMainStoryboardFile") }
}

网页内容由stack overflow 提供, 点击上面的
可以查看英文原文,
原文链接