我正在尝试匹配这样的设计...

我尝试了很多方法。首先尝试通过使用一个具有绿色圆圈和时钟PNG资源的层列表XML资源来进行编程,但根本没有起作用。然后我只是让设计师给我完整的图标(时钟和绿色圆圈),但现在我遇到了这个问题...
(未选择)

(已选择)

我在谷歌上搜索相关术语以解决问题时失败了。
最终,我需要所选标签的颜色为蓝色,但是中心标签图标必须始终保持实际图标而没有其他着色(基本上它需要看起来与 .png 图片完全相同)。
PS:我正在使用 Xamarin.Forms、FreshMvvm 和 FreshTabbedFONavigationContainer。然而,通过 Renderer,我可以直接访问 BottomNavigationView 和所有其他本机 Android 组件。因此,解决方案不必是 Xamarin 解决方案。Java/Kotlin 解决方案也可以,我只需将其转换为 Xamarin。
======================
编辑:
======================
所以我使用Andres Castro下面的代码取得了更多进展,但我仍然遇到了之前的问题。使用Andres的代码,我切换回使用FontAwesome作为图标(这非常好用),但这样做意味着我需要使用LayerDrawable来创建圆形/图标中心选项卡图标。所以这是我目前拥有的... 未选中的中心图标
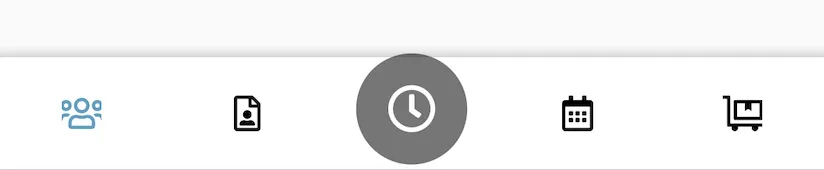
选择的中心图标

如您所见,当中心图标未被选中时,它仍然是灰色的;而当被选中时,它会变成蓝色(与其他四个图标的正确选中/未选中颜色相同)。
以下是我目前针对中心图标的代码:
UpdateTabbedIcons
private void UpdateTabbedIcons()
{
    for (var i = 0; i < Element.Children.Count; i++) {
        var tab = _bottomNavigationView.Menu.GetItem(i);

        var element = Element.Children[i];
        if (element is NavigationPage navigationPage) {
            //if the child page is a navigation page get its root page
            element = navigationPage.RootPage;
        }

        UpdateTabIcon(tab, element);
    }
}
UpdateTabIcon
public void UpdateTabIcon(IMenuItem menuItem, Page page)
{
    var icon = page?.Icon;
    if (icon == null) return;

    var drawable = new IconDrawable(Context, icon, "fa-regular-pro-400.ttf");

    var element = Element.CurrentPage;
    if (element is NavigationPage navigationPage) {
        //if the child page is a navigation page get its root page
        element = navigationPage.RootPage;
    }

    if (page is DoNowTabPage) { //Page for center icon
        drawable.Color(Helpers.Resources.White.ToAndroid());
        var finalDrawable = GetCombinedDrawable(drawable);
        menuItem.SetIcon(finalDrawable);
        return;
    } else if (element == page) {
        drawable.Color(BarSelectedItemColor.ToAndroid());
    } else {
        drawable.Color(BarItemColor.ToAndroid());
    }

    menuItem.SetIcon(drawable);
}
获取组合绘制对象
private Drawable GetCombinedDrawable(IconDrawable iconDrawable)
{
    var displayMetrics = Resources.DisplayMetrics;

    GradientDrawable circleDrawable = new GradientDrawable();
    circleDrawable.SetColor(Helpers.Resources.Green.ToAndroid());
    circleDrawable.SetShape(ShapeType.Oval);
    circleDrawable.SetSize((int)TypedValue.ApplyDimension(ComplexUnitType.Dip, 500, displayMetrics), (int)TypedValue.ApplyDimension(ComplexUnitType.Dip, 500, displayMetrics));
    circleDrawable.Alpha = 1;

    var inset = (int)TypedValue.ApplyDimension(ComplexUnitType.Dip, 140, displayMetrics);
    var bottomInset = (int)TypedValue.ApplyDimension(ComplexUnitType.Dip, 40, displayMetrics);
    LayerDrawable finalDrawable = new LayerDrawable(new Drawable[] { circleDrawable, iconDrawable });
    finalDrawable.SetLayerHeight(1, iconDrawable.IntrinsicHeight);
    finalDrawable.SetLayerWidth(1, iconDrawable.IntrinsicWidth);
    finalDrawable.SetLayerInset(1, inset, inset, inset, inset + bottomInset);
    finalDrawable.SetLayerInsetBottom(0, bottomInset);
    finalDrawable.ClearColorFilter();

    return finalDrawable;
}
正如您在我创建的GradientDrawable中所看到的那样,我将其颜色设置为我的绿色(我有一个名为Resources的自定义类,不是Android的Resources类)。
这就是我卡住的地方。我将圆形可绘制对象设置为绿色,但一旦进入BottomNavigationView,它的颜色总是与其他图标的未选中/选中颜色匹配。
希望能解决这个最后的问题。感谢任何帮助。
_bottomNavigationView.ItemIconTintList = null;- Ryan Alford