自定义AlertDialog主题不起作用。

4

我想要自定义AlertDialog按钮的强调颜色。但是似乎没有生效,好像它正在继承系统的颜色。这是我的样式/主题。

   <color name="actionable_items">#0574ac</color>  <!-- it is blue color --> 
   <style name="LLDialog" parent="Theme.AppCompat.Light.Dialog.Alert">
      <!--buttons color-->
      <item name="colorAccent">@color/actionable_items</item>
      <!--item RadioButton or CheckBox color-->
      <item name="colorControlActivated">@color/actionable_items</item>
      <item name="colorPrimary">@color/actionable_items</item>
      <item name="colorPrimaryDark">@color/actionable_items</item>
      <item name="android:listChoiceIndicatorMultiple">@color/actionable_items</item>
      <item name="android:listChoiceIndicatorSingle">@color/actionable_items</item>
   </style>

这是我的代码,它正在尝试构建AlertDialog对话框。

final CustomPopupBuilder removePlaceDialog =  new CustomPopupBuilder(new ContextThemeWrapper(context,
                                                            R.style.LLDialog));
            removePlaceDialog.setTitle(getString(R.string.delete_place, placeName));
            removePlaceDialog.setMessage(getString(R.string.delete_place_message));
            removePlaceDialog.setPositiveButton(R.string.ok_button, new DialogInterface.OnClickListener() {

               public void onClick(DialogInterface dialog, int which) {
                  ....
                  ....
               }
            });
            removePlaceDialog.setNegativeButton(R.string.cancel, null);
            removePlaceDialog.create().show();

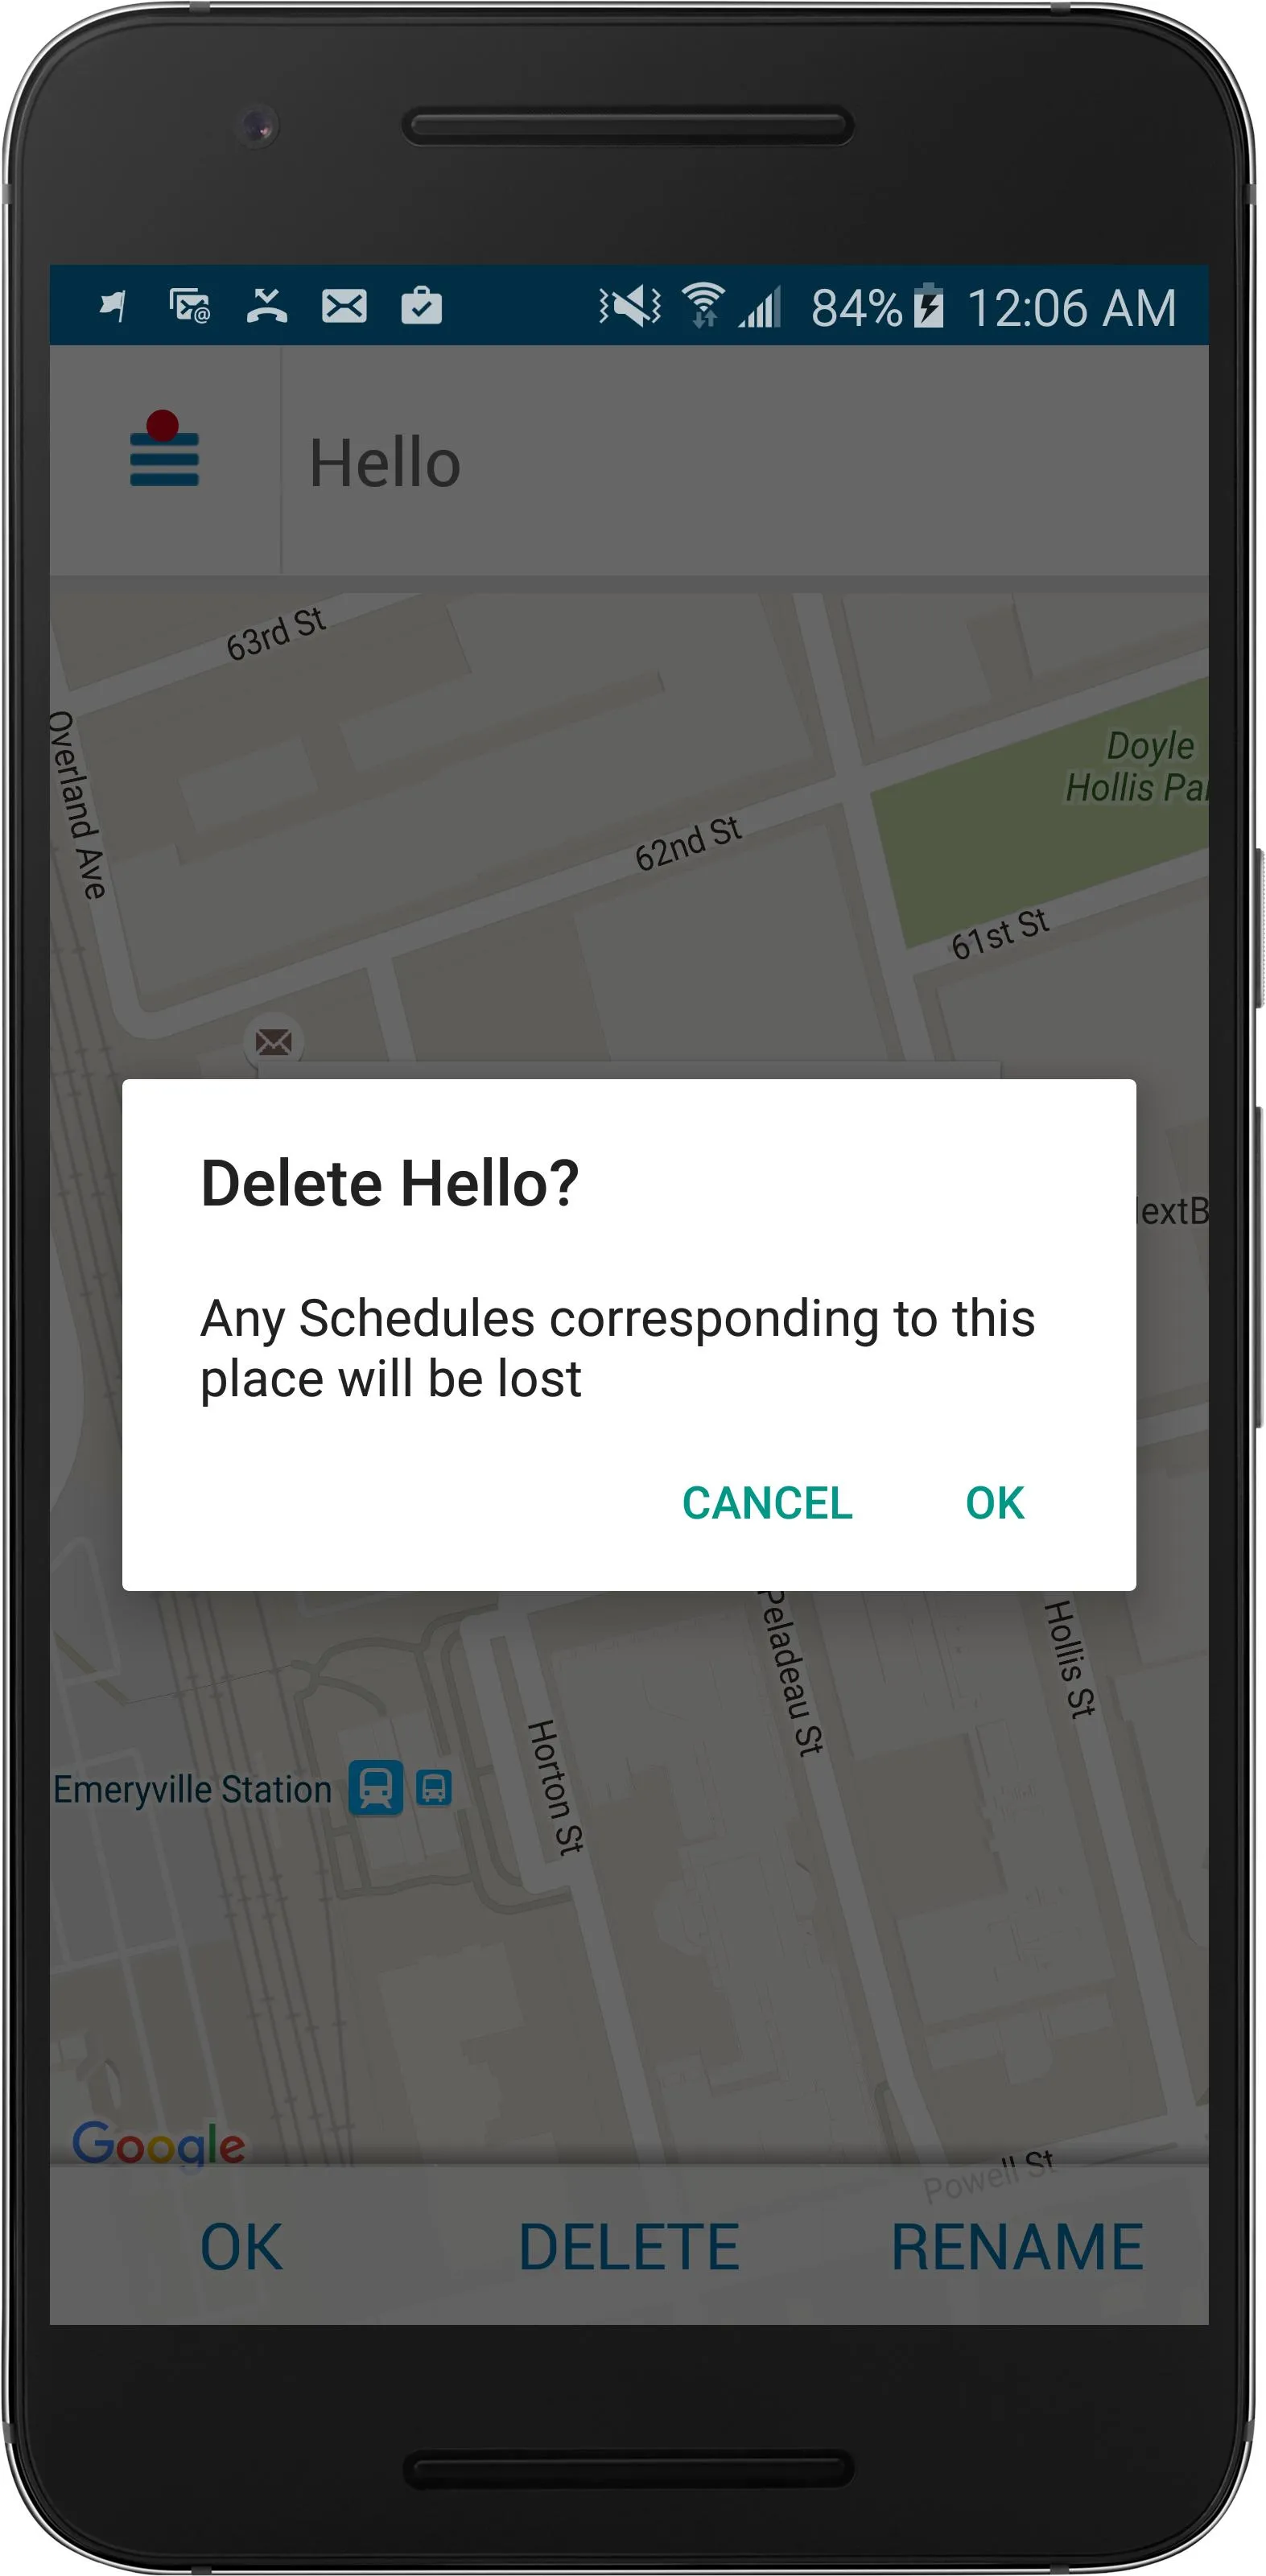
最终的AlertDialog没有相同文本颜色的按钮。 文本颜色类似于绿色。 它似乎是从系统中继承颜色而不是自定义主题。以下是图片:enter image description here 编辑1:我尝试使用AlertDialog.Builder,但结果相同。
final AlertDialog.Builder removePlaceDialog =  AlertDialog.Builder(new ContextThemeWrapper(context,
                                                             R.style.LLDialog));
                removePlaceDialog.setTitle(getString(R.string.delete_place, placeName));
                removePlaceDialog.setMessage(getString(R.string.delete_place_message));
                removePlaceDialog.setPositiveButton(R.string.ok_button, new DialogInterface.OnClickListener() {

                   public void onClick(DialogInterface dialog, int which) {
                      ....
                      ....
                   }
                });
                removePlaceDialog.setNegativeButton(R.string.cancel, null);
                removePlaceDialog.create().show();

编辑2:

我还试图更改对话框的强调颜色,但是我没有看到那种颜色:

<style name="LLDialog" parent="Theme.AppCompat.Light.Dialog.Alert">
      <!--buttons color-->
      <item name="colorAccent">#990000</item>
      ...
      ...
</style>

即使这样也无法改变按钮文字颜色 :(。

为什么你要使用CustomPopupBuilder而不是默认的AlertDialog呢..!! - Janki Gadhiya
@jankigadhiya 我使用了AlertDialog,但是结果相同。它没有根据我的主题/样式自定义AlertDialog。 - Rakesh
6个回答

19
请检查您的AlertDialog导入。它应该从v7支持库中导入,以便在旧版Android上应用样式。我遇到了同样的问题,并将导入行更改为:
import android.app.AlertDialog
import android.support.v7.app.AlertDialog

帮助了我。

2019年更新:

由于谷歌发布了AndroidX库,新的答案将是

import androidx.appcompat.app.AlertDialog;

感谢 @ChristosThemelis


1
是的,如果你要使用appcompat主题,你必须使用support.v7的东西。 - ElliotM
4
如果您正在使用AndroidX库,请使用import androidx.appcompat.app.AlertDialog; - Christos Themelis
1
我从import androidx.appcompat.app.AlertDialog;导入了AlertDialog,但是我仍然无法在对话框中看到任何变化。我使用了官方Material Design网站提供的对话框主题,这是链接 - https://material.io/develop/android/components/dialogs @ChristosThemelis - Kavin Raju S

3

我曾经遇到过同样的问题,以下是我的解决方法:

在styles.xml中声明你的主题并设置属性android:alertDialogTheme

<style name="YourTheme" parent="Theme.AppCompat.Light.DarkActionBar">
    <!-- your theme attributes here -->
    <item name="android:alertDialogTheme">@style/YourDialogTheme</item>
</style>

<style name="YourDialogTheme" parent="Theme.AppCompat.Light.Dialog.Alert" >
    <!-- your dialog-theme attributes here -->
</style>

现在,如果您像这样显示AlertDialog...
AlertDialog.Builder builder = new AlertDialog.Builder(activity); //where activity is an Activity with the theme attribute set to android:theme="@style/YourTheme" (in AndroidManifest)
//...
builder.show();

对话框应该具有@style/YourDialogTheme中指定的accentColor和其他设置。


2
创建一个新样式,如下所示:
<style name="AlertDialogCustom" parent="@android:style/Theme.Holo.Light.Dialog">        
  <!--buttons color-->
  <item name="colorAccent">@color/actionable_items</item>
  <!--item RadioButton or CheckBox color-->
  <item name="colorControlActivated">@color/actionable_items</item>
  <item name="colorPrimary">@color/actionable_items</item>
  <item name="colorPrimaryDark">@color/actionable_items</item>
  <item name="android:listChoiceIndicatorMultiple">@color/actionable_items</item>
  <item name="android:listChoiceIndicatorSingle">@color/actionable_items</item>
</style>

接下来在你的类中:

AlertDialog.Builder dialogBuilder = new AlertDialog.Builder(new ContextThemeWrapper(context, R.style.AlertDialogCustom));    
AlertDialog alertDialog = dialogBuilder.create();    
alertDialog.show();

0

在我的用例中,我成功解决了这个问题,方法是让警告对话框的父级样式与我的主要样式的父级相同。


0

这里有一个例子,希望能帮到你。

public class CustomDialogUI {
    Dialog dialog;
    Vibrator vib;
    RelativeLayout rl;

    @SuppressWarnings("static-access")
    public void dialog(final Context context, String title, String message,
            final Runnable task) {
        dialog = new Dialog(context);
        dialog.requestWindowFeature(Window.FEATURE_NO_TITLE);
        dialog.setContentView(R.layout.custom);
        dialog.setCancelable(false);
        TextView m = (TextView) dialog.findViewById(R.id.message);
        TextView t = (TextView) dialog.findViewById(R.id.title);
        final Button n = (Button) dialog.findViewById(R.id.button2);
        final Button p = (Button) dialog.findViewById(R.id.next_button);
        rl = (RelativeLayout) dialog.findViewById(R.id.rlmain);
        t.setText(bold(title));
        m.setText(message);
        dialog.show();
        n.setText(bold("Close"));
        p.setText(bold("Ok"));
        // color(context,rl);
        vib = (Vibrator) context.getSystemService(context.VIBRATOR_SERVICE);
        n.setOnClickListener(new OnClickListener() {
            @Override
            public void onClick(View arg0) {
                vib.vibrate(15);
                dialog.dismiss();
            }
        });
        p.setOnClickListener(new OnClickListener() {
            @Override
            public void onClick(View arg0) {
                vib.vibrate(20);
                dialog.dismiss();
                task.run();
            }
        });
    }
     //customize text style bold italic....
    public SpannableString bold(String s) {
        SpannableString spanString = new SpannableString(s);
        spanString.setSpan(new StyleSpan(Typeface.BOLD), 0,
                spanString.length(), 0);
        spanString.setSpan(new UnderlineSpan(), 0, spanString.length(), 0);
        // spanString.setSpan(new StyleSpan(Typeface.ITALIC), 0,
        // spanString.length(), 0);
        return spanString;
    }

    }

XML布局

<?xml version="1.0" encoding="utf-8"?>
<RelativeLayout xmlns:android="http://schemas.android.com/apk/res/android"
android:layout_width="match_parent"
android:layout_height="match_parent"
android:background="#00000000"
>

<RelativeLayout
    android:id="@+id/rlmain"
    android:layout_width="fill_parent"
    android:layout_height="150dip"
    android:layout_alignParentLeft="true"
    android:layout_centerVertical="true"
    android:background="#569CE3" >

    <RelativeLayout
        android:id="@+id/relativeLayout1"
        android:layout_width="wrap_content"
        android:layout_height="wrap_content"
        android:layout_alignParentLeft="true"
        android:layout_alignParentTop="true"
        android:layout_centerHorizontal="true"
        android:layout_marginLeft="25dip"
        android:layout_marginTop="10dip" >

        <TextView
            android:id="@+id/title"
            android:layout_width="wrap_content"
            android:layout_height="wrap_content"
            android:layout_alignParentLeft="true"
            android:layout_alignParentTop="true"
            android:text="Are you Sure?"
            android:textAppearance="?android:attr/textAppearanceMedium"
            android:textColor="#ffffff"
            android:textSize="13dip" />
    </RelativeLayout>

    <RelativeLayout
        android:id="@+id/relativeLayout2"
        android:layout_width="wrap_content"
        android:layout_height="wrap_content"
        android:layout_alignLeft="@+id/relativeLayout1"
        android:layout_alignRight="@+id/relativeLayout1"
        android:layout_below="@+id/relativeLayout1"
        android:layout_marginTop="5dip" >
    </RelativeLayout>

    <ProgressBar
        android:id="@+id/process"
        style="?android:attr/progressBarStyleSmall"
        android:layout_width="wrap_content"
        android:layout_height="wrap_content"
        android:layout_alignParentRight="true"
        android:layout_alignParentTop="true"
        android:layout_marginRight="3dip"
        android:layout_marginTop="3dip" />

    <RelativeLayout
        android:id="@+id/relativeLayout3"
        android:layout_width="fill_parent"
        android:layout_height="wrap_content"
        android:layout_alignLeft="@+id/relativeLayout2"
        android:layout_below="@+id/relativeLayout2"
        android:layout_toLeftOf="@+id/process" >

        <TextView
            android:id="@+id/message"
            android:layout_width="wrap_content"
            android:layout_height="wrap_content"
            android:layout_alignParentLeft="true"
            android:layout_centerVertical="true"
            android:text="Medium Text"
            android:textAppearance="?android:attr/textAppearanceMedium"
            android:textColor="#ffffff"
            android:textSize="13dip"/>

    </RelativeLayout>

    <Button
        android:id="@+id/next_button"
        android:layout_width="90dip"
        android:layout_height="35dip"
        android:layout_alignParentBottom="true"
        android:textColor="@drawable/button_text_color"
         android:background="@drawable/blue_button"
         android:layout_marginBottom="5dp"
           android:textSize="10dp"

        android:layout_alignRight="@+id/relativeLayout3"
        android:text="Okay" />

    <Button
        android:id="@+id/button2"
        android:text="Cancel"
        android:textColor="@drawable/button_text_color"
        android:layout_width="90dip"
        android:layout_height="35dip"
        android:layout_marginBottom="5dp"
         android:background="@drawable/blue_button"
         android:layout_marginRight="7dp"
        android:textSize="10dp"
        android:layout_alignParentBottom="true"
        android:layout_toLeftOf="@+id/next_button"
         />

</RelativeLayout>

0
如果您的主题没有反映AlertDialog按钮的颜色,您也可以通过编程来管理它,这可能会很有用。
    AlertDialog.Builder builder = new AlertDialog.Builder(new ContextThemeWrapper(this, R.style.AppCompatAlertDialogStyle));
    builder.setCancelable(false);

    getWindow().clearFlags(WindowManager.LayoutParams.FLAG_WATCH_OUTSIDE_TOUCH);
    String message ="message";
    builder.setTitle("title");

    builder.setMessage(message);
    builder.setPositiveButton("OK", new DialogInterface.OnClickListener() {
        @Override
        public void onClick(DialogInterface dialog, int which) {

        }
    });
    //   builder.setNegativeButton("No, Thanks", null);
    //builder.show();
    AlertDialog alert = builder.create();
    alert.show();
    Button pbutton = alert.getButton(DialogInterface.BUTTON_POSITIVE);
    pbutton.setTextColor(getResources().getColor(R.color.colorAccent));
    Button nbutton = alert.getButton(DialogInterface.BUTTON_NEGATIVE);
    nbutton.setTextColor(getResources().getColor(R.color.accent));

在这里,您可以更改两个按钮的颜色(如果需要),希望对您有用。


网页内容由stack overflow 提供, 点击上面的
可以查看英文原文,
原文链接