Android Studio:发布的APK未签名。

28
当我尝试运行刚构建的发布版apk时,会出现错误“当前选定的版本的apk未签名”。这是在“编辑配置”弹出窗口中。以下是我的步骤:
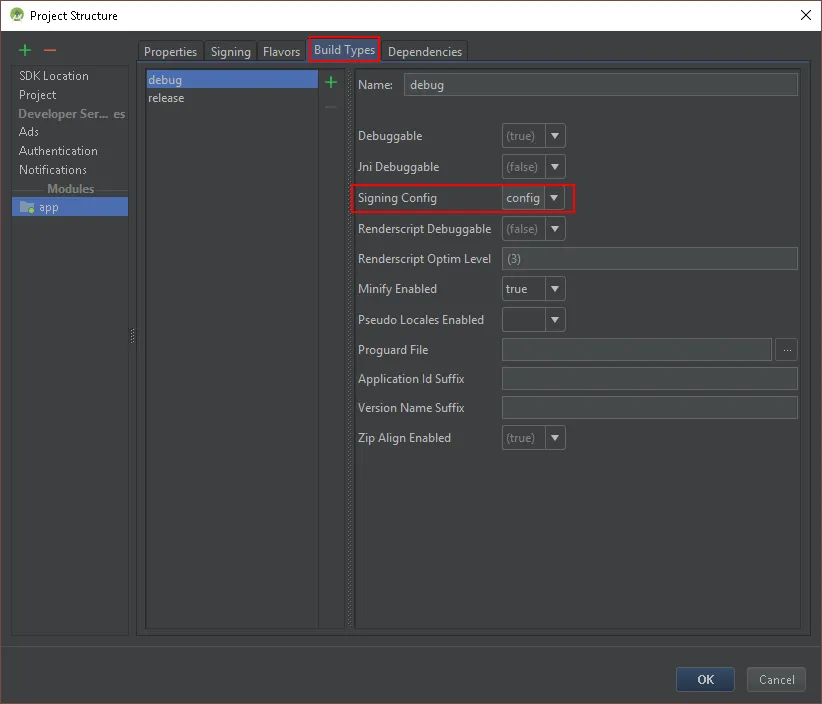
  1. 在“Build Variants”选项卡中选择“release”
  2. 在菜单中选择“Build -> Generate Signed APK”
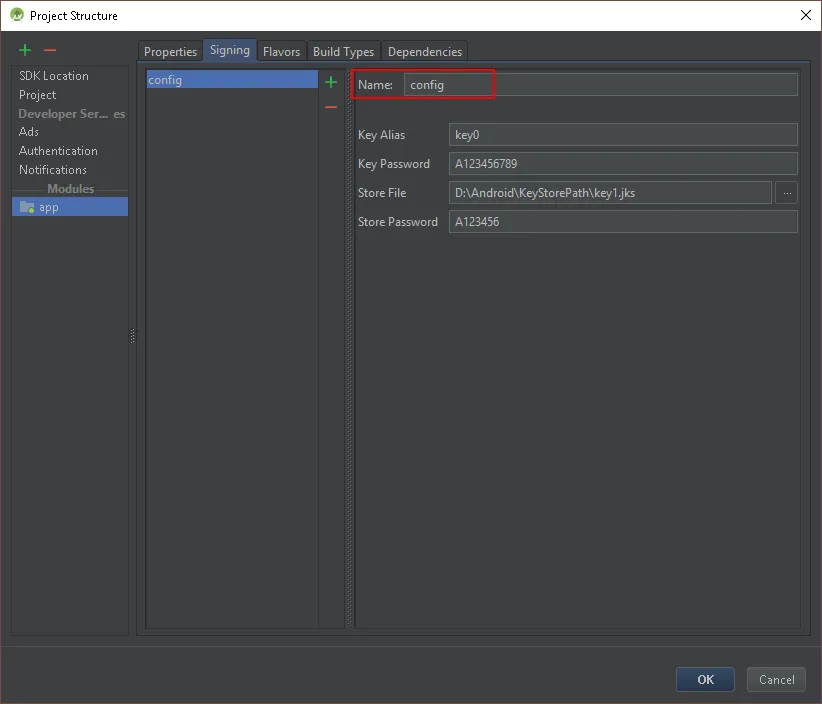
  3. 在弹出窗口中填写密钥库和密码字段。
  4. 在第二个面板中,将目标文件夹更改为...\app\build\outputs\apk(参见下面的注释*)
  5. 观察Studio右上方的通知:APK已成功生成。
  6. 在菜单中单击“Run -> Run App”。
  7. 我得到一个“编辑配置”弹出窗口,显示错误“您当前选择的变体的apk未签名。”
那么,为什么会出现这个错误?生成的APK似乎是有效的。我已经成功地将它发布到了Android商店(仅进行了Alpha测试),并验证了堆栈转储的混淆。但我无法下载它(步骤6),不过我想这没关系,因为我可以顺利下载调试版。
(*) Android Studio将发布版APK的输出默认为更高的目录,可能更方便。但是,当它们分散在各处时,我发现很难管理生成的文件的一致性,因此我更喜欢所有生成的APK都在一个地方。

"我使用指定的密钥库和提供的密码构建了发布版本。":您是如何构建的?使用 Android Studio UI 还是 gradle 命令?需要更多信息。 - Greg Ennis
刚刚构建完成;抱歉,拼写错误。 - Peri Hartman
我使用了Studio中的“Build -> Generate Signed APK...”向导。 - Peri Hartman
@PeriHartman,你能发表你的答案吗? - Ranjithkumar
我没有答案。也许在A.S. 2.0中可以运行 - 我还没有升级。 - Peri Hartman
8个回答

42

前往 文件\项目结构

签名选项卡

类型选项卡

构建类型

完成! ;)


1
谢谢。如果有其他模块,只需签署“app”即可。 - CoolMind
传说中的发现。非常棒的答案。 - Nouman Ghaffar
4
这个界面与当前版本的AS不是最新的。有人能更新一下吗? - payne
从Android Studio Arctic Fox开始: 文件 -> 项目结构 -> 构建变体 -> 签名配置 - Kia

24

在项目结构中设置签名配置。

  1. 文件 -> 项目结构...
  2. 选择 Modules/app (或其他模块)
  3. 点击 Signing 选项卡并填写信息。
    键别名和密钥密码先填。 不同于“生成已签名 APK”对话框的顺序。
  4. 点击 Build Types 选项卡并选择 release。
    在 Signing config 下拉列表中选择 "config"。
  5. 点击“确定”关闭项目结构。
  6. 运行 -> 运行应用程序

运行(或调试)应用程序似乎使用生成的apk,而这些apk是使用“Build -> Build APK”构建的。 因此,如果应用程序模块的构建变体为“release”,则应设置签名配置。


您可以通过按错误文本右侧的“修复”按钮跳转到签名选项卡。 - Andrew Glukhoff

14
将以下行添加到您的 build.gradle 文件中的 release {...} 里。
signingConfig signingConfigs.config

节省了我很多时间。谢谢。 - Hamza

8

首先,如果没有密钥库文件,需创建一个。

  1. 从下拉菜单中选择Build
  2. 选择Generate Signed APK
  3. 点击Next
  4. 点击Create New Keystore
  5. 填写表格,包括密钥库路径、别名、密码和至少一个证书区域字段的内容。
  6. 点击OK
  7. 将会在指定的密钥库路径下创建一个密钥库文件。

其次,将应用程序构建gradle文件更新为类似下面的内容,以包含签名配置。

android {
    signingConfigs {
        config {
            keyAlias 'mykeyalias'
            keyPassword 'android'
            storeFile file('/Users/yourname/path/to/the/android/project/folder/android_project_folder_name/app/debug.keystore')
            storePassword 'android'
        }
    }
    buildTypes {
        debug {
            applicationIdSuffix = ".debug"
            versionNameSuffix "-debug"
        }
        release {
            minifyEnabled false
            proguardFiles getDefaultProguardFile('proguard-android.txt'), 'proguard-rules.pro'
            signingConfig signingConfigs.config
        }
    }
}

第三步,构建并运行应用程序,完成。


3
https://developer.android.com/studio/publish/app-signing#secure-shared-keystore中写到,不应该在build.gradle和版本控制系统中存储凭证信息。因此,请创建签名配置文件(Build > Generate Signed APK...),然后执行此操作。

Create a file named keystore.properties in the root directory of your project. This file should contain your signing information, as follows:

storePassword=myStorePassword
keyPassword=mykeyPassword
keyAlias=myKeyAlias
storeFile=myStoreFileLocation

In your module's build.gradle file, add code to load your keystore.properties file before the android {} block.

// Create a variable called keystorePropertiesFile, and initialize it to your
// keystore.properties file, in the rootProject folder.
def keystorePropertiesFile = rootProject.file("keystore.properties")

// Initialize a new Properties() object called keystoreProperties.
def keystoreProperties = new Properties()

// Load your keystore.properties file into the keystoreProperties object.
keystoreProperties.load(new FileInputStream(keystorePropertiesFile))

android {
    ...
}

You can refer to properties stored in keystoreProperties using the syntax keystoreProperties['propertyName']. Modify the signingConfigs block of your module's build.gradle file to reference the signing information stored in keystoreProperties using this syntax.

android {
    signingConfigs {
        config {
            keyAlias keystoreProperties['keyAlias']
            keyPassword keystoreProperties['keyPassword']
            storeFile file(keystoreProperties['storeFile'])
            storePassword keystoreProperties['storePassword']
        }
    }
    ...
}

build.gradle中,您可以选择添加以下内容:

buildTypes {
    release {
        ...
        signingConfig signingConfigs.config
    }
}

现在您可以制作已签名的apk。不要忘记从版本控制中排除keystore.properties文件。

2
尝试在您的构建文件中添加以下内容:
buildTypes {
release {
        signingConfig signingConfigs.release
        minifyEnabled true
        shrinkResources true
        proguardFiles getDefaultProguardFile('proguard-android.txt'), 'proguard-rules.pro'
    }
    debug {
        minifyEnabled false
    }
}

谢谢,我漏掉了“signingConfig signingConfigs.release”。 - Princeps Polycap

1
在 build.gradle 文件中添加以下代码。
buildTypes {
        release {
            minifyEnabled false
            shrinkResources false
            proguardFiles getDefaultProguardFile('proguard-android.txt'), 'proguard-rules.pro'
            signingConfig signingConfigs.debug
        }
        debug {
            minifyEnabled false
            signingConfig signingConfigs.debug
        }
    }

0

我曾经遇到过同样的问题,结果发现我配置了signingConfigs属性时出错了。

具体来说,我认为我没有密钥的密码,但实际上我已经设置了它。添加缺失的信息后,问题得以解决。

signingConfigs {
        config {
            keyAlias 'key0'
            storeFile file('C:/Users/xxx/xxx/keystore/xxx.jks')
            storePassword '123'
            keyPassword '123' // this was missing
        }
    }

网页内容由stack overflow 提供, 点击上面的
可以查看英文原文,
原文链接