在安卓TabLayout中显示虚拟键盘

8
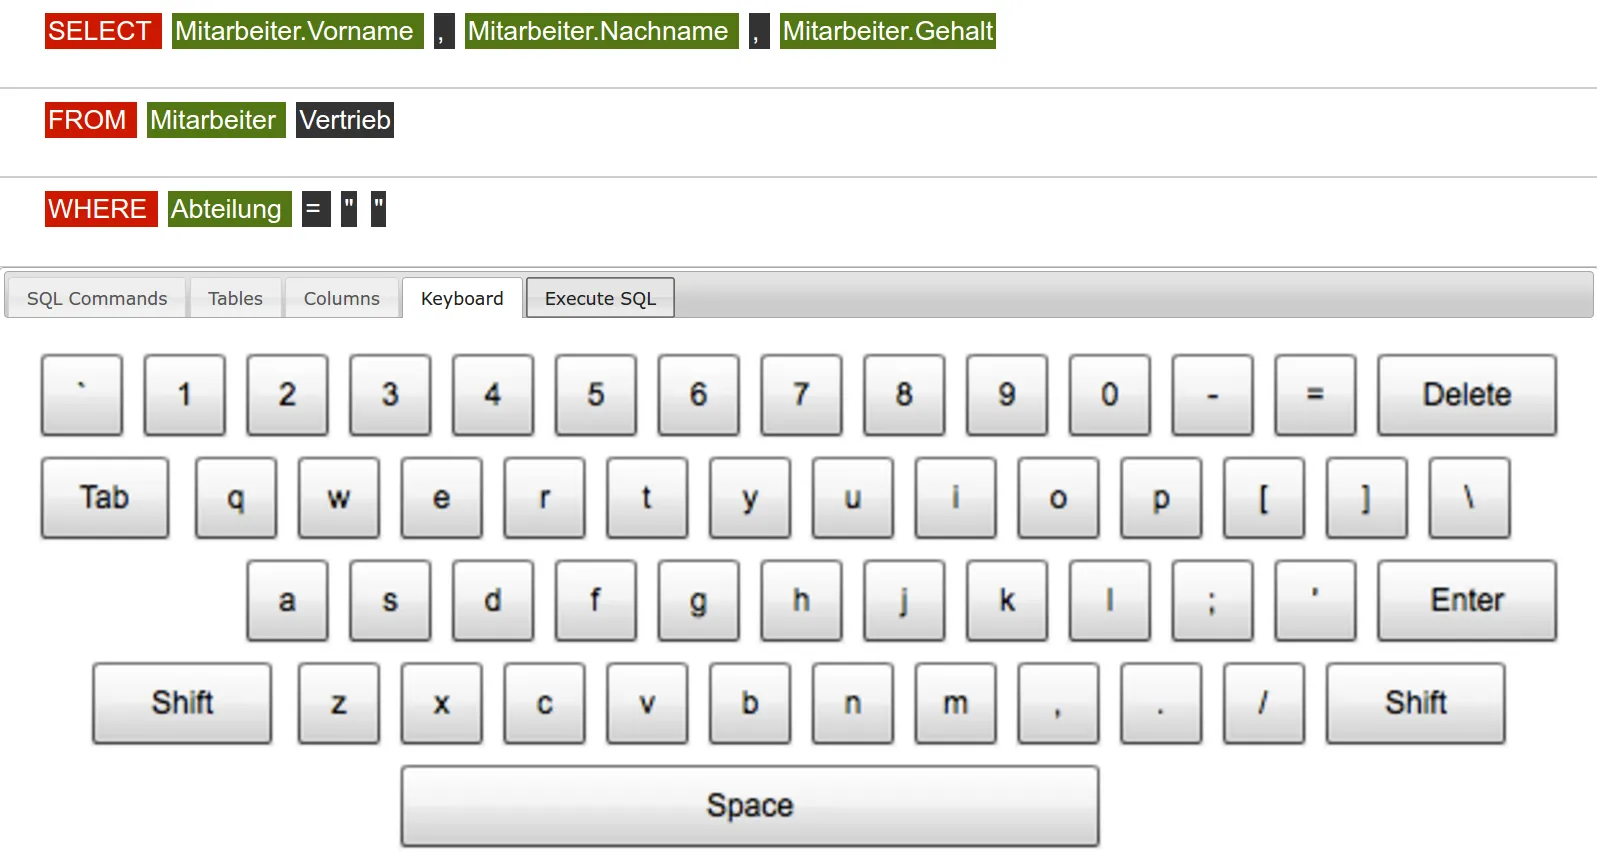
我正在使用TabLayout显示不同的输入方法。第一个标签包含按钮,第四个标签应该显示嵌入在这个TabLayout中的标准键盘。这是一个屏幕截图,展示了它应该是什么样子:

enter image description here

TabLayout目前运作正常。我尝试创建一个带有KeyboardView的布局XML文件,但是应用程序没有显示键盘:
<?xml version="1.0" encoding="utf-8"?>
<android.inputmethodservice.KeyboardView
    xmlns:android="http://schemas.android.com/apk/res/android"
    android:id="@+id/keyboard"
    android:layout_width="match_parent"
    android:layout_height="wrap_content"
    android:layout_alignParentBottom="true"
    />

如果我使用简单的Textview,应用程序会显示文本...所以TabLayout本身是有效的:
<?xml version="1.0" encoding="utf-8"?>
<RelativeLayout xmlns:android="http://schemas.android.com/apk/res/android"
    android:layout_width="match_parent"
    android:layout_height="match_parent"
    android:orientation="vertical">

    <TextView
        android:layout_width="wrap_content"
        android:layout_height="wrap_content"
        android:textAppearance="?android:attr/textAppearanceMedium"
        android:text="This is a tab layout"
        android:id="@+id/textView"
        android:layout_centerVertical="true"
        android:layout_centerHorizontal="true" />
</RelativeLayout>

我的问题是如何创建一个简单的键盘并在TabLayout中显示它?谢谢!

我不确定,但你是否尝试为KeyboardView指定某个高度?比如约250dp左右的高度? - Hussein El Feky
3个回答

1
在我的代码片段中,我需要一些行代码,例如我需要添加一个布局XML:
public class SQLConsoleTab2Fragment extends SQLConsoleFragment implements KeyboardView.OnKeyboardActionListener {

    public KeyboardView keyboard123;
    public View Tab2View;

 @Override
    public View onCreateView(LayoutInflater inflater, ViewGroup container, Bundle savedInstanceState) {
//execute(v)


        Tab2View = inflater.inflate(R.layout.tab2, container, false);
        keyboard123 = (KeyboardView) Tab2View.findViewById(R.id.keyboard123);

        Keyboard k1 = new Keyboard(Tab2View.getContext(), R.xml.qwerty_keyboard);


Tab2View.findViewById(R.id.keyboard123);
        keyboard123.setKeyboard(k1);
        keyboard123.setEnabled(true);
        keyboard123.setPreviewEnabled(true);

        keyboard123.setOnKeyboardActionListener(this);

        return Tab2View;
    }
}

1
我两年前写过一个输入法。虽然你的情况不同于我的,但是思路应该相同。
问题在于你没有为键盘视图指定一个键盘布局
请看代码:
    @Override
    public void onMeasure(int widthMeasureSpec, int heightMeasureSpec) {
        // Round up a little
        if (mKeyboard == null) {
            setMeasuredDimension(mPaddingLeft + mPaddingRight, mPaddingTop + mPaddingBottom);
        } else {
            int width = mKeyboard.getMinWidth() + mPaddingLeft + mPaddingRight;
            if (MeasureSpec.getSize(widthMeasureSpec) < width + 10) {
                width = MeasureSpec.getSize(widthMeasureSpec);
            }
            setMeasuredDimension(width, mKeyboard.getHeight() + mPaddingTop + mPaddingBottom);
        }
    }

mKeyboard 变量可以通过 setKeyboard 进行设置。你需要做的是:

  1. 在资源文件夹中创建一个键盘布局文件
  2. 创建一个 Keyboard 实例并将其设置到 KeyboardView
  3. 尝试运行代码。

1

我没有写关于其他信息,因此我认为根据文档或这个示例编写与键盘配合使用的完整步骤是有意义的:

1. 通过添加属性(到活动或服务)更改清单

<service android:name=".SimpleIME"
    android:label="@string/simple_ime"
    android:permission="android.permission.BIND_INPUT_METHOD"
    >
    <meta-data android:name="android.view.im" android:resource="@xml/method"/>
    <intent-filter>
        <action android:name="android.view.InputMethod" />
    </intent-filter>            
</service>

2) 创建具有键盘属性的主文件:

<?xml version="1.0" encoding="utf-8"?>
<input-method xmlns:android="http://schemas.android.com/apk/res/android"> 
    <subtype
        android:label="@string/subtype_en_US"      
        android:imeSubtypeLocale="en_US"
        android:imeSubtypeMode="keyboard" />
</input-method>

3) 在布局中定义KeyboardView(与您所做的相同)

<?xml version="1.0" encoding="UTF-8"?>
<android.inputmethodservice.KeyboardView
    xmlns:android="http://schemas.android.com/apk/res/android"
    android:id="@+id/keyboard"
    android:layout_width="match_parent"
    android:layout_height="wrap_content"
    android:layout_alignParentBottom="true"
    android:keyPreviewLayout ="@layout/preview"
/>

4) 定义键盘按键(仅为示例):

<Keyboard xmlns:android="http://schemas.android.com/apk/res/android"
    android:keyWidth="10%p"
    android:horizontalGap="0px"
    android:verticalGap="0px"  
    android:keyHeight="60dp" >
    <Row>
        <Key android:codes="49" android:keyLabel="1" android:keyEdgeFlags="left"/>
        <Key android:codes="50" android:keyLabel="2"/>
        <Key android:codes="51" android:keyLabel="3"/>
        <Key android:codes="52" android:keyLabel="4"/>

        // ..........
</Keyboard>

5)定义一个服务或扩展此接口在Activity中:

public class SimpleIME extends InputMethodService
    implements OnKeyboardActionListener{

    private KeyboardView kv;
    private Keyboard keyboard;

    private boolean caps = false;

    @Override
    public void onKey(int primaryCode, int[] keyCodes) {        

    }

    @Override
    public void onPress(int primaryCode) {
    }

    @Override
    public void onRelease(int primaryCode) {            
    }

    @Override
    public void onText(CharSequence text) {     
    }

    @Override
    public void swipeDown() {   
    }

    @Override
    public void swipeLeft() {
    }

    @Override
    public void swipeRight() {
    }

    @Override
    public void swipeUp() {
    }
}

6) 只需根据示例或文档更新操作方法即可。就是这样...


网页内容由stack overflow 提供, 点击上面的
可以查看英文原文,
原文链接