我正在尝试在Android中在按钮之间绘制线条。我创建了一个自定义类,用于在相对布局内的按钮之间绘制线条(相对布局是父布局)。
这是我的MatchTheColoumnDrawView.java类,它接受上下文、起始视图、结束视图、线条颜色、结束圆圈颜色、厚度(浮点数)、方向(从左到右或从右到左)。
import android.content.Context;
import android.graphics.Canvas;
import android.graphics.Color;
import android.graphics.DashPathEffect;
import android.graphics.Paint;
import android.graphics.Path;
import android.util.Log;
import android.view.View;

/**
 * Created by Abhishek on 12/21/2016.
 *
 * Changes made as per new design on Date 9 Oct 2017
 *
 */

public class MatchTheColumnDrawView extends View {


    public static final int LEFT_TO_RIGHT = 1, RIGHT_TO_LEFT = 2;

    private Paint mLinePaint, mCirclePaint;

    private View startView, endView;

    private int direction;

    private Canvas canvas;

    private float dashWidth = 15f;

    private float dashGap = 8f;

    float[] intervals = new float[]{dashWidth, dashGap};

    float phase = 0;

    private int LINE_COLOR = Color.parseColor("#BEBEBE");

    private int END_CIRCLE_COLOR = Color.parseColor("#FF99CC00");

    /**
     *
     * parametrised constructor draws line from
     * @startView
     * to
     * @endView
     * as per
     * @direction
     * and
     * @lineColor
     * and
     * @endCircleColor
     *
     * when
     * @lineColor == null
     * default lineColor is gray
     *
     * when
     * @endCircleColor == null
     * default endCircleColor is green
     * */

    public MatchTheColumnDrawView(Context context,
                                  View startView, View endView,
                                  String lineColor, String endCircleColor,
                                  float thickness, int direction) {

        super(context);

        mLinePaint = new Paint();
        if (lineColor != null) LINE_COLOR = Color.parseColor(lineColor);
        mLinePaint.setColor(LINE_COLOR);
        mLinePaint.setStrokeWidth(thickness);
        mLinePaint.setStyle(Paint.Style.STROKE);

        mCirclePaint = new Paint();
        if (endCircleColor != null) END_CIRCLE_COLOR = Color.parseColor(endCircleColor);
        mCirclePaint.setColor(END_CIRCLE_COLOR);
        mCirclePaint.setStrokeWidth(thickness);

        this.startView = startView;
        this.endView = endView;
        this.direction = direction;

        //setBackgroundColor To Transparent
        super.setBackgroundColor(Color.TRANSPARENT);
    }

    public View getStartView() {
        return startView;
    }

    public void setStartView(View startView) {
        this.startView = startView;
    }

    public View getEndView() {
        return endView;
    }

    public void setEndView(View endView) {
        this.endView = endView;
    }

    public Canvas getCanvas() {
        return canvas;
    }

    public int getDirection() {
        return direction;
    }

    public void setDirection(int direction) {
        this.direction = direction;
    }

    @Override
    protected void onDraw(Canvas canvas) {

        this.canvas = canvas;

        Log.d("Direction", String.valueOf(direction));

        Log.d("Start View Y:", String.valueOf(startView.getY()));
        Log.d("Start View H:", String.valueOf(startView.getHeight()));

        Log.d("End View Y:", String.valueOf(endView.getY()));
        Log.d("End View H:", String.valueOf(endView.getHeight()));

        //By default takes LEFT_TO_RIGHT

        if (direction == RIGHT_TO_LEFT) {

            //For RIGHT TO LEFT
            //Calculating Left X And Mid Of Height Y
            /*
            *                   ______________
            *                  |              |
            * This Point ==>> .|              |
            *                  |              |
            *                  |______________|
            * */

            float startViewLeftX = startView.getX();
            float startViewMidHeightY = startView.getY() + startView.getHeight() / 2;

            //Calculating Right X And Mid Of Height Y
            /*
            *     ______________
            *    |              |
            *    |              |.  <<== This Point
            *    |              |
            *    |______________|
            * */

            float endViewRightX = endView.getX() + endView.getWidth(); //20 is just to remove unwanted padding on Right Side
            float endViewMidHeightY = endView.getY() + endView.getHeight() / 2;

            Path mPath = new Path();

            mPath.moveTo(startViewLeftX, startViewMidHeightY);
            mPath.lineTo(endViewRightX, endViewMidHeightY);

            DashPathEffect dashPathEffect = new DashPathEffect(intervals, phase);

            mLinePaint.setPathEffect(dashPathEffect);

            canvas.drawPath(mPath, mLinePaint);

            //canvas.drawLine(startViewLeftX, startViewMidHeightY, endViewRightX, endViewMidHeightY, mLinePaint);
            canvas.drawCircle(startViewLeftX, startViewMidHeightY, 5, mCirclePaint);
            canvas.drawCircle(endViewRightX, endViewMidHeightY, 5, mCirclePaint);
        } else {

            //FOR LEFT_TO_RIGHT
            //Calculating Right X And Mid Of Height Y
            /*
            *     ______________
            *    |              |
            *    |              |.  <<== This Point
            *    |              |
            *    |______________|
            * */

            float startViewRightX = startView.getX() + startView.getWidth(); //20 is just to remove unwanted padding on Right Side
            float startViewMidHeightY = startView.getY() + startView.getHeight() / 2;

            //Calculating Left X And Mid Of Height Y
            /*
            *                   ______________
            *                  |              |
            * This Point ==>> .|              |
            *                  |              |
            *                  |______________|
            * */

            float endViewLeftX = endView.getX();
            float endViewMidHeightY = endView.getY() + endView.getHeight() / 2;

            Path mPath = new Path();

            mPath.moveTo(startViewRightX, startViewMidHeightY);
            mPath.lineTo(endViewLeftX, endViewMidHeightY);

            DashPathEffect dashPathEffect = new DashPathEffect(intervals, phase);

            mLinePaint.setPathEffect(dashPathEffect);

            canvas.drawPath(mPath, mLinePaint);
            //canvas.drawLine(startViewRightX, startViewMidHeightY, endViewLeftX, endViewMidHeightY, mLinePaint);
            canvas.drawCircle(startViewRightX, startViewMidHeightY, 5, mCirclePaint);
            canvas.drawCircle(endViewLeftX, endViewMidHeightY, 5, mCirclePaint);
        }
    }

    @Override
    public void setBackgroundColor(int color) {
        super.setBackgroundColor(color);
    }


}
我写了一个名为MatchTheFollowingAttempted的类,它扩展了相对布局RelativeLayout,并包含了绘制按钮和它们之间线条的逻辑。以下是MatchTheFollowingAttempted.java类的代码。
import android.content.Context;
import android.util.AttributeSet;
import android.view.View;
import android.view.ViewGroup;
import android.widget.Button;
import android.widget.RelativeLayout;

import java.util.ArrayList;

/**
 * Created by Abhishek on 24-10-2017.
 */

public class MatchTheFollowingAttempted extends RelativeLayout {

    private Context mContext;

    int numberOfOneSideButtons = 5;


    public MatchTheFollowingAttempted(Context context) {
        super(context);
        mContext = context;
        initialiseView();
    }

    public MatchTheFollowingAttempted(Context context, AttributeSet attrs) {
        super(context, attrs);
        mContext = context;
        initialiseView();
    }

    public MatchTheFollowingAttempted(Context context, AttributeSet attrs, int defStyleAttr) {
        super(context, attrs, defStyleAttr);
        mContext = context;
        initialiseView();
    }

    public MatchTheFollowingAttempted(Context context, AttributeSet attrs, int defStyleAttr, int defStyleRes) {
        super(context, attrs, defStyleAttr, defStyleRes);
        mContext = context;
        initialiseView();
    }

    public void initialiseView() {

        ArrayList<Button> leftSideButtons = new ArrayList<>();
        ArrayList<Button> rightSideButtons = new ArrayList<>();
        ArrayList<MatchTheColumnDrawView> matchTheColumnDrawViewArrayList = new ArrayList<>();


        for (int i = 0; i < numberOfOneSideButtons; i++) {

            Button mButton = new Button(mContext);

            mButton.setId(View.generateViewId());

            RelativeLayout.LayoutParams layoutParams = new LayoutParams(ViewGroup.LayoutParams.WRAP_CONTENT, ViewGroup.LayoutParams.WRAP_CONTENT);

            if (i != 0) {

                layoutParams.addRule(BELOW, leftSideButtons.get(i-1).getId());

            }

            layoutParams.setMargins(10, 10, 10, 10);

            mButton.setLayoutParams(layoutParams);

            leftSideButtons.add(mButton);

            addView(mButton);


        }

        for (int i = 0; i < numberOfOneSideButtons; i++) {

            Button mButton = new Button(mContext);

            mButton.setId(View.generateViewId());

            RelativeLayout.LayoutParams layoutParams = new LayoutParams(ViewGroup.LayoutParams.WRAP_CONTENT, ViewGroup.LayoutParams.WRAP_CONTENT);

            layoutParams.addRule(ALIGN_PARENT_RIGHT);

            if (i != 0) {

                layoutParams.addRule(BELOW, rightSideButtons.get(i-1).getId());

            }

            layoutParams.setMargins(10, 10, 10, 10);

            mButton.setLayoutParams(layoutParams);

            rightSideButtons.add(mButton);

            addView(mButton);

        }

        for (int i = 0; i < numberOfOneSideButtons; i++) {

            MatchTheColumnDrawView matchTheColumnDrawView = new MatchTheColumnDrawView(mContext, leftSideButtons.get(i), rightSideButtons.get(4-i), null, null, 2.0f, MatchTheColumnDrawView.LEFT_TO_RIGHT);

            matchTheColumnDrawViewArrayList.add(matchTheColumnDrawView);

            addView(matchTheColumnDrawView);
        }


    }

}
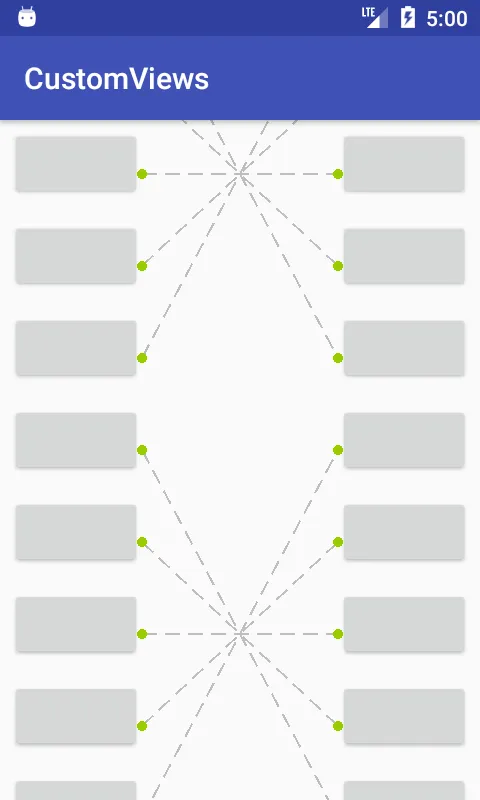
当我直接在LinearLayout(在Scrollview内部)中使用MatchTheFollowingAttempted时,它会显示视图,包括按钮和它们之间的线条。如附图所示(Image_One)。以下是其XML代码:
<?xml version="1.0" encoding="utf-8"?>
<RelativeLayout xmlns:android="http://schemas.android.com/apk/res/android"
    xmlns:tools="http://schemas.android.com/tools"
    android:layout_width="match_parent"
    android:layout_height="match_parent">

    <ScrollView
        android:layout_width="match_parent"
        android:layout_height="match_parent"
        android:fillViewport="true">

        <LinearLayout
            android:layout_width="match_parent"
            android:layout_height="match_parent"
            android:orientation="vertical">

            <MatchTheFollowingAttempted
                android:layout_width="match_parent"
                android:layout_height="wrap_content">

            </MatchTheFollowingAttempted>

        </LinearLayout>

    </ScrollView>

</RelativeLayout>
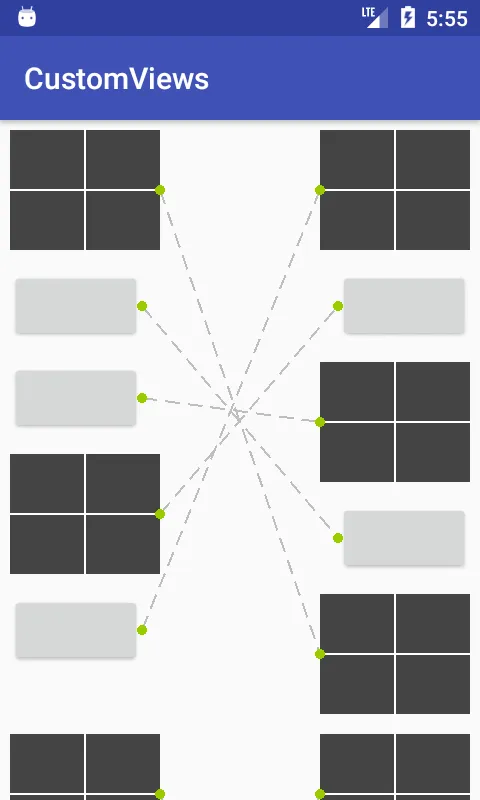
当我在线性布局中添加第二个MatchTheFollowingAttempted时,线条将不会显示(如附图Image_Two所示)。这是具有两个MatchTheFollowingAttempted的xml的内容。
<?xml version="1.0" encoding="utf-8"?>
<RelativeLayout xmlns:android="http://schemas.android.com/apk/res/android"
    xmlns:tools="http://schemas.android.com/tools"
    android:layout_width="match_parent"
    android:layout_height="match_parent">

    <ScrollView
        android:layout_width="match_parent"
        android:layout_height="match_parent"
        android:fillViewport="true">

        <LinearLayout
            android:layout_width="match_parent"
            android:layout_height="match_parent"
            android:orientation="vertical">

            <MatchTheFollowingAttempted
                android:layout_width="match_parent"
                android:layout_height="wrap_content">

            </MatchTheFollowingAttempted>

            <MatchTheFollowingAttempted
                android:layout_width="match_parent"
                android:layout_height="wrap_content">

            </MatchTheFollowingAttempted>

        </LinearLayout>

    </ScrollView>

</RelativeLayout>
(说明:这是一个关于it技术的问题,原句不够清晰,无法进行更好的翻译。)当我运行它时,它没有显示第二个布局。