Android - 使用AnimatorSet进行缩放动画

17

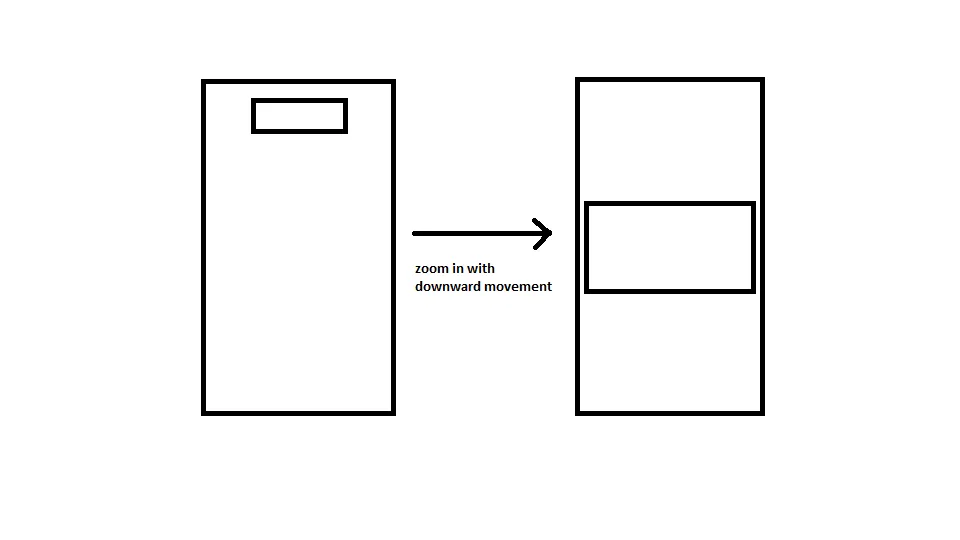
官方的Zooming a View教程使用一个AnimatorSet来将视图放大。它创造了向下运动的幻觉,当视图扩大时。然后,简单地回放AnimatorSet以创建缩小的幻觉。

向下运动缩放 
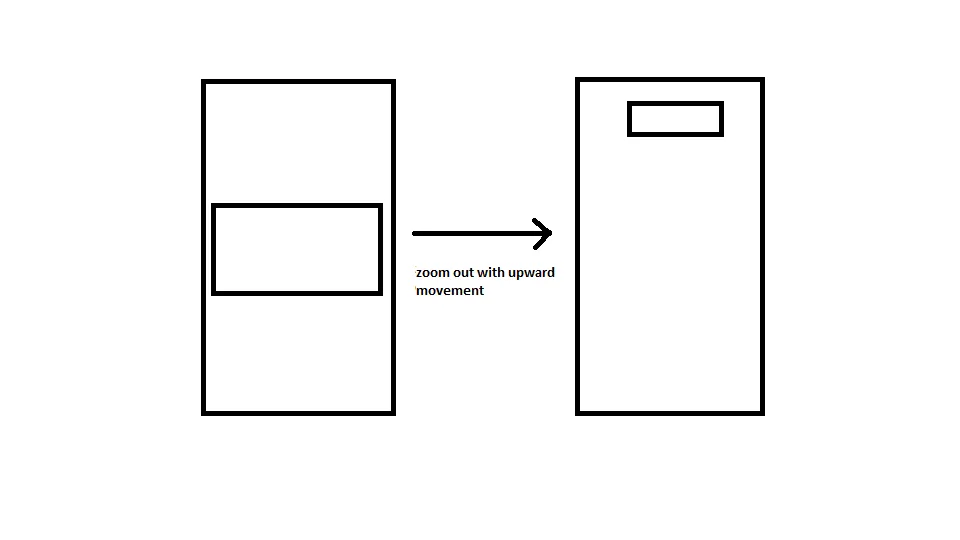
我需要实现的是完全相反的效果。我需要从一个扩大的视图开始,并通过向上运动将其缩小为较小的视图:

向上运动缩放 似乎不能使用示例中的反转代码。该示例假设您首先放大并展开视图,然后将其缩小回原始缩略图标。

到目前为止,我尝试过以下方法。我的XML布局如下:

<FrameLayout xmlns:android="http://schemas.android.com/apk/res/android"
android:id="@+id/container"
android:layout_width="match_parent"
android:layout_height="match_parent">

<LinearLayout android:layout_width="match_parent"
    android:layout_height="match_parent"
    android:orientation="vertical"
    android:background="#1999da">             

    <LinearLayout
        android:layout_width="match_parent"
        android:layout_height="wrap_content"
        android:layout_marginTop="16dp"
        android:orientation="horizontal"
        android:layout_gravity="center"
        android:gravity="center">

        <!-- The final shrunk image -->

        <ImageView
            android:id="@+id/thumb_button_1"
            android:layout_width="wrap_content"
            android:layout_height="50dp"
            android:layout_marginRight="1dp"
            android:visibility="invisible"/>

    </LinearLayout>

</LinearLayout>

<!-- The initial expanded image that needs to be shrunk -->

<ImageView
    android:id="@+id/expanded_image"
    android:layout_width="wrap_content"
    android:layout_height="125dp"
    android:layout_gravity="center"
    android:src="@drawable/title_logo_expanded"
    android:scaleType="centerCrop"/>

</FrameLayout>

这里是执行缩小操作的方法。我基本上尝试反转教程中的过程:

private void zoomImageFromThumbReverse(final View expandedImageView, int imageResId, final int duration) {
    // If there's an animation in progress, cancel it immediately and proceed with this one.      

    if (mCurrentAnimator != null) {
        mCurrentAnimator.cancel();
    }

    // Load the low-resolution "zoomed-out" image.
    final ImageView thumbView = (ImageView) findViewById(R.id.thumb_button_1);
    thumbView.setImageResource(imageResId);

    // Calculate the starting and ending bounds for the zoomed-in image. This step
    // involves lots of math. Yay, math.
    final Rect startBounds = new Rect();
    final Rect finalBounds = new Rect();
    final Point globalOffset = new Point();

    // The start bounds are the global visible rectangle of the container view (i.e. the FrameLayout), and the
    // final bounds are the global visible rectangle of the thumbnail. Also
    // set the container view's offset as the origin for the bounds, since that's
    // the origin for the positioning animation properties (X, Y).
    findViewById(R.id.container).getGlobalVisibleRect(startBounds, globalOffset);
    thumbView.getGlobalVisibleRect(finalBounds);
    startBounds.offset(-globalOffset.x, -globalOffset.y);
    finalBounds.offset(-globalOffset.x, -globalOffset.y);

    // Adjust the start bounds to be the same aspect ratio as the final bounds using the
    // "center crop" technique. This prevents undesirable stretching during the animation.
    // Also calculate the start scaling factor (the end scaling factor is always 1.0).
    float startScale;
    if ((float) finalBounds.width() / finalBounds.height()
            > (float) startBounds.width() / startBounds.height()) {
        // Extend start bounds horizontally
        startScale = (float) startBounds.height() / finalBounds.height();
        float startWidth = startScale * finalBounds.width();
        float deltaWidth = (startWidth - startBounds.width()) / 2;
        startBounds.left -= deltaWidth;
        startBounds.right += deltaWidth;
    } else {
        // Extend start bounds vertically
        startScale = (float) startBounds.width() / finalBounds.width();
        float startHeight = startScale * finalBounds.height();
        float deltaHeight = (startHeight - startBounds.height()) / 2;
        startBounds.top -= deltaHeight;
        startBounds.bottom += deltaHeight;
    }

    // Hide the expanded-image and show the zoomed-out, thumbnail view. When the animation begins,
    // it will position the zoomed-in view in the place of the thumbnail.
    expandedImageView.setAlpha(0f);
    thumbView.setVisibility(View.VISIBLE);

    // Set the pivot point for SCALE_X and SCALE_Y transformations to the top-left corner of
    // the zoomed-in view (the default is the center of the view).
    thumbView.setPivotX(0f);
    thumbView.setPivotY(0f);

    // Construct and run the parallel animation of the four translation and scale properties
    // (X, Y, SCALE_X, and SCALE_Y).
    AnimatorSet set = new AnimatorSet();
    set
            .play(ObjectAnimator.ofFloat(thumbView, View.X, startBounds.left,
                    finalBounds.left))
            .with(ObjectAnimator.ofFloat(thumbView, View.Y, startBounds.top,
                    finalBounds.top))
            .with(ObjectAnimator.ofFloat(thumbView, View.SCALE_X, startScale, 1f))
            .with(ObjectAnimator.ofFloat(thumbView, View.SCALE_Y, startScale, 1f));
    //set.setDuration(mShortAnimationDuration);
    set.setDuration(duration);
    set.setInterpolator(new DecelerateInterpolator());
    set.addListener(new AnimatorListenerAdapter() {
        @Override
        public void onAnimationEnd(Animator animation) {
            mCurrentAnimator = null;
        }

        @Override
        public void onAnimationCancel(Animator animation) {
            mCurrentAnimator = null;
        }
    });
    set.start();
    mCurrentAnimator = set;

    // Upon clicking the zoomed-out image, it should zoom back down to the original bounds
    // and show the thumbnail instead of the expanded image.
    final float startScaleFinal = startScale;
    thumbView.setOnClickListener(new View.OnClickListener() {
        @Override
        public void onClick(View view) {
            if (mCurrentAnimator != null) {
                mCurrentAnimator.cancel();
            }

            // Animate the four positioning/sizing properties in parallel, back to their
            // original values.
            AnimatorSet set = new AnimatorSet();
            set
                    .play(ObjectAnimator.ofFloat(thumbView, View.X, startBounds.left))
                    .with(ObjectAnimator.ofFloat(thumbView, View.Y, startBounds.top))
                    .with(ObjectAnimator
                            .ofFloat(thumbView, View.SCALE_X, startScaleFinal))
                    .with(ObjectAnimator
                            .ofFloat(thumbView, View.SCALE_Y, startScaleFinal));
            //set.setDuration(mShortAnimationDuration);
            set.setDuration(duration);
            set.setInterpolator(new DecelerateInterpolator());
            set.addListener(new AnimatorListenerAdapter() {
                @Override
                public void onAnimationEnd(Animator animation) {
                    expandedImageView.setAlpha(1f);
                    thumbView.setVisibility(View.GONE);
                    mCurrentAnimator = null;
                }

                @Override
                public void onAnimationCancel(Animator animation) {
                    expandedImageView.setAlpha(1f);
                    thumbView.setVisibility(View.GONE);
                    mCurrentAnimator = null;
                }
            });
            set.start();
            mCurrentAnimator = set;
        }
    });
}

我在onCreate()中调用此方法,如下所示:

final View expandedImageView = findViewById(R.id.expanded_image);
new Handler().postDelayed(new Runnable(){
        public void run() {
            zoomImageFromThumbReverse(expandedImageView, R.drawable.title_logo_min, 1000);
        }}, 1000);

好了,伙计们。它不起作用。我不知道为什么。演示例子完美地运行,那么为什么这个不行呢?看看并告诉我是否疯了。

有人能够确定错误吗?或者指导我正确的方向吗?所有的帮助将不胜感激。

2个回答

6
以下是我最终使用的解决方案:

这是我最终使用的解决方案:

private void applyAnimation(final View startView, final View finishView, long duration) {
    float scalingFactor = ((float)finishView.getHeight())/((float)startView.getHeight());

    ScaleAnimation scaleAnimation =  new ScaleAnimation(1f, scalingFactor,
                                                        1f, scalingFactor,
                                                        Animation.RELATIVE_TO_SELF, 0.5f,
                                                        Animation.RELATIVE_TO_SELF, 0.5f);

    scaleAnimation.setDuration(duration);
    scaleAnimation.setInterpolator(new AccelerateDecelerateInterpolator());

    Display display = getWindowManager().getDefaultDisplay();

    int H;

    if(Build.VERSION.SDK_INT >= 13){
        Point size = new Point();
        display.getSize(size);
        H = size.y;
    }
    else{
        H = display.getHeight();
    }

    float h = ((float)finishView.getHeight());

    float verticalDisplacement = (-(H/2)+(3*h/4));

    TranslateAnimation translateAnimation = new TranslateAnimation(Animation.ABSOLUTE, 0,
                                                                   Animation.ABSOLUTE, 0,
                                                                   Animation.ABSOLUTE, 0,
                                                                   Animation.ABSOLUTE, verticalDisplacement);

    translateAnimation.setDuration(duration);
    translateAnimation.setInterpolator(new AccelerateDecelerateInterpolator());

    AnimationSet animationSet = new AnimationSet(false);
    animationSet.addAnimation(scaleAnimation);
    animationSet.addAnimation(translateAnimation);
    animationSet.setFillAfter(false);

    startView.startAnimation(animationSet);
}

这里的关键因素是TranslateAnimation参数中toYDelta的值:

toYDelta = (-(H/2)+(3*h/4));

理解为什么这个有效是主要的事情。其他大部分都很简单。

2

好的,我想您希望从您的图像和描述中实现向上移动的缩小效果。我无法理解您的代码,对我来说似乎过于复杂(我是新手)。现在我已经使用以下代码完成了您所需的操作。首先,我声明了一个相对布局,其中包含一个图像视图,这个相对布局将成为容器。我设置了初始宽度和高度,但稍后我们将从代码中进行更改。

<RelativeLayout
    android:id="@+id/container"
    xmlns:android="http://schemas.android.com/apk/res/android"
    xmlns:tools="http://schemas.android.com/tools"
    android:layout_width="match_parent"
    android:layout_height="match_parent"
    android:paddingBottom="@dimen/activity_vertical_margin"
    android:paddingLeft="@dimen/activity_horizontal_margin"
    android:paddingRight="@dimen/activity_horizontal_margin"
    android:paddingTop="@dimen/activity_vertical_margin"
    tools:context=".MainActivity">


    <ImageView
        android:id="@+id/imageView"
        android:layout_width="400dp"
        android:layout_height="200dp"
        android:layout_centerHorizontal="true"
        android:scaleType="fitXY"
        android:src="@drawable/my_image"/>
</RelativeLayout>

现在,在Activity中我设置了一个布局变化的监听器,这样我就可以获取容器的实际大小。然后为ImageView设置布局。

public class MainActivity extends Activity {
    ImageView im;
    RelativeLayout container;

    @Override
    protected void onCreate(Bundle savedInstanceState) {
        super.onCreate(savedInstanceState);
        Logger.init().hideThreadInfo().setMethodCount(0);

        setContentView(R.layout.activity_main);
        im = (ImageView) findViewById(R.id.imageView);
        container = (RelativeLayout) findViewById(R.id.container);
        container.getViewTreeObserver().addOnGlobalLayoutListener(new ViewTreeObserver.OnGlobalLayoutListener() {
            @Override
            public void onGlobalLayout() {
                setInitialPos();
                container.getViewTreeObserver().removeOnGlobalLayoutListener(this);
            }
        });

    }

    int width;
    int height;
    int topMargin;

    private void setInitialPos() {
        Logger.e("container: " + container.getWidth() + " x " + container.getHeight());
        width = container.getWidth();
        height = 400;
        RelativeLayout.LayoutParams layoutParams = (RelativeLayout.LayoutParams) im.getLayoutParams();
        layoutParams.width = width;
        layoutParams.height = height;
        topMargin = (container.getHeight() - height) / 2;
        layoutParams.topMargin = topMargin;
        im.setLayoutParams(layoutParams);

        startAnimation();
    }

我们需要对三个元素进行动画处理,分别是宽度、高度和上边距(用于定位)。因此,我声明了三个变量来记录动画的初始位置,并在初始布局设置中计算它们。现在,我们需要同时对这三个变量进行动画处理,这很容易实现。

    private void startAnimation() {
        AnimatorSet animator = new AnimatorSet();

        Animator widthAnimator = ObjectAnimator.ofInt(this, "width", width, 200);
        widthAnimator.setInterpolator(new LinearInterpolator());

        Animator heightAnimator = ObjectAnimator.ofInt(this, "height", height, 100);
        heightAnimator.setInterpolator(new LinearInterpolator());

        Animator marginAnimator = ObjectAnimator.ofInt(this, "topMargin", topMargin, 0);
        marginAnimator.setInterpolator(new LinearInterpolator());

        animator.playTogether(widthAnimator, heightAnimator, marginAnimator);
        animator.setDuration(3000);
        animator.start();
    }

    public void setWidth(int w) {
        RelativeLayout.LayoutParams layoutParams = (RelativeLayout.LayoutParams) im.getLayoutParams();
        layoutParams.width = w;
        im.setLayoutParams(layoutParams);
    }

    public void setHeight(int h) {
        RelativeLayout.LayoutParams layoutParams = (RelativeLayout.LayoutParams) im.getLayoutParams();
        layoutParams.height = h;
        im.setLayoutParams(layoutParams);
    }

    public void setTopMargin(int m) {
        RelativeLayout.LayoutParams layoutParams = (RelativeLayout.LayoutParams) im.getLayoutParams();
        layoutParams.topMargin = m;
        im.setLayoutParams(layoutParams);
    }
}

网页内容由stack overflow 提供, 点击上面的
可以查看英文原文,
原文链接