CKEditor,图片上传(filebrowserUploadUrl)

37

我正在使用CKEditor,并希望能够允许用户在文本编辑器中上传和嵌入图片...

以下JS代码是用于加载CKEditor的:

CKEDITOR.replace('meeting_notes', {
    startupFocus: true,
    toolbar: [
        ['ajaxsave'],
        ['Bold', 'Italic', 'Underline', '-', 'NumberedList', 'BulletedList', '-', 'Link', 'Unlink'],
        ['Cut', 'Copy', 'Paste', 'PasteText'],
        ['Undo', 'Redo', '-', 'RemoveFormat'],
        ['TextColor', 'BGColor'],
        ['Maximize', 'Image']
    ],
    filebrowserUploadUrl: '/notes/add/ajax/upload-inline-image/index.cfm'
});

我卡在了filebrowserUploadUrl这个地方。这个URL应该返回什么给CKEditor才能让这个过程生效?

谢谢


寻求解决方案的人不应忽视 Stack Exchange 为 Drupal 问题提供的特定 Drupal 网站,同时还提供了一种替代的图片上传方式:http://drupal.stackexchange.com/questions/10383/ckeditor-simple-image-upload-functionality - kubilay
6
CKEditor库不是Drupal本身的一部分,它是一个第三方的插件。 - Agi Hammerthief
12个回答

42

这个URL应该指向您可能拥有的自定义文件浏览器URL。

我已经在我的一个项目中完成了这个操作,并在我的博客上发布了一篇关于这个主题的教程。

http://www.mixedwaves.com/2010/02/integrating-fckeditor-filemanager-in-ckeditor/

如果您不想自己创建,该教程提供了逐步说明如何将FCKEditor内置的文件浏览器集成到CKEditor中。 它非常简单。


非常棒的教程。您有没有注意到在Chrome 20.0.1132.57中,文件浏览器弹出窗口没有显示? - marvc1
只是想说 - 你太棒了!非常好的教程。 - BWDesign
@Penuel,兄弟,你能否帮我看一下我的问题 https://stackoverflow.com/questions/45397155/ckedtior-appearance-not-show-fully-in-drupal-7? - May Phyu
@NarendraVerma现在似乎工作正常。可能是一些临时问题? - Penuel
1
抱歉,我使用的路径有拼写错误。再次感谢! - rahul singh
显示剩余4条评论

14

也许现在已经有点晚了。你的代码是正确的,请再次检查一下你在filebrowserUploadUrl中的URL。

CKEDITOR.replace( 'editor1', {
    filebrowserUploadUrl: "upload/upload.php" 
} );

以及Upload.php文件

if (file_exists("images/" . $_FILES["upload"]["name"]))
{
 echo $_FILES["upload"]["name"] . " already exists. ";
}
else
{
 move_uploaded_file($_FILES["upload"]["tmp_name"],
 "images/" . $_FILES["upload"]["name"]);
 echo "Stored in: " . "images/" . $_FILES["upload"]["name"];
}

1
你应该在链接中包含代码示例,以防链接失效。 - Ashley Medway
1
我喜欢这个,因为它是最简单的解决方案,而且根本不需要任何插件。 - Arturo Torres Sánchez
这是最好的答案! - Christopher Smit
我收到了“服务器响应不正确”的错误信息,请帮我解决一下? - rahul singh

6
新的CKeditor没有包括文件管理器(CKFinder是付费的)。您可以集成一个免费的文件管理器,它外观漂亮且易于在CKeditor中实现。

http://labs.corefive.com/2009/10/30/an-open-file-manager-for-ckeditor-3-0/

你需要下载它,将其复制到你的项目中。 所有的指令都在那里,但基本上你只需在代码中放置添加的文件管理器index.html页面的路径。
CKEDITOR.replace( 'meeting_notes',
{
startupFocus : true,
toolbar :
[
['ajaxsave'],
['Bold', 'Italic', 'Underline', '-', 'NumberedList', 'BulletedList', '-', 'Link', 'Unlink' ],
['Cut','Copy','Paste','PasteText'],
['Undo','Redo','-','RemoveFormat'],
['TextColor','BGColor'],
['Maximize', 'Image']
],
filebrowserUploadUrl : '/filemanager/index.html' // you must write path to filemanager where you have copied it.
});    

大多数语言都受支持(php、asp、MVC 和 aspx - ashx 等)。

兄弟,你能否帮我看一下我的问题?链接是 https://stackoverflow.com/questions/45397155/ckedtior-appearance-not-show-fully-in-drupal-7 。 - May Phyu

3
如果您不想购买CKFinder,就像我一样不想购买CKFinder,那么我为CKEditor 4编写了一个非常可靠的上传程序。它由第二个表单组成,紧贴在您的文本区表单上方,并利用iframe hack,尽管其名称如此,但它是无缝和不显眼的。
图片成功上传后,它将出现在您的CKEditor窗口中,以及已经存在的任何内容。
editor.php(表单页面):
<?php
set_time_limit ( 3600 )
?><!DOCTYPE html PUBLIC "-//W3C//DTD XHTML 1.0 Transitional//EN" "http://www.w3.org/TR/xhtml1/DTD/xhtml1-transitional.dtd">
<html xmlns="http://www.w3.org/1999/xhtml">
<head>
<meta http-equiv="Content-Type" content="text/html; charset=utf-8" />
<title>Content Editor</title>
<link href="jquery-ui-1.10.2/themes/vader/ui.dialog.css" rel="stylesheet" media="screen" id="dialog_ui" />
<link href="jquery-ui-1.10.2/themes/vader/jquery-ui.css" rel="stylesheet" media="screen" id="dialog_ui" />
<script src="jquery-ui-1.10.2/jquery-1.9.1.js"></script>
<script src="jquery-ui-1.10.2/jquery.form.js"></script>
<script src="jquery-ui-1.10.2/ui/jquery-ui.js"></script>
<script src="ckeditor/ckeditor.js"></script>
<script src="ckeditor/config.js"></script>
<script src="ckeditor/adapters/jquery.js"></script>
<script src="ckeditor/plugin2.js"></script>
<script type="text/javascript">
$(document).ready(function() {
    $('#editor').ckeditor({ height: 400, width:600});
});

function placePic(){

    function ImageExist(url){
       var img = new Image();
       img.src = url;
       return img.height != 0;
    }

var filename = document.forms['uploader']['uploadedfile'].value;
document.forms['uploader']['filename'].value = filename;
var url = 'http://www.mydomain.com/external/images/cms/'+filename;
document.getElementById('uploader').submit();
var string = CKEDITOR.instances.editor.getData();
var t = setInterval(function(){

            var exists = ImageExist(url);
            if(exists === true){
                    if(document.getElementById('loader')){
                        document.getElementById('loader').parentNode.removeChild(document.getElementById('loader'));
                    }
                    CKEDITOR.instances.editor.setData(string + "<img src=\""+url+"\" />");
                    clearInterval(t);
            }
            else{
                if(! document.getElementById("loader")){
                    var loader = document.createElement("div");
                    loader.setAttribute("id","loader");
                    loader.setAttribute("style","position:absolute;margin:-300px auto 0px 240px;width:113px;height:63px;text-align:center;z-index:10;");
                    document.getElementById('formBox').appendChild(loader);

                    var loaderGif = document.createElement("img");
                    loaderGif.setAttribute("id","loaderGif");
                    loaderGif.setAttribute("style","width:113px;height:63px;text-align:center;");
                    loaderGif.src = "external/images/cms/2dumbfish.gif";
                    document.getElementById('loader').appendChild(loaderGif);
                }
            }

            },100);
}

function loadContent(){
if(document.forms['editorform']['site'].value !== "" && document.forms['editorform']['page'].value !== ""){
    var site = document.forms['editorform']['site'].value;
    var page = document.forms['editorform']['page'].value;
    var url = site+"/"+page+".html";
    $.ajax({
        type: "GET",
        url: url,
        dataType: 'html',
        success: function (html) {
            CKEDITOR.instances.editor.setData(html);
        }
    });
}
}
</script>
<style>
button{
  width: 93px;
  height: 28px;
  border:none;
  padding: 0 4px 8px 0;
  font-weight:bold
}
#formBox{
    width:50%;
margin:10px auto 0px auto;
font-family:Tahoma, Geneva, sans-serif;
font-size:12px;
}
#field{
position:absolute;
top:10px;
margin-left:300px;
margin-bottom:20px;
}
#target{
position:absolute;
top:100px;
left:100px;
width:400px;
height:100px;
display:none;
}
.textField{
    padding-left: 1px;
border-style: solid;
border-color: black;
border-width: 1px;
font-family: helvetica, arial, sans serif;
padding-left: 1px;
}
#report{
float:left;
margin-left:20px;
margin-top:10px;
font-family: helvetica, arial, sans serif;
font-size:12px;
color:#900;
}
</style>
</head>

<body>
<?php
if(isset($_GET['r'])){ ?><div id="report">
<?php echo $_GET['r']; ?> is changed.
</div><?php
}
?>
<div id="formBox">
<form id="uploader" name="uploader" action="editaction.php"  method="post" target="target" enctype="multipart/form-data">
<input type="hidden" name="MAX_FILE_SIZE" value="50000000" />
<input type="hidden" name="filename" value="" />
Insert image:&nbsp;<input name="uploadedfile" type="file" class="textField" onchange="placePic();return false;" />&nbsp;&nbsp;
</form>

<form name="editorform" id="editorform" method="post" action="editaction.php" >
<div id="field" >Site:&nbsp;<select name="site"  class="textField" onchange="loadContent();return false;">
    <option value=""></option>
    <option value="scubatortuga">scubatortuga</option>
    <option value="drytortugascharters">drytortugascharters</option>
    <option value="keyscombo">keyscombo</option>
    <option value="keywesttreasurehunters">keywesttreasurehunters</option>
    <option value="spearfishkeywest">spearfishkeywest</option>
</select>
Page:&nbsp;<select name="page" class="textField" onchange="loadContent();return false;">
    <option value=""></option>
    <option value="one">1</option>
    <option value="two">2</option>
    <option value="three">3</option>
    <option value="four">4</option>
</select>
</div><br />
<textarea name="editor" id="editor"></textarea><br />
<input type="submit" name="submit" value="Submit" />
</form>
</div>
<iframe name="target" id="target"></iframe>
</body>
</html>

这里是实际执行文件上传的动作页面editaction.php

<?php
//editaction.php

foreach($_POST as $k => $v){
    ${"$k"} = $v;
}
//fileuploader.php
if($_FILES){
  $target_path = "external/images/cms/";
  $target_path = $target_path . basename( $_FILES['uploadedfile']['name']); 
  if(! file_exists("$target_path$filename")){
    move_uploaded_file($_FILES['uploadedfile']['tmp_name'], $target_path);
  }
}
else{
    $string = stripslashes($editor);
    $filename = "$site/$page.html";
    $handle = fopen($filename,"w");
    fwrite($handle,$string,strlen($string));
    fclose($handle);
    header("location: editor.php?r=$filename");
}
?>


3

使用 CKeditor 版本 4 或更高版本时,编辑器期望从服务器端返回 JSON。较旧的版本可能需要返回 text/html 类型的响应,其中包含一个 JavaScript 代码片段。可以查看此链接以了解有关返回格式的解释Explanation of return formats。在服务器端,如果您正在使用 C#,则可以创建如下的数据模型:

namespace editors.Models
{
    public class PostModel
    {
        public string CKEditor { get; set; }  // for older editors
        public string CKEditorFuncNum { get; set; }  // for older editors
        public string langCode { get; set; }  // for older editors
        public int uploaded { get; set; } 
        public string filename { get; set; }
    }
}

并使用以下代码从上传程序返回结果:

PostModel fez = new PostModel { CKEditor = "TheEditor1", CKEditorFuncNum = "1", langCode = "en", uploaded = 1, filename = "/images/in/" + filenameVariable };
return Ok(fez);

尽管 .net 很可能会自动将其转换为 json,但请确保返回 content-type 应用程序/json。对于想要检查上传文件是否真正为图像文件的人来说,如果您使用 Asp.net core,则需要以非标准方式安装 system.drawing 库。这是如何做到的。还要注意,您可以在 config.js 文件中更改发布类型,以 config.filebrowserUploadMethod='form'; 代替 config.filebrowserUploadMethod='xhr';

2

最近我也需要这个答案,花了几个小时才找到,所以我决定提供一些更加实用的信息和完整的答案来回答这个问题。

最终我偶然发现了 这个教程,它向我很好地解释了这个问题。为了方便 StackOverflow 的用户,如果该教程被删除,我会在此重申该教程。同时,我还将包括我对该教程所做的一些更改,使其成为更灵活的解决方案。


入门指南

让我们从任何版本的 ckeditor 开始(基本版、标准版、完整版、自定义版),唯一的要求是你必须有插件imagefilebrowser

(截至目前,所有套餐都包含这两个插件,除了基本版,但可以将其添加到基本版中。)

在上传必要的 ckeditor 文件之后,请确保您的安装正常工作。

确保您链接了 ckeditor.js 文件脚本 <script src="ckeditor/ckeditor.js"></script>,然后像这样初始化它:

$(document).ready(function() {
    CKEDITOR.replace( 'editor1' );
});
<textarea name="editor1"></textarea>

CKEditor配置

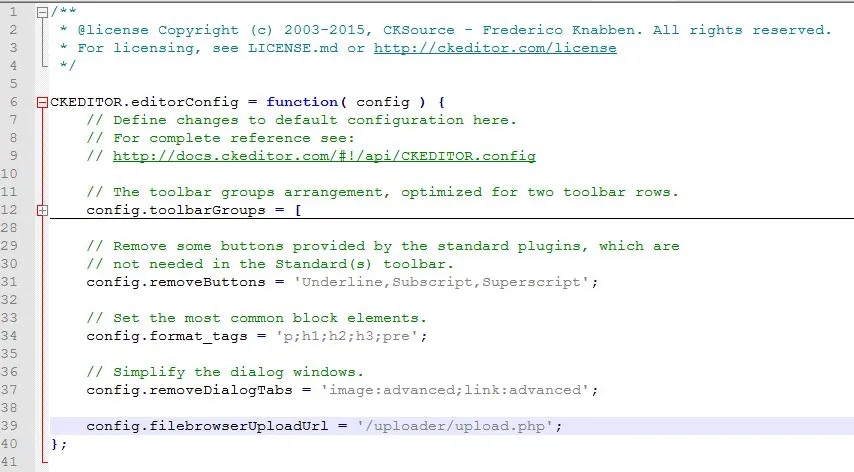
现在我们需要告诉CKEditor,我们想要启用上传功能。您可以进入您的ckeditor文件夹,并编辑`config.js'文件。我们需要在主函数内添加这行代码:

config.filebrowserUploadUrl = '/uploader/upload.php';

将其放置在合适的位置即可。

CKEDITOR.editorConfig = function( config ) {
    // Define changes to default configuration here. For example:
    // config.language = 'fr';
    // config.uiColor = '#AADC6E';

    config.filebrowserUploadUrl = '/uploader/upload.php';
};

注意:此URL来自您的项目根目录。无论您从哪里加载此文件,它都将从您的网站索引开始。也就是说,如果您的URL是example.com,则此URL将指向http://example.com/uploader/upload.php

完成CKEditor配置!这很容易,不是吗?

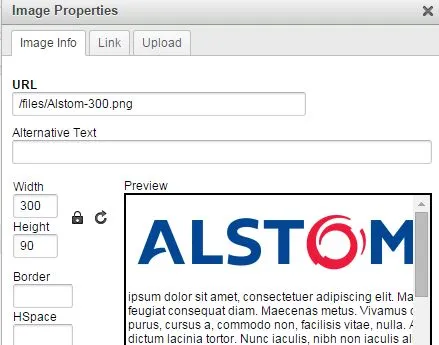
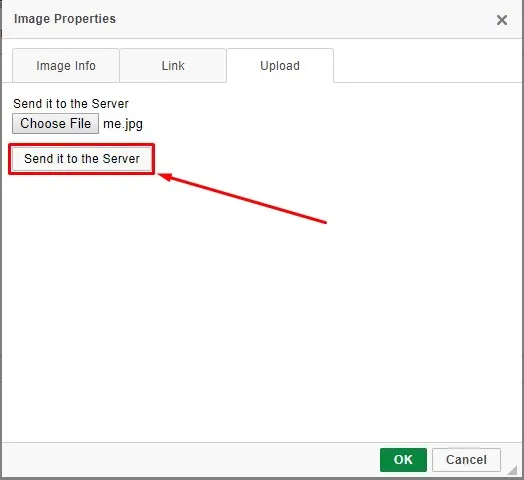
实际上,如果您现在再次测试图像上传,您将获得一个上传选项,尽管它还不能完全工作。

enter image description here


服务器配置

现在您会注意到,在此步骤之前,它以一个upload.php文件结束。这是我卡住的部分,我认为应该有一些默认值可以与此一起使用,但据我所知没有。幸运的是,我找到了一个可行的方案,并对其进行了一些更改,以允许更多的自定义。

因此,让我们转到您在上一步中提供的路径,为了保持本教程的连贯性,我将使用/uploader/upload.php

在此位置,创建一个名为(您猜对了)upload.php的文件。

这个文件将处理我们的文件上传。

我将放入我的自定义上传类,但它基于我找到并分叉的此github

upload.php:

<?php
// Upload script for CKEditor.
// Use at your own risk, no warranty provided. Be careful about who is able to access this file
// The upload folder shouldn't be able to upload any kind of script, just in case.
// If you're not sure, hire a professional that takes care of adjusting the server configuration as well as this script for you.
// (I am not such professional)

// Configuration Options: Change these to alter the way files being written works
$overwriteFiles = false;

//THESE SETTINGS ONLY MATTER IF $overwriteFiles is FALSE

    //Seperator between the name of the file and the generated ending.
    $keepFilesSeperator = "-"; 

    //Use "number" or "random". "number" adds a number, "random" adds a randomly generated string.
    $keepFilesAddonType = "random"; 

    //Only usable when $keepFilesAddonType is "number", this specifies where the number starts iterating from.
    $keepFilesNumberStart = 1; 

    //Only usable when $keepFilesAddonType is "random", this specifies the length of the string.
    $keepFilesRandomLength = 4; 

//END FILE OVERWRITE FALSE SETTINGS

// Step 1: change the true for whatever condition you use in your environment to verify that the user
// is logged in and is allowed to use the script
if (true) {
    echo("You're not allowed to upload files");
    die(0);
}

// Step 2: Put here the full absolute path of the folder where you want to save the files:
// You must set the proper permissions on that folder (I think that it's 644, but don't trust me on this one)
// ALWAYS put the final slash (/)
$basePath = "/home/user/public_html/example/pages/projects/uploader/files/";

// Step 3: Put here the Url that should be used for the upload folder (it the URL to access the folder that you have set in $basePath
// you can use a relative url "/images/", or a path including the host "http://example.com/images/"
// ALWAYS put the final slash (/)
$baseUrl = "http://example.com/pages/projects/uploader/files/";

// Done. Now test it!


// No need to modify anything below this line
//----------------------------------------------------

// ------------------------
// Input parameters: optional means that you can ignore it, and required means that you
// must use it to provide the data back to CKEditor.
// ------------------------

// Optional: instance name (might be used to adjust the server folders for example)
$CKEditor = $_GET['CKEditor'] ;

// Required: Function number as indicated by CKEditor.
$funcNum = $_GET['CKEditorFuncNum'] ;

// Optional: To provide localized messages
$langCode = $_GET['langCode'] ;

// ------------------------
// Data processing
// ------------------------

// The returned url of the uploaded file
$url = '' ;

// Optional message to show to the user (file renamed, invalid file, not authenticated...)
$message = '';

// in CKEditor the file is sent as 'upload'
if (isset($_FILES['upload'])) {
    // Be careful about all the data that it's sent!!!
    // Check that the user is authenticated, that the file isn't too big,
    // that it matches the kind of allowed resources...
    $name = $_FILES['upload']['name'];

    //If overwriteFiles is true, files will be overwritten automatically.
    if(!$overwriteFiles) 
    {
        $ext = ".".pathinfo($name, PATHINFO_EXTENSION);
        // Check if file exists, if it does loop through numbers until it doesn't.
        // reassign name at the end, if it does exist.
        if(file_exists($basePath.$name)) 
        {
            if($keepFilesAddonType == "number") {
                $operator = $keepFilesNumberStart;
            } else if($keepFilesAddonType == "random") {
                $operator = bin2hex(openssl_random_pseudo_bytes($keepFilesRandomLength/2));
            }
            //loop until file does not exist, every loop changes the operator to a different value.
            while(file_exists($basePath.$name.$keepFilesSeperator.$operator)) 
            {
                if($keepFilesAddonType == "number") {
                    $operator++;
                } else if($keepFilesAddonType == "random") {
                    $operator = bin2hex(openssl_random_pseudo_bytes($keepFilesRandomLength/2));
                }
            }
            $name = rtrim($name, $ext).$keepFilesSeperator.$operator.$ext;
        }
    }
    move_uploaded_file($_FILES["upload"]["tmp_name"], $basePath . $name);

    // Build the url that should be used for this file   
    $url = $baseUrl . $name ;

    // Usually you don't need any message when everything is OK.
//    $message = 'new file uploaded';   
}
else
{
    $message = 'No file has been sent';
}
// ------------------------
// Write output
// ------------------------
// We are in an iframe, so we must talk to the object in window.parent
echo "<script type='text/javascript'> window.parent.CKEDITOR.tools.callFunction($funcNum, '$url', '$message')</script>";

?>

我对这个类所做的更改使您能够启用/禁用文件覆盖,并为您提供一些选项,以便在您不想覆盖文件时使用。原始类总是无条件覆盖。
默认情况下,此类被设置为保留所有文件,而不进行覆盖。您可以调整这些设置以更好地适应您的需求。
如果您注意到,有一段代码只是一个if(true)语句,显然总是为真。
if (true) {
    echo("You're not allowed to upload files");
    die(0);
}

这是为了安全起见。在此处,您应该检查上传用户是否已登录/允许上传。如果您不担心这个问题,可以删除这些代码行或将其设置为if(false)(不建议)

您还需要编辑$basePath$baseUrl变量以适应您服务器的需求,否则它将无法工作。除此之外,下面的所有内容都可以保留,除非您想要尝试一些新的东西。

该类不提供文件保护,您可能需要对其进行一些修改,使其更加安全,以防止人们向您的服务器上传脚本或病毒。


我希望这个小教程能够帮助到某些人,因为我花费了太长时间来尝试让它为自己工作,我希望我可以为别人节省一些时间。

该教程还有一些不错的故障排除步骤,可能有助于您找到出现问题的原因。

enter image description here


2
我的最新问题是如何在CKEditor中集成CKFinder以进行图像上传。这里有解决方案。
  1. Download CKEditor and extract in your web folder root.

  2. Download CKFinder and extract withing ckeditor folder.

  3. Then add references to the CKEditor, CKFinder and put

     <CKEditor:CKEditorControl ID="CKEditorControl1" runat="server"></CKEditor:CKEditorControl>
    

    to your aspx page.

  4. In code behind page OnLoad event add this code snippet

    protected override void OnLoad(EventArgs e)
    {
      CKFinder.FileBrowser _FileBrowser = new CKFinder.FileBrowser();
      _FileBrowser.BasePath = "ckeditor/ckfinder/";
      _FileBrowser.SetupCKEditor(CKEditorControl1);
    }
    
  5. Edit Confic.ascx file.

    public override bool CheckAuthentication()
    {
      return true;
    }
    
    // Perform additional checks for image files.
    SecureImageUploads = true;
    

(来源)


1
孤立的链接被认为是一个不好的答案,因为它本身没有意义,并且目标资源未来也不能保证存在。请尽量包含您所链接信息的摘要。 - j0k

1

如果您在Grails ckeditor插件中遇到相同的问题,请使用

filebrowserUploadUrl:'/YourAppName/ck/ofm'

来调用处理图像上传的函数。如果您想使用自定义功能,可以提供该文件路径。


1
这个简单的演示可能会帮助你获得你想要的东西。以下是你想上传图片的html/php代码:
<html>
<head>
 <script src="http://cdn.ckeditor.com/4.6.2/standard-all/ckeditor.js"></script>
  </head>
<body>
<form  action="index.php" method="POST"  style="width:500xp;">

<textarea rows="5" name="content" id="content"></textarea>

<br>
<input type="submit" name="submit" value="Post">

</form>
<script>
 CKEDITOR.replace( 'content', {
  height: 300,
  filebrowserUploadUrl: "upload.php"
 });
</script>
</body>
</html>

这里是upload.php文件的代码。

 <?php
if(isset($_FILES['upload']['name']))
{
 $file = $_FILES['upload']['tmp_name'];
 $file_name = $_FILES['upload']['name'];
 $file_name_array = explode(".", $file_name);
 $extension = end($file_name_array);
 //we want to save the image with timestamp and randomnumber
 $new_image_name = time() . rand(). '.' . $extension;
 chmod('upload', 0777);
 $allowed_extension = array("jpg", "gif", "png");
 if(in_array($extension, $allowed_extension))
 {
  move_uploaded_file($file, 'upload/' . $new_image_name);
  $function_number = $_GET['CKEditorFuncNum'];
  $url = 'upload/' . $new_image_name;
  $message = '';
  echo "<script type='text/javascript'>window.parent.CKEDITOR.tools.callFunction($function_number, '$url', '$message');</script>";
 }
}
?>

注意:不要忘记在同一文件夹中创建一个名为“upload”的文件夹,并将所有三个文件保存在同一目录中。稍后,您可以在了解其工作原理后更改它们的目录。还要记得按下如下图片所示的发送到服务器按钮。

screenshot


0
你可以使用这段代码。
     <script>
                // Replace the <textarea id="editor"> with a CKEditor
                // instance, using default configuration.

                CKEDITOR.config.filebrowserImageBrowseUrl = '/admin/laravel-filemanager?type=Files';
                CKEDITOR.config.filebrowserImageUploadUrl = '/admin/laravel-filemanager/upload?type=Images&_token=';
                CKEDITOR.config.filebrowserBrowseUrl = '/admin/laravel-filemanager?type=Files';
                CKEDITOR.config.filebrowserUploadUrl = '/admin/laravel-filemanager/upload?type=Files&_token=';

                CKEDITOR.replaceAll( 'editor');
   </script>

网页内容由stack overflow 提供, 点击上面的
可以查看英文原文,
原文链接