安卓ListView头部

122

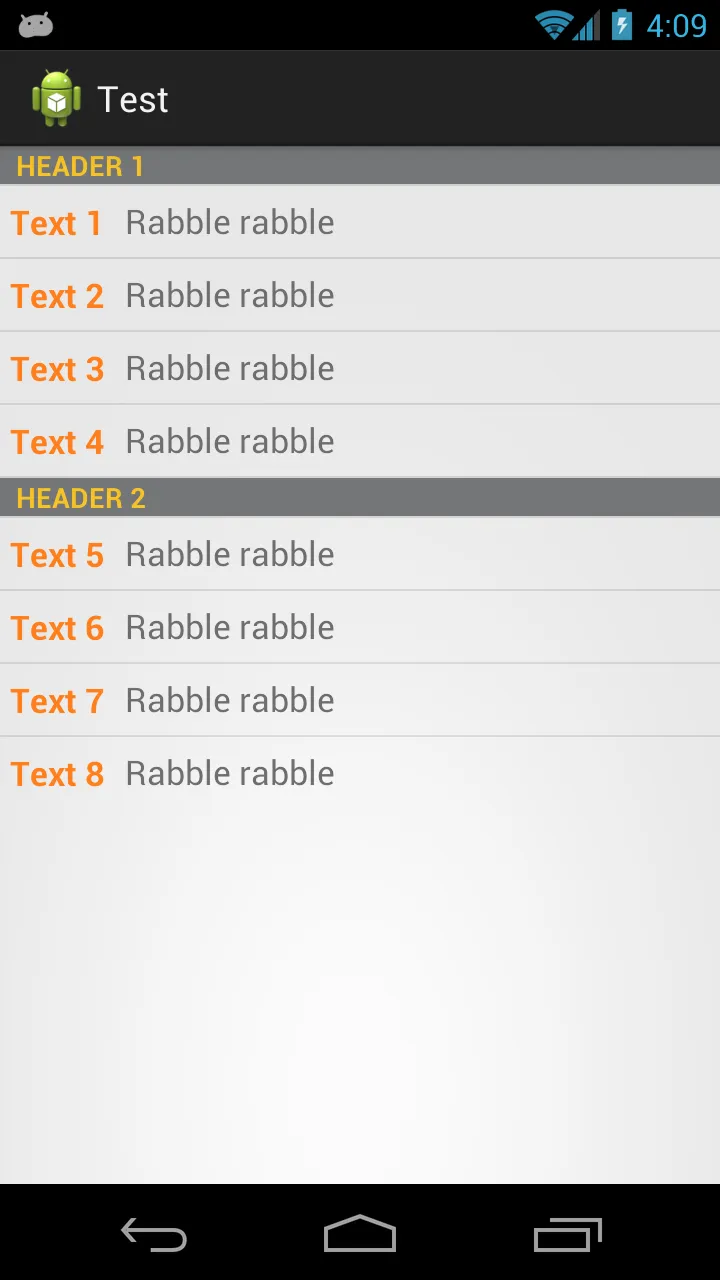
我有一个 ListView,其中包含某些事件。这些事件按日期排序,我想为每一天都添加带有该日期的标题,并在下面列出相应的事件。

以下是我填充列表的方式:

ArrayList<TwoText> crs = new ArrayList<TwoText>();

crs.add(new TwoText("This will be header", event.getDate()));

for (Event event : events) {
    crs.add(new TwoText(event.getStartString() + "-" + event.getEndString(), event.getSubject()));
}

arrayAdapter = new TwoTextArrayAdapter(this, R.layout.my_list_item, crs);
lv1.setAdapter(arrayAdapter);

这就是我的类TwoText的样子:

public class TwoText {
    public String classID;
    public String state;

    public TwoText(String classID, String state) {
        this.classID = classID;
        this.state = state;
    }
}

以下是我的TwoTextArrayAdapter类的代码:

import java.util.ArrayList;
import android.app.Activity;
import android.content.Context;
import android.view.LayoutInflater;
import android.view.View;
import android.view.ViewGroup;
import android.widget.ArrayAdapter;
import android.widget.TextView;

public class TwoTextArrayAdapter extends ArrayAdapter<TwoText> {

    private ArrayList<TwoText> classes;
    private Activity con;
    TextView seperator;

    public TwoTextArrayAdapter(Activity context, int textViewResourceId, ArrayList<TwoText> classes) {
        super(context, textViewResourceId, classes);
        this.con = context;
        this.classes = classes;

    }

    @Override

    public View getView(int position, View convertView, ViewGroup parent) {

        View v = convertView;

        if (v == null) {

            LayoutInflater vi = (LayoutInflater) con.getSystemService(Context.LAYOUT_INFLATER_SERVICE);

            v = vi.inflate(R.layout.my_list_item, null);

        }

        TwoText user = classes.get(position);

        if (user != null) {

            TextView content1 = (TextView) v.findViewById(R.id.list_content1);

            TextView content2 = (TextView) v.findViewById(R.id.list_content2);

            if (content1 != null) {

                content1.setText(user.classID);
            }   
            if(content2 != null) {

                content2.setText(user.state);
            }
        }
        return v;
    }
}

这是我的my_list_item.xml文件

<?xml version="1.0" encoding="utf-8"?>
<LinearLayout xmlns:android="http://schemas.android.com/apk/res/android"
    android:layout_width="match_parent"
    android:layout_height="match_parent"
    android:orientation="vertical" >

    <TextView
        style="?android:attr/listSeparatorTextViewStyle"
        android:id="@+id/separator"
        android:text="Header"
        android:layout_width="fill_parent"
        android:layout_height="wrap_content"
        android:background="#757678"
        android:textColor="#f5c227" />

    <LinearLayout
        xmlns:android="http://schemas.android.com/apk/res/android"
        android:layout_width="match_parent"
        android:layout_height="match_parent"
        android:orientation="horizontal" >

        <TextView
            android:id="@+id/list_content1"
            android:layout_width="wrap_content"
            android:layout_height="match_parent"
            android:layout_margin="5dip"
            android:clickable="false"
            android:gravity="center"
            android:longClickable="false"
            android:paddingBottom="1dip"
            android:paddingTop="1dip"
            android:text="sample"
            android:textColor="#ff7f1d"
            android:textSize="17dip"
            android:textStyle="bold" />

        <TextView
            android:id="@+id/list_content2"
            android:layout_width="wrap_content"
            android:layout_height="match_parent"
            android:layout_margin="5dip"
            android:clickable="false"
            android:gravity="center"
            android:linksClickable="false"
            android:longClickable="false"
            android:paddingBottom="1dip"
            android:paddingTop="1dip"
            android:text="sample"
            android:textColor="#6d6d6d"
            android:textSize="17dip" />
    </LinearLayout>

</LinearLayout>

目前我正在做的是将标题作为常规列表对象添加,但我希望它能作为标题,并在我的情况下带有日期。

以下是我在xml中用于标题的代码:

<TextView
        style="?android:attr/listSeparatorTextViewStyle"
        android:id="@+id/separator"
        android:text="Header"
        android:layout_width="fill_parent"
        android:layout_height="wrap_content"
        android:background="#757678"
        android:textColor="#f5c227" />

我尝试在不必要的时候隐藏它,在必要的时候显示它,但是这样破坏了我的其他代码。我尝试了几个教程,但是它们也产生了同样的效果。

有没有人能指导我如何轻松地做到这一点?

5个回答

336

这是我的做法,关键在于 getItemViewTypegetViewTypeCount 这两个方法。在 Adapter 类中,getViewTypeCount 返回列表中有多少种类型的项,此例中我们有一个标题项和一个事件项,所以是两种。

getItemViewType 应该返回输入位置处的 View 的类型。

Android 会自动处理传递正确类型的 ViewconvertView 中。

下面是代码的结果:

首先我们有一个接口,我们的两种列表项类型将实现该接口。

public interface Item {
    public int getViewType();
    public View getView(LayoutInflater inflater, View convertView);
}

然后我们有一个适配器,它接受一个Item列表。

public class TwoTextArrayAdapter extends ArrayAdapter<Item> {
    private LayoutInflater mInflater;

    public enum RowType {
        LIST_ITEM, HEADER_ITEM
    }

    public TwoTextArrayAdapter(Context context, List<Item> items) {
        super(context, 0, items);
        mInflater = LayoutInflater.from(context);
    }

    @Override
    public int getViewTypeCount() {
        return RowType.values().length;

    }

    @Override
    public int getItemViewType(int position) {
        return getItem(position).getViewType();
    }
@Override
public View getView(int position, View convertView, ViewGroup parent) {
   return getItem(position).getView(mInflater, convertView);
}

编辑 更好的性能..可以在滚动时注意到

private static final int TYPE_ITEM = 0; 
private static final int TYPE_SEPARATOR = 1; 

public View getView(int position, View convertView, ViewGroup parent)  {
    ViewHolder holder = null;
    int rowType = getItemViewType(position);
    View View;
    if (convertView == null) {
        holder = new ViewHolder();
        switch (rowType) {
            case TYPE_ITEM:
                convertView = mInflater.inflate(R.layout.task_details_row, null);
                holder.View=getItem(position).getView(mInflater, convertView);
                break;
            case TYPE_SEPARATOR:
                convertView = mInflater.inflate(R.layout.task_detail_header, null);
                holder.View=getItem(position).getView(mInflater, convertView);
                break;
        }
        convertView.setTag(holder);
    }
    else
    {
        holder = (ViewHolder) convertView.getTag();
    }
    return convertView; 
} 

public static class ViewHolder {
    public  View View; } 
}

然后我们有实现Item并填充正确布局的类。在你的情况下,你会有像Header类和ListItem类这样的东西。

   public class Header implements Item {
    private final String         name;

    public Header(String name) {
        this.name = name;
    }

    @Override
    public int getViewType() {
        return RowType.HEADER_ITEM.ordinal();
    }

    @Override
    public View getView(LayoutInflater inflater, View convertView) {
        View view;
        if (convertView == null) {
            view = (View) inflater.inflate(R.layout.header, null);
            // Do some initialization
        } else {
            view = convertView;
        }

        TextView text = (TextView) view.findViewById(R.id.separator);
        text.setText(name);

        return view;
    }

}

接下来是ListItem类。

    public class ListItem implements Item {
    private final String         str1;
    private final String         str2;

    public ListItem(String text1, String text2) {
        this.str1 = text1;
        this.str2 = text2;
    }

    @Override
    public int getViewType() {
        return RowType.LIST_ITEM.ordinal();
    }

    @Override
    public View getView(LayoutInflater inflater, View convertView) {
        View view;
        if (convertView == null) {
            view = (View) inflater.inflate(R.layout.my_list_item, null);
            // Do some initialization
        } else {
            view = convertView;
        }

        TextView text1 = (TextView) view.findViewById(R.id.list_content1);
        TextView text2 = (TextView) view.findViewById(R.id.list_content2);
        text1.setText(str1);
        text2.setText(str2);

        return view;
    }

}

展示它的简单Activity

public class MainActivity extends ListActivity {

    @Override
    protected void onCreate(Bundle savedInstanceState) {
        super.onCreate(savedInstanceState);
        setContentView(R.layout.activity_main);

        List<Item> items = new ArrayList<Item>();
        items.add(new Header("Header 1"));
        items.add(new ListItem("Text 1", "Rabble rabble"));
        items.add(new ListItem("Text 2", "Rabble rabble"));
        items.add(new ListItem("Text 3", "Rabble rabble"));
        items.add(new ListItem("Text 4", "Rabble rabble"));
        items.add(new Header("Header 2"));
        items.add(new ListItem("Text 5", "Rabble rabble"));
        items.add(new ListItem("Text 6", "Rabble rabble"));
        items.add(new ListItem("Text 7", "Rabble rabble"));
        items.add(new ListItem("Text 8", "Rabble rabble"));

        TwoTextArrayAdapter adapter = new TwoTextArrayAdapter(this, items);
        setListAdapter(adapter);
    }

}

R.layout.header的布局。

<?xml version="1.0" encoding="utf-8"?>
<LinearLayout xmlns:android="http://schemas.android.com/apk/res/android"
    android:layout_width="match_parent"
    android:layout_height="match_parent"
    android:orientation="horizontal" >

    <TextView
        style="?android:attr/listSeparatorTextViewStyle"
        android:id="@+id/separator"
        android:text="Header"
        android:layout_width="fill_parent"
        android:layout_height="wrap_content"
        android:background="#757678"
        android:textColor="#f5c227" />

</LinearLayout>

R.layout.my_list_item的布局

<?xml version="1.0" encoding="utf-8"?>
<LinearLayout xmlns:android="http://schemas.android.com/apk/res/android"
    android:layout_width="match_parent"
    android:layout_height="match_parent"
    android:orientation="horizontal" >

    <TextView
        android:id="@+id/list_content1"
        android:layout_width="wrap_content"
        android:layout_height="match_parent"
        android:layout_margin="5dip"
        android:clickable="false"
        android:gravity="center"
        android:longClickable="false"
        android:paddingBottom="1dip"
        android:paddingTop="1dip"
        android:text="sample"
        android:textColor="#ff7f1d"
        android:textSize="17dip"
        android:textStyle="bold" />

    <TextView
        android:id="@+id/list_content2"
        android:layout_width="wrap_content"
        android:layout_height="match_parent"
        android:layout_margin="5dip"
        android:clickable="false"
        android:gravity="center"
        android:linksClickable="false"
        android:longClickable="false"
        android:paddingBottom="1dip"
        android:paddingTop="1dip"
        android:text="sample"
        android:textColor="#6d6d6d"
        android:textSize="17dip" />

</LinearLayout>

R.layout.activity_main.xml的布局。

<RelativeLayout xmlns:android="http://schemas.android.com/apk/res/android"
    xmlns:tools="http://schemas.android.com/tools"
    android:layout_width="match_parent"
    android:layout_height="match_parent"
    tools:context=".MainActivity" >

    <ListView
        android:id="@android:id/list"
        android:layout_width="fill_parent"
        android:layout_height="fill_parent" />

</RelativeLayout>

您还可以更高级一些,使用ViewHolders、异步加载内容或者其他你想要的方式。


5
我很喜欢你这里的解决方案,但由于你正在扩展 ArrayAdapter,所以不应该跟踪自己的项目列表。只需使用 ArrayAdapter 中内部跟踪的即可。否则,你将使存储项目所需的内存量加倍。 - Ifrit
3
很好的解决方案。如果标题无法点击(这可以在构造函数中设置),我只会在适配器中添加以下内容:@Override public boolean isEnabled(int position) { return (getItem(position).getViewType() == RowType.LIST_ITEM.ordinal()); } - dwbrito
2
当列表视图滚动时,行会被随机化。有人可以指导一下吗? - i_raqz
1
为什么谷歌不能只用三行代码就实现这个功能呢? - Ojonugwa Jude Ochalifu
4
这个答案是我在SO上找到的最好的答案之一 - 清晰、简洁且解释得很好。然而,我在ListView的结果中遇到了一个问题,它们以半随机的顺序显示(第一个标题和项目还好,后面的则混乱了)。我设法找出了问题所在。“EDIT Better For Performance.. can be noticed when scrolling” 下面的代码块使我困扰 - 从自定义ArrayAdapter类中删除这些代码为我解决了问题。我建议每个遇到随机结果的人都尝试一下。非常感谢这个优秀的答案。确实帮了我大忙! - blueprintchris
显示剩余20条评论

9
您可能正在寻找一个有标题(组)来分离项目(子项)的可扩展列表视图
关于这个主题的好教程在这里

我不希望它们可以扩展。 - Rohit Malish
如果那是唯一的问题,你可以重写onItemClick方法来防止扩展/折叠视图。 - Saito Mea
但是我仍然需要它们可以被点击以供其他用途。 - Rohit Malish
哦...我实际上是想说 onGroupClick,它只处理对“标题”点击的操作,您不需要禁用点击或类似的操作,只需取消任何折叠操作并从一开始就将所有组设置为展开状态即可。 - Saito Mea
我同意在大多数情况下ExpandableListView是最好的选择。但是,我有一个情况需要在我的Activity中有时显示平面列表,有时显示带标题的列表。遗憾的是,ExpandableListAdapter接口没有扩展ListAdapter接口,因此为了实现多态性,我被迫使用@antew的解决方案。 - tytk

3
作为替代方案,有一个专门为此用例设计的不错的第三方库。您需要根据适配器中存储的数据生成标题。它们称为Rolodex适配器,并与ExpandableListViews一起使用。它们可以轻松自定义为像带有标题的普通列表一样的行为。
使用OP的Event对象并知道标题基于与之关联的Date,代码看起来会像这样: 活动
    //There's no need to pre-compute what the headers are. Just pass in your List of objects. 
    EventDateAdapter adapter = new EventDateAdapter(this, mEvents);
    mExpandableListView.setAdapter(adapter);

适配器。
private class EventDateAdapter extends NFRolodexArrayAdapter<Date, Event> {

    public EventDateAdapter(Context activity, Collection<Event> items) {
        super(activity, items);
    }

    @Override
    public Date createGroupFor(Event childItem) {
        //This is how the adapter determines what the headers are and what child items belong to it
        return (Date) childItem.getDate().clone();
    }

    @Override
    public View getChildView(LayoutInflater inflater, int groupPosition, int childPosition,
                             boolean isLastChild, View convertView, ViewGroup parent) {
        //Inflate your view

        //Gets the Event data for this view
        Event event = getChild(groupPosition, childPosition);

        //Fill view with event data
    }

    @Override
    public View getGroupView(LayoutInflater inflater, int groupPosition, boolean isExpanded,
                             View convertView, ViewGroup parent) {
        //Inflate your header view

        //Gets the Date for this view
        Date date = getGroup(groupPosition);

        //Fill view with date data
    }

    @Override
    public boolean hasAutoExpandingGroups() {
        //This forces our group views (headers) to always render expanded.
        //Even attempting to programmatically collapse a group will not work.
        return true;
    }

    @Override
    public boolean isGroupSelectable(int groupPosition) {
        //This prevents a user from seeing any touch feedback when a group (header) is clicked.
        return false;
    }
}

1

这是一个示例项目,基于antew详细和有帮助的答案,实现了具有多个标题的ListView,并使用视图持有者来提高滚动性能。

在这个项目中,ListView中表示的对象是HeaderItem类或RowItem类的实例,它们都是抽象类Item的子类。每个Item子类对应于自定义适配器ItemAdapter中的不同视图类型。ItemAdapter上的getView()方法将每个列表项的视图创建委托给HeaderItemRowItem中的个性化getView()方法,具体取决于传递给适配器上的getView()方法的位置所使用的Item子类。每个Item子类都提供了自己的视图持有者。

视图持有者的实现如下。在Item子类的getView()方法中,检查传递给ItemAdapter的getView()方法的View对象是否为null。如果是,则膨胀相应的布局,并通过View.setTag()将视图持有者对象实例化并与膨胀的视图相关联。如果View对象不为null,则已经将视图持有者对象与视图关联,并且可以通过View.getTag()检索到视图持有者。可以从HeaderItem的以下代码片段中看到视图持有者的使用方式:
@Override
View getView(LayoutInflater i, View v) {
    ViewHolder h;
    if (v == null) {
        v = i.inflate(R.layout.header, null);
        h = new ViewHolder(v);
        v.setTag(h);
    } else {
        h = (ViewHolder) v.getTag();
    }
    h.category.setText(text());
    return v;
}

private class ViewHolder {
    final TextView category;

    ViewHolder(View v) {
        category = v.findViewById(R.id.category);
    }
}

完整的ListView实现如下。这是Java代码:
import android.app.ListActivity;
import android.os.Bundle;
import android.view.LayoutInflater;
import android.view.View;
import android.view.ViewGroup;
import android.widget.ArrayAdapter;
import android.widget.TextView;

import java.util.ArrayList;
import java.util.Collections;
import java.util.HashSet;
import java.util.List;
import java.util.Set;

public class MainActivity extends ListActivity {
    @Override
    protected void onCreate(Bundle savedInstanceState) {
        super.onCreate(savedInstanceState);
        setListAdapter(new ItemAdapter(getItems()));
    }

    class ItemAdapter extends ArrayAdapter<Item> {
        final private List<Class<?>> viewTypes;

        ItemAdapter(List<Item> items) {
            super(MainActivity.this, 0, items);
            if (items.contains(null))
                throw new IllegalArgumentException("null item");
            viewTypes = getViewTypes(items);
        }

        private List<Class<?>> getViewTypes(List<Item> items) {
            Set<Class<?>> set = new HashSet<>();
            for (Item i : items) 
                set.add(i.getClass());
            List<Class<?>> list = new ArrayList<>(set);
            return Collections.unmodifiableList(list);
        }

        @Override
        public int getViewTypeCount() {
            return viewTypes.size();
        }

        @Override
        public int getItemViewType(int position) {
            Item t = getItem(position);
            return viewTypes.indexOf(t.getClass());
        }

        @Override
        public View getView(int position, View v, ViewGroup unused) {
            return getItem(position).getView(getLayoutInflater(), v);
        }
    }

    abstract private class Item {
        final private String text;

        Item(String text) {
            this.text = text;
        }

        String text() { return text; }

        abstract View getView(LayoutInflater i, View v);
    }

    private class HeaderItem extends Item {
        HeaderItem(String text) {
            super(text);
        }

        @Override
        View getView(LayoutInflater i, View v) {
            ViewHolder h;
            if (v == null) {
                v = i.inflate(R.layout.header, null);
                h = new ViewHolder(v);
                v.setTag(h);
            } else {
                h = (ViewHolder) v.getTag();
            }
            h.category.setText(text());
            return v;
        }

        private class ViewHolder {
            final TextView category;

            ViewHolder(View v) {
                category = v.findViewById(R.id.category);
            }
        }
    }

    private class RowItem extends Item {
        RowItem(String text) {
            super(text);
        }

        @Override
        View getView(LayoutInflater i, View v) {
            ViewHolder h;
            if (v == null) {
                v = i.inflate(R.layout.row, null);
                h = new ViewHolder(v);
                v.setTag(h);
            } else {
                h = (ViewHolder) v.getTag();
            }
            h.option.setText(text());
            return v;
        }

        private class ViewHolder {
            final TextView option;

            ViewHolder(View v) {
                option = v.findViewById(R.id.option);
            }
        }
    }

    private List<Item> getItems() {
        List<Item> t = new ArrayList<>();
        t.add(new HeaderItem("Header 1"));
        t.add(new RowItem("Row 2"));
        t.add(new HeaderItem("Header 3"));
        t.add(new RowItem("Row 4"));

        t.add(new HeaderItem("Header 5"));
        t.add(new RowItem("Row 6"));
        t.add(new HeaderItem("Header 7"));
        t.add(new RowItem("Row 8"));

        t.add(new HeaderItem("Header 9"));
        t.add(new RowItem("Row 10"));
        t.add(new HeaderItem("Header 11"));
        t.add(new RowItem("Row 12"));

        t.add(new HeaderItem("Header 13"));
        t.add(new RowItem("Row 14"));
        t.add(new HeaderItem("Header 15"));
        t.add(new RowItem("Row 16"));

        t.add(new HeaderItem("Header 17"));
        t.add(new RowItem("Row 18"));
        t.add(new HeaderItem("Header 19"));
        t.add(new RowItem("Row 20"));

        t.add(new HeaderItem("Header 21"));
        t.add(new RowItem("Row 22"));
        t.add(new HeaderItem("Header 23"));
        t.add(new RowItem("Row 24"));

        t.add(new HeaderItem("Header 25"));
        t.add(new RowItem("Row 26"));
        t.add(new HeaderItem("Header 27"));
        t.add(new RowItem("Row 28"));
        t.add(new RowItem("Row 29"));
        t.add(new RowItem("Row 30"));

        t.add(new HeaderItem("Header 31"));
        t.add(new RowItem("Row 32"));
        t.add(new HeaderItem("Header 33"));
        t.add(new RowItem("Row 34"));
        t.add(new RowItem("Row 35"));
        t.add(new RowItem("Row 36"));

        return t;
    }

}

还有两种列表项布局,每个子类都有一种。这里是header布局,由HeaderItem使用:

<?xml version="1.0" encoding="utf-8"?>
<LinearLayout xmlns:android="http://schemas.android.com/apk/res/android"
    android:layout_width="match_parent"
    android:layout_height="wrap_content"
    android:background="#FFAAAAAA"
    >
    <TextView
        android:id="@+id/category"
        android:layout_width="wrap_content"
        android:layout_height="wrap_content"
        android:layout_margin="4dp"
        android:textColor="#FF000000"
        android:textSize="20sp"
        android:textStyle="bold"
        />
 </LinearLayout>

这里是布局代码 row,被 RowItem 使用:
<LinearLayout xmlns:android="http://schemas.android.com/apk/res/android"
    android:layout_width="match_parent"
    android:layout_height="wrap_content"
    android:minHeight="?android:attr/listPreferredItemHeight"
    >
    <TextView
        android:id="@+id/option"
        android:layout_width="wrap_content"
        android:layout_height="wrap_content"
        android:textSize="15sp"
        />
</LinearLayout>

以下是生成的ListView部分图像:

ListView with multiple headers


1
我是一名有用的助手,可以为您翻译文本。
我做了什么来使日期(例如2016年12月01日)成为标题。 我使用了StickyHeaderListView库。

https://github.com/emilsjolander/StickyListHeaders

将日期转换为毫秒级长整型[不包括时间],并将其作为标题ID。
@Override
public long getHeaderId(int position) {
    return <date in millis>;
}

网页内容由stack overflow 提供, 点击上面的
可以查看英文原文,
原文链接