创建Xcode模板可能会非常复杂,因为几乎可以编辑项目的任何内容都可以编写脚本。重申您已经知道的是,应在~/Library/Developer/Xcode/Templates目录中创建一个新文件夹。这是Xcode在创建项目时扫描的位置之一。例如,将此文件夹命名为“Custom Templates”将使其显示在Xcode的项目创建对话框中。在此新文件夹中创建另一个名为“baseApp.xctemplate”的文件夹。这将使名为baseApp的模板出现,一旦我们所有文件都在其中。
开始新模板最容易通过复制Xcode现有模板来完成。主要是因为从头编写至关重要的TemplateInfo.plist文件可能很麻烦。这些文件位于Xcode应用程序中。在finder中显示其内容并导航到:
/Xcode.app/Contents/Developer/Platforms/iPhoneOS.platform/Developer/Library/Xcode/Templates/Project Templates/iOS/Application
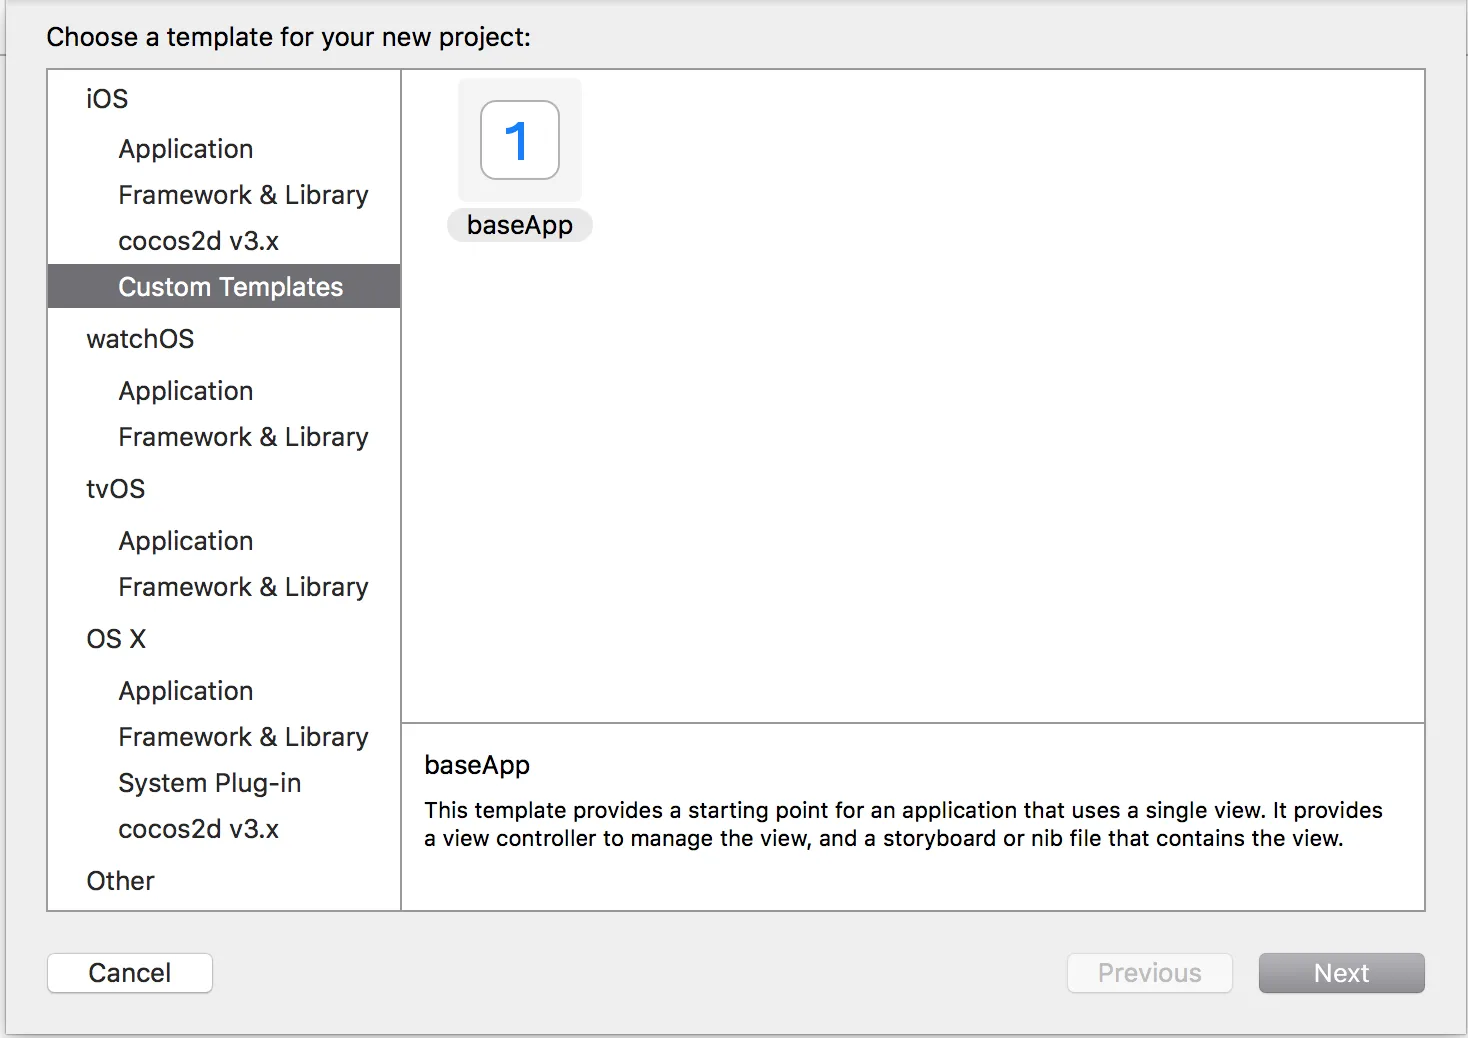
从“单视图应用程序”模板中复制所有3个文件到之前创建的baseApp.xctemplate文件夹。这一步非常重要,但在此之后第一个模板几乎已经准备好了。双击TemplateInfo.plist文件,在Xcode中打开它,并将Identifier键的最后一部分更改为baseApp。就是这样 - 现在Xcode中的新项目对话框应该看起来像下面的图像。更改TemplateIcon.tiff是一个好主意。除此之外,BaseApp已经完成了Objective-c和Swift,Storyboards,CoreData支持等选项。
现在创建一个名为“xibApp”的新Xcode项目,基于新的baseApp模板(无选项)。然后按照以下4个步骤操作:
• 删除Main.storyboard和ViewController(移到垃圾桶中)
• 在Info.plist中删除“Main storyboard file base name”条目
• 添加一个名为ViewController的新Cocoa Touch Class,基于UIViewController,并勾选包含xib文件的框
• 用以下代码替换AppDelegate中的didFinishLaunchingWithOptions函数:
    window = UIWindow.init(frame: UIScreen.mainScreen().bounds)
    window?.backgroundColor = UIColor.whiteColor()

    let viewController = ViewController()

    window!.rootViewController = viewController
    window!.makeKeyAndVisible()

    return true
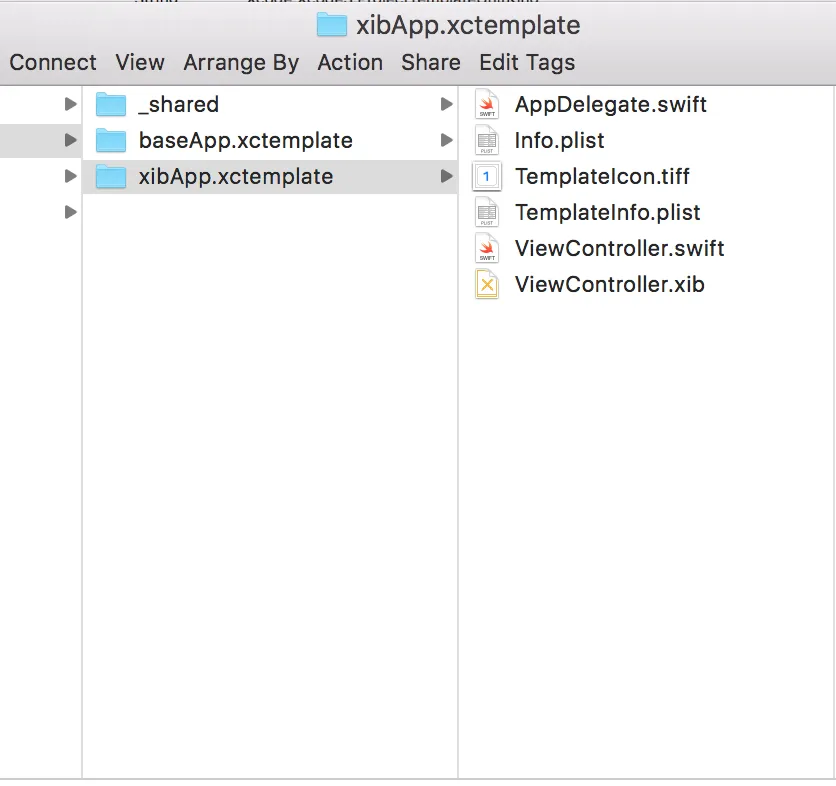
您现在应该能够运行该应用程序。如果一切正常,请退出Xcode。在自定义模板目录中复制baseApp.xctemplate并将其重命名为“xibApp.xctemplate”。然后在该目录中删除Main.storyboard文件,并从xibApp文件夹中复制AppDelegate、Info.plist、ViewController.swift和ViewController.xib文件到xibApp.xctemplate文件夹中。双击xibApp文件夹中的TemplateInfo.plist以在Xcode中打开它,并将标识符重命名为“com.apple.dt.unit.xibApp”。还需要解决的另一个问题是此文件中的第一个祖先。它设置为“com.apple.dt.unit.storyboardApplication”,如果保留,将使所有结果项目成为故事板项目。为了解决这个问题,我们将创建自己的祖先。
Xcode使用祖先层次结构来包含整个项目树。只要位于Xcode目录中(即应用程序本身或~/Library/Developer/Xcode/),并且具有.xctemplate扩展名的任何文件夹都可以作为祖先。此外,这些目录必须包含正确设置的TemplateInfo.plist文件。因此,请获取位于Xcode应用程序内容中(Developer/Platforms/iPhoneOS.platform/Developer/Library/Xcode/Templates/Project Templates/iOS/Application)的“Cocoa Touch Application Base.xctemplate”内部的TemplateInfo.plist文件。将此文件放入“Custom Templates”文件夹中的新文件夹中,并将文件夹命名为“Custom Xib Base.xctemplate”。该文件夹的名称将成为我们祖先的名称。Xcode将删除名称中的所有空格,并将其转换为“customXibBase”,这是我们新祖先的扩展名:“com.apple.dt.unit.customXibBase”。由于“Custom Xib Base.xctemplate”文件夹可能成为其他模板的祖先,因此将其移动到Custom Templates目录中一个新的、合适命名的子文件夹中(例如“shared”)可能是个好主意。
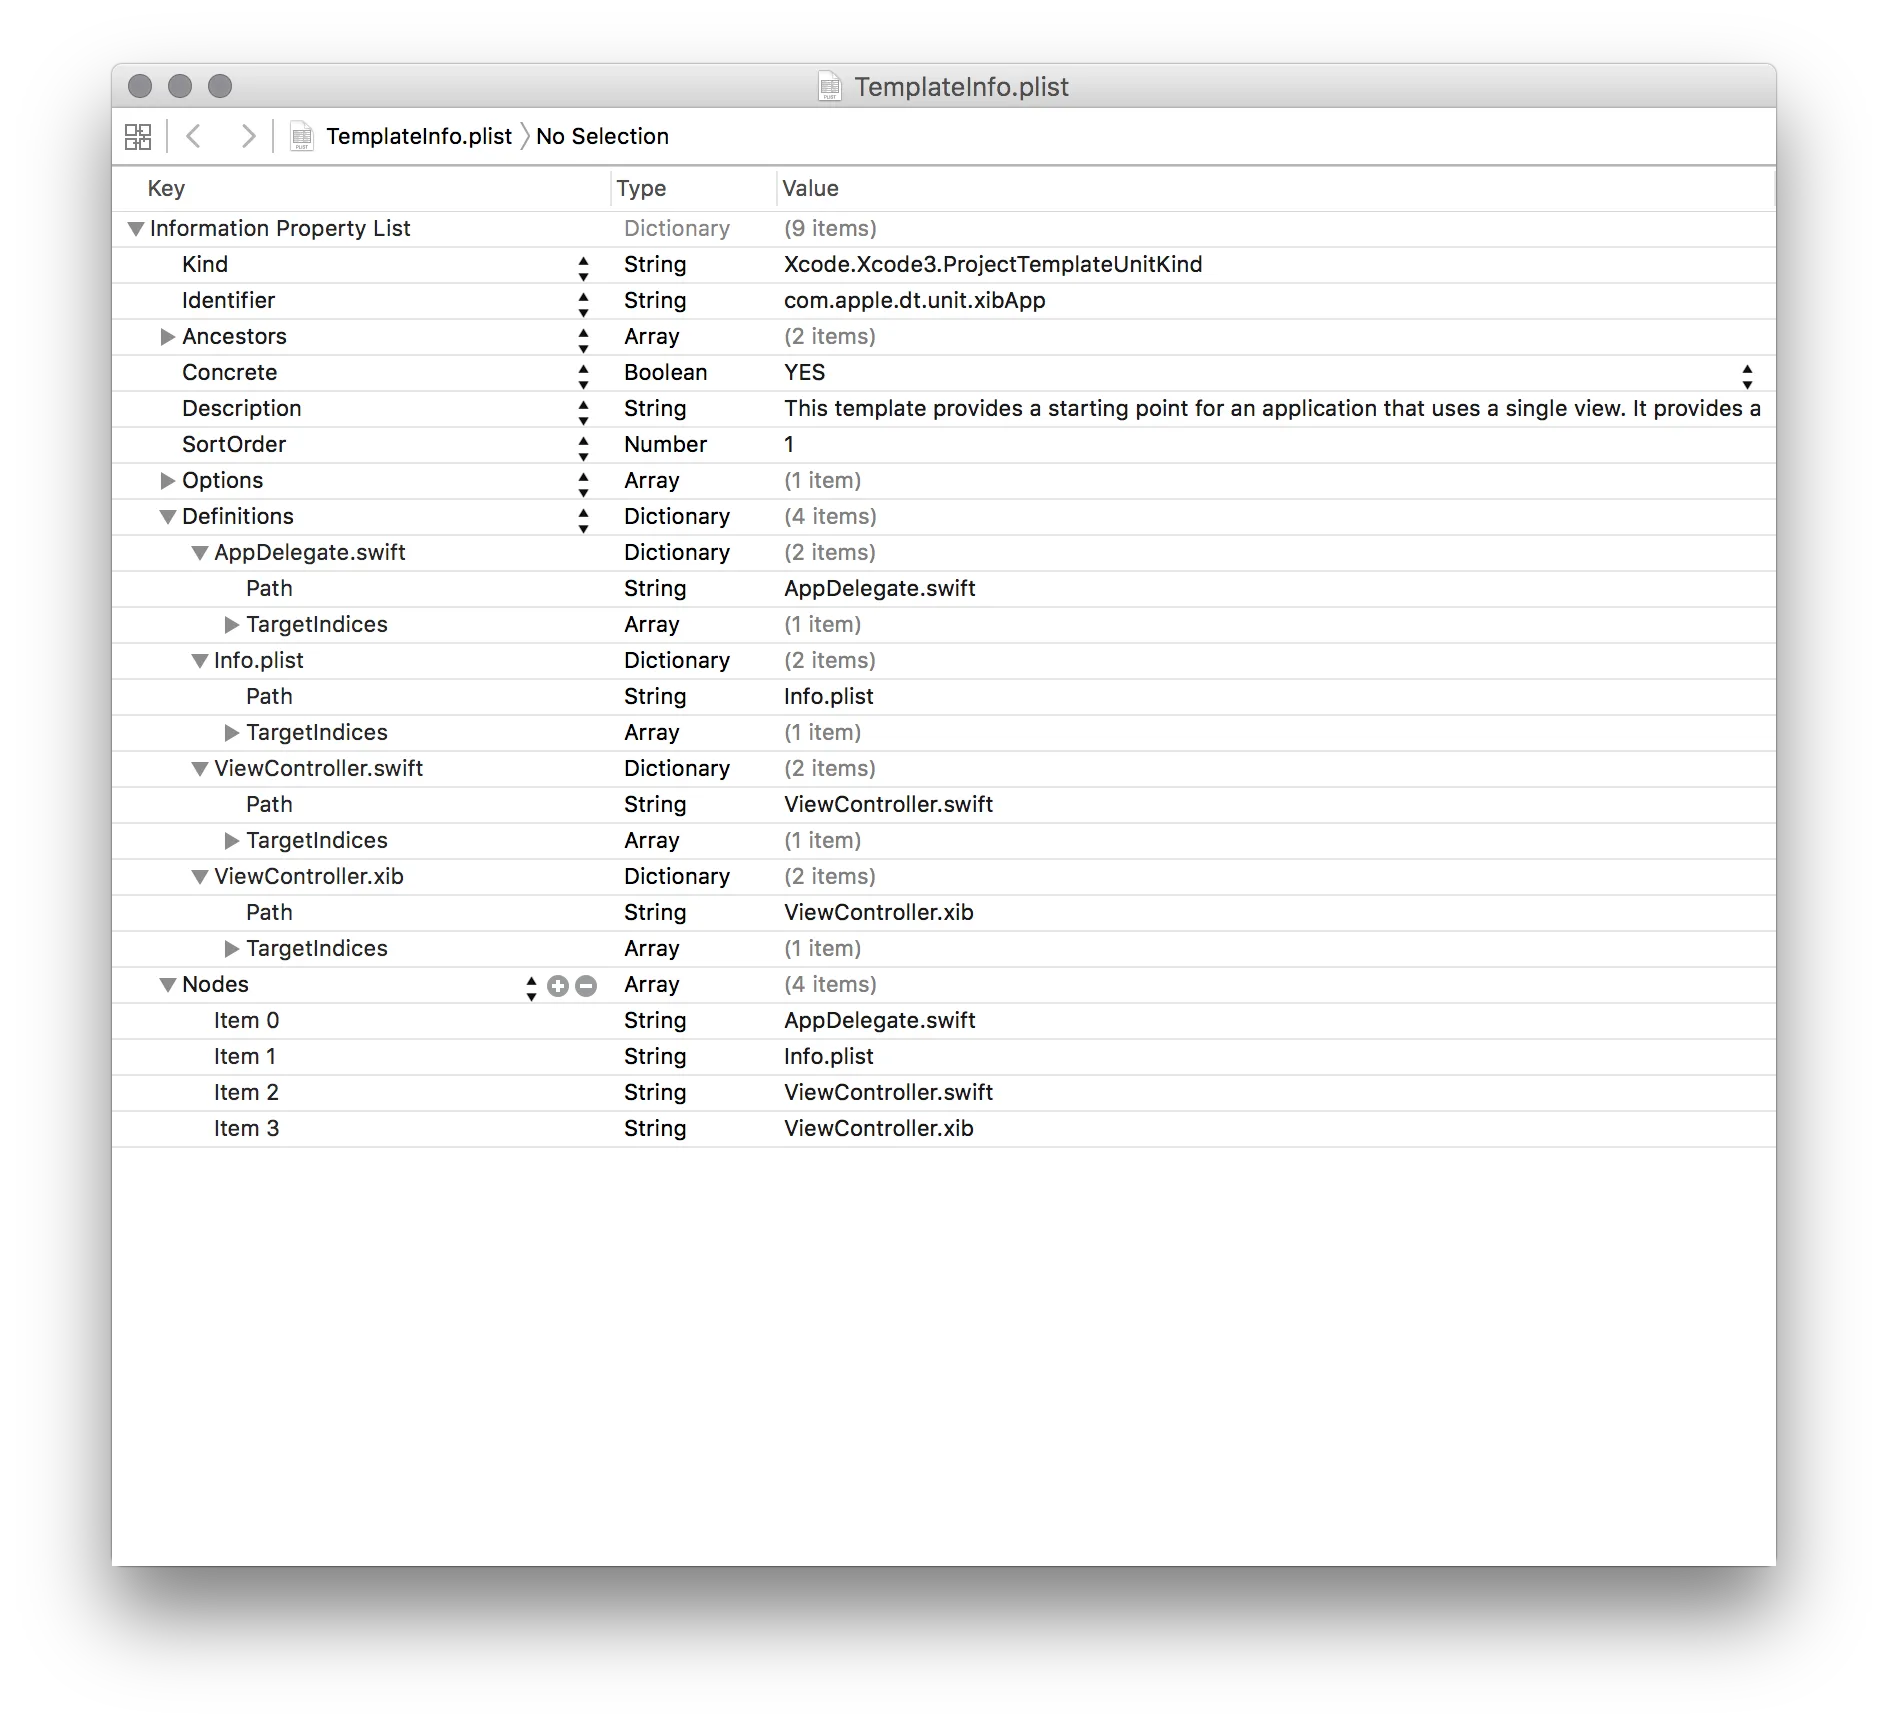
回到 xibApp.xctemplate 目录下的 TemplateInfo.plist。双击它,点击 Ancestors 旁边的展开三角,在第一项下将“storyboardApplication”替换为“customXibBase”,使整行变为“com.apple.dt.unit.customXibBase”。最后,我们需要为包含的4个文件(AppDelegate、Info.plist、ViewController.swift 和 ViewController.xib)提供 Definitions 和 Nodes,如下图所示。保存文件并退出 Xcode。完成了。
如果一切顺利,现在应该在“自定义模板”类别下有一个名为 xibApp 的新项目模板!我认为这是一种可行但 hackish 的方法来生成新模板。它可能会在更新的 Xcode 版本中出现问题。但这是进一步探索项目模板的好起点。
xibApp.xctemplate 的最终 TemplateInfo.plist:
<?xml version="1.0" encoding="UTF-8"?>
<!DOCTYPE plist PUBLIC "-//Apple//DTD PLIST 1.0//EN" "http://www.apple.com/DTDs/PropertyList-1.0.dtd">
<plist version="1.0">
<dict>
    <key>Kind</key>
    <string>Xcode.Xcode3.ProjectTemplateUnitKind</string>
    <key>Identifier</key>
    <string>com.apple.dt.unit.xibApp</string>
    <key>Ancestors</key>
    <array>
        <string>com.apple.dt.unit.customXibBase</string>
        <string>com.apple.dt.unit.coreDataCocoaTouchApplication</string>
    </array>
    <key>Concrete</key>
    <true/>
    <key>Description</key>
    <string>This template provides a starting point for an application that uses a single view. It provides a view controller to manage the view, and a storyboard or nib file that contains the view.</string>
    <key>SortOrder</key>
    <integer>1</integer>
    <key>Options</key>
    <array>
        <dict>
            <key>Identifier</key>
            <string>languageChoice</string>
            <key>Units</key>
            <dict>
                <key>Objective-C</key>
                <dict>
                    <key>Nodes</key>
                    <array>
                        <string>ViewController.h:comments</string>
                        <string>ViewController.h:imports:importCocoa</string>
                        <string>ViewController.h:interface(___FILEBASENAME___ : UIViewController)</string>
                        <string>ViewController.m:comments</string>
                        <string>ViewController.m:imports:importHeader:ViewController.h</string>
                        <string>ViewController.m:extension</string>
                        <string>ViewController.m:implementation:methods:viewDidLoad(- (void\)viewDidLoad)</string>
                        <string>ViewController.m:implementation:methods:viewDidLoad:super</string>
                        <string>ViewController.m:implementation:methods:didReceiveMemoryWarning(- (void\)didReceiveMemoryWarning)</string>
                        <string>ViewController.m:implementation:methods:didReceiveMemoryWarning:super</string>
                    </array>
                </dict>
                <key>Swift</key>
                <dict>
                    <key>Nodes</key>
                    <array>
                        <string>ViewController.swift:comments</string>
                        <string>ViewController.swift:imports:importCocoa</string>
                        <string>ViewController.swift:implementation(___FILEBASENAME___: UIViewController)</string>
                        <string>ViewController.swift:implementation:methods:viewDidLoad(override func viewDidLoad(\))</string>
                        <string>ViewController.swift:implementation:methods:viewDidLoad:super</string>
                        <string>ViewController.swift:implementation:methods:didReceiveMemoryWarning(override func didReceiveMemoryWarning(\))</string>
                        <string>ViewController.swift:implementation:methods:didReceiveMemoryWarning:super</string>
                    </array>
                </dict>
            </dict>
        </dict>
    </array>
    <key>Definitions</key>
    <dict>
        <key>AppDelegate.swift</key>
        <dict>
            <key>Path</key>
            <string>AppDelegate.swift</string>
            <key>TargetIndices</key>
            <array>
                <integer>0</integer>
            </array>
        </dict>
        <key>Info.plist</key>
        <dict>
            <key>Path</key>
            <string>Info.plist</string>
            <key>TargetIndices</key>
            <array>
                <integer>0</integer>
            </array>
        </dict>
        <key>ViewController.swift</key>
        <dict>
            <key>Path</key>
            <string>ViewController.swift</string>
            <key>TargetIndices</key>
            <array>
                <integer>0</integer>
            </array>
        </dict>
        <key>ViewController.xib</key>
        <dict>
            <key>Path</key>
            <string>ViewController.xib</string>
            <key>TargetIndices</key>
            <array>
                <integer>0</integer>
            </array>
        </dict>
    </dict>
    <key>Nodes</key>
    <array>
        <string>AppDelegate.swift</string>
        <string>Info.plist</string>
        <string>ViewController.swift</string>
        <string>ViewController.xib</string>
    </array>
</dict>
</plist>
如果您对这个答案有任何问题,请告诉我。这将为您提供基于xib的模板,创建一个新的自定义祖先,并允许通过添加新的定义和节点来将尽可能多的文件添加到模板中。
<key>BuildPhases</key>。有什么建议吗? 谢谢 - Frade