我需要将一个wav文件从44100Hz降采样到16000Hz,不使用任何外部的Python库,最好只用wave和/或audioop。我尝试使用setframerate函数将wav文件的帧率更改为16000,但那只会减慢整个录音的速度。我该如何仅将音频文件降采样到16kHz并保持相同的音频长度?
降采样WAV音频文件
32
- d3cr1pt0r
3
如果你降到11025Hz,就会更容易,只需要低通滤波器,然后取每4个样本。 - samgak
1音频操作库中的ratecv函数是否符合您的需求?https://docs.python.org/2/library/audioop.html#audioop.ratecv - Jim Jeffries
1它需要是16kHz,因为我们的管道工具需要将其导出到Unity项目中。您能否给我一个使用audioop.ratecv函数的示例?因为我对该函数的片段参数感到困惑。我该如何获得它?@JimJeffries - d3cr1pt0r
8个回答
57
你可以使用Librosa的load()函数。
import librosa
y, s = librosa.load('test.wav', sr=8000) # Downsample 44.1kHz to 8kHz
安装Librosa所需的额外努力可能会换来内心的宁静。
专业提示:在Anaconda上安装Librosa时,您还需要安装ffmpeg。
pip install librosa
conda install -c conda-forge ffmpeg
这将帮助您避免出现NoBackendError()错误。
- wafflecat
3
14可能是这里最好的评论,而且似乎也是最新的。
只是缺少 OP 请求的“保存(save)”,这很简单,只需要使用
librosa.output.write_wav(filename, y, sr)就行了。 - hyit5自Librosa 0.8版本开始,已删除write_wav函数。建议现在使用soundfile.write代替。 - Austin
27
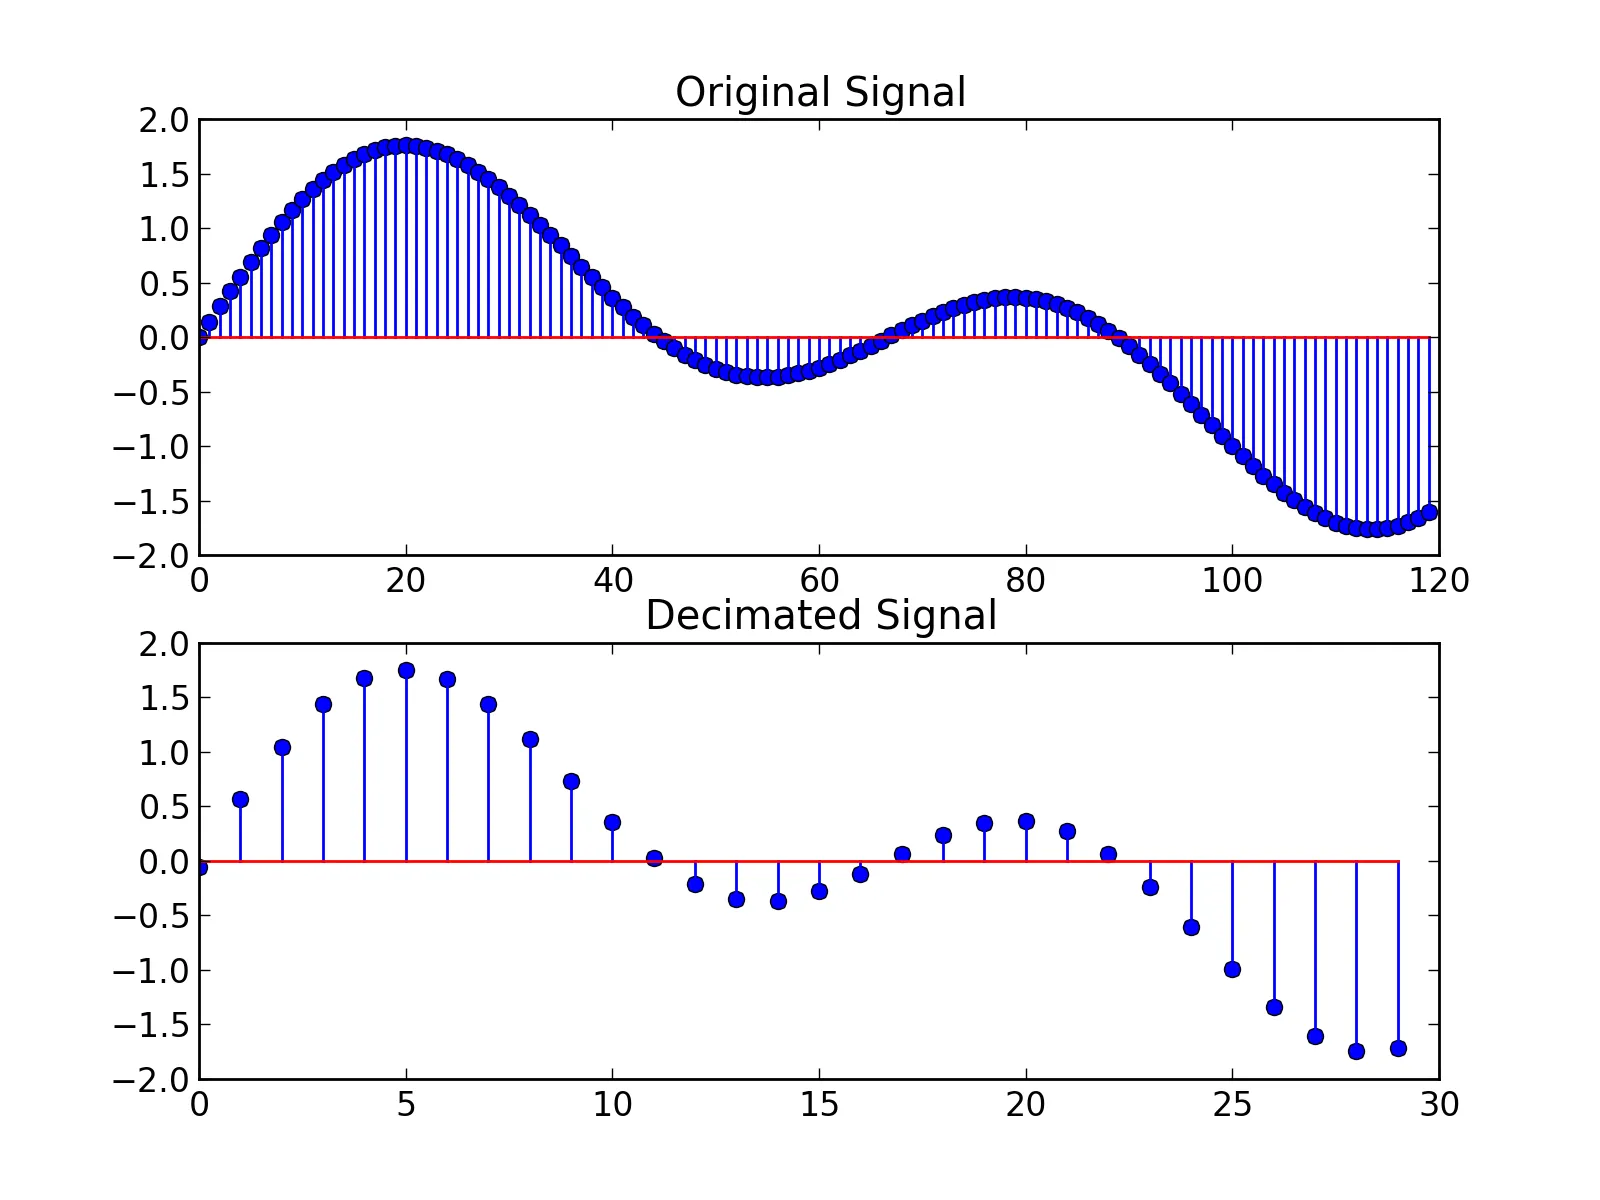
为了降采样(也称为decimate)您的信号(即减少采样率),或者升采样(增加采样率),您需要在数据之间进行插值。想法是你需要以某种方式绘制出你的点之间的曲线,然后以新的采样率从这个曲线取值。这是因为你想知道声波在未采样的某个时间的值,所以你必须通过某种方式猜测这个值。唯一一个子采样容易的情况是当你将采样率除以整数 $k$。在这种情况下,你只需要取$k$个样本的桶并仅保留第一个样本。但这不会回答你的问题。请参见下面的图片,其中有一个以两个不同比例采样的曲线。
我确实遇到了这种情况,我正在加载一个44100Hz的波形文件,并需要48000Hz的采样数据,因此我编写了以下几行代码来加载我的数据:
我确实遇到了这种情况,我正在加载一个44100Hz的波形文件,并需要48000Hz的采样数据,因此我编写了以下几行代码来加载我的数据:
    # Imports
    from scipy.io import wavfile
    import scipy.signal as sps

    # Your new sampling rate
    new_rate = 48000

    # Read file
    sampling_rate, data = wavfile.read(path)

    # Resample data
    number_of_samples = round(len(data) * float(new_rate) / sampling_rate)
    data = sps.resample(data, number_of_samples)
请注意,如果您只进行下采样并希望比傅里叶变换更快的方法,则可以使用decimate方法。
- Jeremy Cochoy
3
你对这个观点有什么看法?“scipy.signal.resample在音频重采样方面表现不佳。这很快就变得明显了-它在频域中工作,通过在频域中基本上截断或零填充信号来实现。在时间域中,这相当丑陋(特别是因为它假定信号是循环的)。"来源:http://signalsprocessed.blogspot.com/2016/08/audio-resampling-in-python.html - Matthew Walker
@MatthewWalker,您可以使用
scipy.signal.resample_poly在时间域中使用多项式。 resample在频域中操作,您可以显式地控制傅里叶变换所使用的window。对于resample_poly,您可以使用padtype和cval控制填充。我认为只有在重新采样时看到伪影时,您才需要根据自己的需求调整参数。这肯定取决于您正在处理的信号类型。 - Jeremy Cochoy从Scipy文档中可以得知:参数window控制傅里叶域窗口,在零填充之前削弱傅里叶频谱,以减轻对采样信号的重新采样值产生的振铃现象,这些信号并不是你想要解释为带限信号。 - Jeremy Cochoy
13
非常感谢大家的回答。我已经找到了解决方案,而且它运行得非常好。以下是整个函数。
def downsampleWav(src, dst, inrate=44100, outrate=16000, inchannels=2, outchannels=1):
    if not os.path.exists(src):
        print 'Source not found!'
        return False

    if not os.path.exists(os.path.dirname(dst)):
        os.makedirs(os.path.dirname(dst))

    try:
        s_read = wave.open(src, 'r')
        s_write = wave.open(dst, 'w')
    except:
        print 'Failed to open files!'
        return False

    n_frames = s_read.getnframes()
    data = s_read.readframes(n_frames)

    try:
        converted = audioop.ratecv(data, 2, inchannels, inrate, outrate, None)
        if outchannels == 1:
            converted = audioop.tomono(converted[0], 2, 1, 0)
    except:
        print 'Failed to downsample wav'
        return False

    try:
        s_write.setparams((outchannels, 2, outrate, 0, 'NONE', 'Uncompressed'))
        s_write.writeframes(converted)
    except:
        print 'Failed to write wav'
        return False

    try:
        s_read.close()
        s_write.close()
    except:
        print 'Failed to close wav files'
        return False

    return True
- d3cr1pt0r
2
5我知道这已经是老问题了,但我最近遇到了同样的问题,所以我尝试了这段代码并发现其中有一个微妙的错误。如果我的输入通道(inchannels)和输出通道(outchannels)都等于1,则仍然会调用“tomono” 函数,这会破坏我的音频信号(长度减半)。另外,在写入帧时,你只应该写入转换后的[0](根据是否已调用tomono),因为ratecv返回的新状态(newstate)是无关紧要的。 - user667804
以上模块都在标准库中。 - spacether
10
我尝试使用Librosa,但是即使给出了以下行:y, s = librosa.load('test.wav', sr=16000)和librosa.output.write_wav(filename, y, sr),声音文件也不能以给定的采样率(16000,从44kHz下采样)保存。
但是pydub可以正常工作。这是由jiaaro提供的一个很棒的库,我使用了以下命令:
from pydub import AudioSegment as am
sound = am.from_file(filepath, format='wav', frame_rate=22050)
sound = sound.set_frame_rate(16000)
sound.export(filepath, format='wav')
以上代码指定了以22050的帧率读取的文件转换为16000的帧率,并使用
export函数用新的帧率覆盖现有文件。它比librosa表现更好,但我正在寻找比较两个软件包速度的方法,但由于数据很少,我还没有想出来!参考:https://github.com/jiaaro/pydub/issues/232
- Gowtham S
2
1Librosa自0.8版本开始已经移除了write_wav函数。现在建议使用soundfile.write函数。 - Austin
在我的情况下,如果您运行
sound.set_frame_rate(16000)而不是分配sound = sound.set_frame_rate(16000),它将无法工作,因为set_frame_rate(..)会产生一个新的对象。 - Nikolas7
您可以使用
scipy中的重采样功能。不过,这需要进行一些类型转换,将Python本地的bytestring转换为scipy所需的数组,这可能会有些棘手。还有一个问题是,在Python的wave模块中,无法确定数据是否带符号(只能确定是否为8或16位)。虽然它应该适用于两种情况,但我没有测试过。
这是一个小程序,将44.1kHz的无符号8位和16位单声道音频转换成16位。如果您有立体声或使用其他格式,调整代码应该不难。在程序开头编辑输入/输出名称即可。我从未试图使用命令行参数。
#!/usr/bin/env python
# -*- coding: utf-8 -*-
#
#  downsample.py
#
#  Copyright 2015 John Coppens <john@jcoppens.com>
#
#  This program is free software; you can redistribute it and/or modify
#  it under the terms of the GNU General Public License as published by
#  the Free Software Foundation; either version 2 of the License, or
#  (at your option) any later version.
#
#  This program is distributed in the hope that it will be useful,
#  but WITHOUT ANY WARRANTY; without even the implied warranty of
#  MERCHANTABILITY or FITNESS FOR A PARTICULAR PURPOSE.  See the
#  GNU General Public License for more details.
#
#  You should have received a copy of the GNU General Public License
#  along with this program; if not, write to the Free Software
#  Foundation, Inc., 51 Franklin Street, Fifth Floor, Boston,
#  MA 02110-1301, USA.
#
#

inwave = "sine_44k.wav"
outwave = "sine_16k.wav"

import wave
import numpy as np
import scipy.signal as sps

class DownSample():
    def __init__(self):
        self.in_rate = 44100.0
        self.out_rate = 16000.0

    def open_file(self, fname):
        try:
            self.in_wav = wave.open(fname)
        except:
            print("Cannot open wav file (%s)" % fname)
            return False

        if self.in_wav.getframerate() != self.in_rate:
            print("Frame rate is not %d (it's %d)" % \
                  (self.in_rate, self.in_wav.getframerate()))
            return False

        self.in_nframes = self.in_wav.getnframes()
        print("Frames: %d" % self.in_wav.getnframes())

        if self.in_wav.getsampwidth() == 1:
            self.nptype = np.uint8
        elif self.in_wav.getsampwidth() == 2:
            self.nptype = np.uint16

        return True

    def resample(self, fname):
        self.out_wav = wave.open(fname, "w")
        self.out_wav.setframerate(self.out_rate)
        self.out_wav.setnchannels(self.in_wav.getnchannels())
        self.out_wav.setsampwidth (self.in_wav.getsampwidth())
        self.out_wav.setnframes(1)

        print("Nr output channels: %d" % self.out_wav.getnchannels())

        audio = self.in_wav.readframes(self.in_nframes)
        nroutsamples = round(len(audio) * self.out_rate/self.in_rate)
        print("Nr output samples: %d" %  nroutsamples)

        audio_out = sps.resample(np.fromstring(audio, self.nptype), nroutsamples)
        audio_out = audio_out.astype(self.nptype)

        self.out_wav.writeframes(audio_out.copy(order='C'))

        self.out_wav.close()

def main():
    ds = DownSample()
    if not ds.open_file(inwave): return 1
    ds.resample(outwave)
    return 0

if __name__ == '__main__':
    main()
- jcoppens
2
嗨,脚本写得不错,但是在我的情况下,当我输入一个5秒长的wav文件时,它输出了一个10秒长的wav文件...你能告诉我为什么会这样吗?我该如何修复它呢?(抱歉,我在Python方面没有太多实践和知识) - undefined
@A.Joly:谢谢你的评论。自2015年以来,很多事情发生了变化!我会看一下这个问题。一个问题是从
fromstring变成了frombuffer(第72行),但这不是唯一的问题。 - undefined1
您可以在 Windows、macOS 或 Linux 上使用 ffmpeg 工具来完成此操作。从官方链接(https://ffmpeg.org/download.html)下载 ffmpeg。我下载了 gyan.dev 版本。对于 Windows,按照以下步骤进行:
- 解压下载的文件
- 将文件夹重命名为
ffmpeg - 剪切此文件夹并将其粘贴到操作系统驱动器中。通常是
C驱动器 - 移动到
bin文件夹,其中包含ffmpeg.exe - 单击地址栏并复制路径,对我来说,它是
C:\ffmpeg\bin - 通过在开始菜单中键入
env打开环境变量 - 在
高级选项卡下,单击环境变量按钮 - 在
用户变量下选择Path并单击编辑 - 单击
新建按钮,并在字段中粘贴已复制的路径 - 对于每个窗口,单击
确定 - 现在打开
CMD并键入ffmpeg -version以确认是否已正确将路径添加到环境变量中。如果是,则会显示有关ffmpeg的信息,否则会出现错误。
现在,我们已经准备好重新采样音频了。现在在您的python文件中添加以下代码。
import os

source_file = "path/to/input/file/with/extension"    # "source_file.wav"
output_file = "path/to/output/file/with/extension"   # "compressed_output_file.wav"

output_str = f"ffmpeg -i {source_file} -ac 1 -ar 16000 {output_file}"
os.system(output_str)
print(output_str)
在我的许多项目中,我使用了这段代码来进行
wav和mp3文件的上采样和下采样。注意:上采样会增加文件大小,而下采样会减小文件大小。
- ARHAM RUMI
1
请注意,如果未使用选项
-sample_fmts明确要求,ffmpeg将输出16位音频样本。我无法理解ffmpeg的这种设计选择... - Itamar Katz1
如果您使用tensorflow库,可以将44100立体声.mp3文件转换为16000单声道.wav文件。
!pip install tensorflow-io==0.25.0   # что сломалось с ==0.26.0
import tensorflow_io as tfio
import tensorflow as tf
import numpy as np


srcFilePath = '/content/data/dataset_phoneme_in/she/pronunciation_en_she.mp3'
dstFilePath =  '/content/temp/1.wav'

#wavFensor=getAudioTensorFromFilePath(src)


rateOut=16000

audioIOTensor = tfio.audio.AudioIOTensor(srcFilePath)  #читает разный формат  работает на версии  !pip install tensorflow-io==0.25.0
print(audioIOTensor.shape)
chanalsIn=(int)(audioIOTensor.shape[1])
rateIn=(int)(audioIOTensor.rate)
print(audioIOTensor.shape[1])
audioTensor = audioIOTensor[0:] #get audio block   получить звуковый блок

if (chanalsIn>1): #sterio to mono
  audioTensor=audioTensor.numpy()
  audioTensor=np.average(audioTensor,axis=1)
  audio_slice=tf.convert_to_tensor(audioTensor)

print(audioTensor.shape)

#change rate
audioTensor=tfio.audio.resample(audioTensor, rateIn,rateOut)

print(audioTensor.shape)


# remove last dimension
#audioTensor = tf.squeeze(audioTensor, axis=[1])
# convert to wav and save
#wav = tf.cast(audioTensor, tf.float32) / 32768.0
print(audioTensor.shape)
audioTensor=tf.expand_dims(audioTensor, axis=1)  # add axis for tf.audio.encode_wav
print(audioTensor.shape)
outWavAudio=tf.audio.encode_wav(audio=audioTensor,sample_rate=rateOut)

tf.io.write_file(dst,outWavAudio)
- Nikolay L
0
首先,您需要导入'librosa'库 使用'librosa.load'重新采样音频文件 librosa.load(path,sr) 最初的sr(采样率)= 22050。如果您想保留原始采样率,请使sr=None。否则,音频将被重新采样为所提供的采样率
- Gaurao Mate
网页内容由stack overflow 提供, 点击上面的可以查看英文原文,
原文链接
原文链接