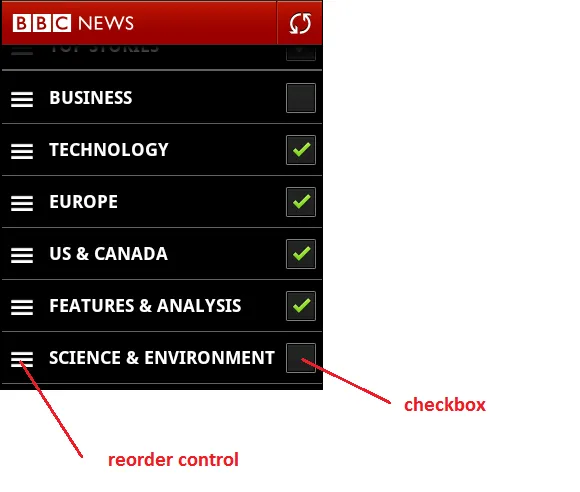
我正在开发一个新闻阅读应用程序,希望用户可以选择显示/隐藏新闻类别(例如头条新闻、商业、科技、体育等),并像BBC Android新闻应用程序一样重新排序。
请参见下面的图片:
我的问题是:
- 如何在单元格左侧创建重新排序控件? (默认情况下,在编辑模式下,它位于单元格右侧)
- 我有一个复选框自定义控件。如何将其放在单元格的右侧?
我正在开发一个新闻阅读应用程序,希望用户可以选择显示/隐藏新闻类别(例如头条新闻、商业、科技、体育等),并像BBC Android新闻应用程序一样重新排序。
请参见下面的图片:
我的问题是:
(0) 我假设您已经设置好了表格,等等。
(1) 只有在您的表格单元格始终可拖动时,此解决方案才有效。将此添加到您的Table View Controller .m文件中的viewDidLoad中。
- (void)viewDidLoad
{
    [super viewDidLoad];
    [self setEditing:YES];
}
(2) 为了让您可以重新排序单元格,请在tableView:cellForRowAtIndexPath:方法中添加cell.showsReorderControl = YES;。
(3) 确保您有tableView:canMoveRowAtIndexPath:和tableView:moveRowAtIndexPath:toIndexPath:这两个方法。
- (BOOL)tableView:(UITableView *)tableview canMoveRowAtIndexPath:(NSIndexPath *)indexPath
{
    return YES;
}

- (void)tableView:(UITableView *)tableView moveRowAtIndexPath:(NSIndexPath *)fromIndexPath toIndexPath:(NSIndexPath *)toIndexPath
{
}
(4) 因为您希望重新排序控件位于左侧,所以我们必须去掉通常在那里的删除圆圈,tableView:editingStyleForRowAtIndexPath: 方法可以实现此功能。
- (UITableViewCellEditingStyle)tableView:(UITableView *)tableView editingStyleForRowAtIndexPath:(NSIndexPath *)indexPath
{
    return UITableViewCellEditingStyleNone;
}
(5) 最后一步,魔法发生的地方 - 添加tableView:willDisplayCell:forRowAtIndexPath:方法,搜索单元格的子视图,缩小到私有的UITableViewCellReorderControl,最后覆盖它。
- (void) tableView:(UITableView *)tableView willDisplayCell:(UITableViewCell *)cell forRowAtIndexPath:(NSIndexPath *)indexPath
{
    for(UIView* view in cell.subviews)
    {
        if([[[view class] description] isEqualToString:@"UITableViewCellReorderControl"])
        {
            // Creates a new subview the size of the entire cell
            UIView *movedReorderControl = [[UIView alloc] initWithFrame:CGRectMake(0, 0, CGRectGetMaxX(view.frame), CGRectGetMaxY(view.frame))];
            // Adds the reorder control view to our new subview
            [movedReorderControl addSubview:view];
            // Adds our new subview to the cell
            [cell addSubview:movedReorderControl];
            // CGStuff to move it to the left
            CGSize moveLeft = CGSizeMake(movedReorderControl.frame.size.width - view.frame.size.width, movedReorderControl.frame.size.height - view.frame.size.height);
            CGAffineTransform transform = CGAffineTransformIdentity;
            transform = CGAffineTransformTranslate(transform, -moveLeft.width, -moveLeft.height);
            // Performs the transform
            [movedReorderControl setTransform:transform];
        }
    }
}
不要寻找 UITableViewCellReorderControl, 它是非公开的API,可能在未来更改,我建议在 UITableView 上使用 UILongPressGestureRecognizer 并实现自己的排序逻辑。
我在 HPReorderTableView 中解决了一般情况 (响应单元格上任意部分的长按)。这是一个可以替代UITableView的插件。它可以轻松地修改以响应单元格特定部分的触摸操作,例如通过实现reorderGestureRecognizer委托的gestureRecognizer:shouldReceiveTouch: 方法。
现在,对于 iOS 9 及更高版本,有一个更加简便的解决方案。
tableView.semanticContentAttribute = .forceRightToLeft
编辑:
正如Roland所提到的,您应该注意,如果您通过leading和trailing约束而不是left和right来对齐单元格的子视图,则此设置将翻转一切。
Luke Dubert, 对于 iOS 7 的建议需要稍作修改:
```UIView *cellSubview = cell.subviews[0];
for(UIView* view in cellSubview.subviews)
{
if([[[view class] description] isEqualToString:@"UITableViewCellReorderControl"])
{
我在使用Swift 4.2对iOS 12进行了测试,而不是使用view.self.description == "UITableViewCellReorderControl",请使用view.self.description.contains("UITableViewCellReorderControl")
func tableView(_ tableView: UITableView, willDisplay cell: UITableViewCell, forRowAt indexPath: IndexPath) {
    for view in cell.subviews {
        if view.self.description.contains("UITableViewCellReorderControl") {
            let movedReorderControl = UIView(frame: CGRect(x: 0, y: 0, width: view.frame.maxX, height: view.frame.maxY))
            movedReorderControl.addSubview(view)
            cell.addSubview(movedReorderControl)
            let moveLeft = CGSize(width: movedReorderControl.frame.size.width - view.frame.size.width, height: movedReorderControl.frame.size.height - view.frame.size.height)
            var transform: CGAffineTransform = .identity
            transform = transform.translatedBy(x: -moveLeft.width, y: -moveLeft.height)
            movedReorderControl.transform = transform
        }
    }
}
受Luke解决方案的启发,我找到了一种可靠且直接的方法来实现这一点:
@implementation CustomTableViewCell

-(void) layoutSubviews {
    [super layoutSubviews];

    // set the frames of the other subviews here if necessary, for example:
    // self.textLabel.frame = CGRectMake(80, 0, self.textLabel.frame.size.width, self.textLabel.frame.size.height);

    for (UIView* view in self.subviews) {
        if ([[[view class] description] containsString:@"UITableViewCellReorderControl"]) {
            [view setFrame:CGRectMake(20, 0, view.frame.size.width, view.frame.size.height)];
        }
    }
}

@end
只需创建自定义的UITableViewCell,覆盖其子视图并修改每个视图的位置,在所有已知的情况下都可以很好地工作。
在willDisplayCellAtIndexPath下执行UITableViewReorderControl定制不会百分之百地起作用,第一个重新排序按钮偶尔不会正确定位。
这个解决方案在iOS7上对我无效,所以我创建了一个适用于两者的版本,希望它有用:
- (void)moveReorderControl:(UITableViewCell *)cell subviewCell:(UIView *)subviewCell
{
    if([[[subviewCell class] description] isEqualToString:@"UITableViewCellReorderControl"]) {
    static int TRANSLATION_REORDER_CONTROL_Y = -20;

        //Code to move the reorder control, you change change it for your code, this works for me
        UIView* resizedGripView = [[UIView alloc] initWithFrame:CGRectMake(0, 0,    CGRectGetMaxX(subviewCell.frame), CGRectGetMaxY(subviewCell.frame))];
        [resizedGripView addSubview:subviewCell];
        [cell addSubview:resizedGripView];

        //  Original transform
        const CGAffineTransform transform = CGAffineTransformMakeTranslation(subviewCell.frame.size.width - cell.frame.size.width, TRANSLATION_REORDER_CONTROL_Y);
        //  Move custom view so the grip's top left aligns with the cell's top left

        [resizedGripView setTransform:transform];
   }
}

//This method is due to the move cells icons is on right by default, we need to move it.
- (void) tableView:(UITableView *)tableView willDisplayCell:(UITableViewCell *)cell forRowAtIndexPath:(NSIndexPath *)indexPath
{
    if (tableView.tag == MEETING_BLOCK_TABLE_TAG) {
        for(UIView* subviewCell in cell.subviews)
        {
            if ([ROCFunctions isIOS7]) {
                if([[[subviewCell class] description] isEqualToString:@"UITableViewCellScrollView"]) {
                    for(UIView* subSubviewCell in subviewCell.subviews) {
                        [self moveReorderControl:cell subviewCell:subSubviewCell];
                    }
                }
            }
            else{
                [self moveReorderControl:cell subviewCell:subviewCell];
            }
        }
    }
}
感谢以上的每一个人。这是我的解决方案。已在iOS7和iOS9上进行了测试。
@implementation StoryPreviewCell
-(void)layoutSubviews{
    [super layoutSubviews];

    //subviews contains first level and second level views.
    NSMutableArray *subviews = [NSMutableArray array];
    [subviews addObjectsFromArray:self.subviews];
    for (NSInteger i=0; i<self.subviews.count; i++) {
        UIView *firstLevelView = self.subviews[i];
        if(firstLevelView.subviews.count) [subviews addObjectsFromArray:firstLevelView.subviews];
    }

    for(UIView* view in subviews) {
        if([[[view class] description] isEqualToString:@"UITableViewCellReorderControl"]) {
            UIView *reorderControl = view;
            CGFloat leftMoveDistance = 100;//can customize
            CGAffineTransform transform = CGAffineTransformTranslate(CGAffineTransformIdentity, -leftMoveDistance, 0);
            reorderControl.transform = transform;
        }
    }
}
@end
public override void WillDisplay(UITableView tableView, UITableViewCell cell, NSIndexPath indexPath)
{
    (cell as GraphBarLineCell)?.SetEditionMode(tableView.Editing);
}
private UIView _reorderControlContainer;

public void SetEditionMode(bool editing)
    {
        _title.Frame = editing ? TitleFrameForEditing : TitleFrame;

        if (editing)
        {
            var reorderControl = Subviews.FirstOrDefault(x => x.Class.Name.Equals("UITableViewCellReorderControl"));

            if (reorderControl != null)
            {
                _reorderControlContainer?.RemoveFromSuperview();

                // Creates a new subview the size of the entire cell
                _reorderControlContainer = new UIView(new CGRect(0, 0, reorderControl.Frame.GetMaxX(), reorderControl.Frame.GetMaxY()));

                // Adds the reorder control view to our new subview
                _reorderControlContainer.AddSubview(reorderControl);

                // Adds our new subview to the cell
                AddSubview(_reorderControlContainer);

                // CGStuff to move it to the left
                var moveLeft = new CGSize(_reorderControlContainer.Frame.Size.Width - reorderControl.Frame.Size.Width,
                    _reorderControlContainer.Frame.Size.Height - reorderControl.Frame.Size.Height);

                var transform = CGAffineTransform.MakeIdentity();
                transform = CGAffineTransform.Translate(transform, -moveLeft.Width, -moveLeft.Height);
                _reorderControlContainer.Transform = transform;

                // Align the icon with the title
                var icon = reorderControl.Subviews[0];
                icon.Frame = new CGRect(10, 25, icon.Frame.Width, icon.Frame.Height);
            }
        }
    }
@interface UIView (ClassSearch)

- (instancetype)subviewOfClassMatching:(NSString*)partialName;

@end

@implementation UIView (ClassSearch)

-(instancetype)subviewOfClassMatching:(NSString *)partialName
{
    if ([[[self class] description] rangeOfString:partialName options:NSCaseInsensitiveSearch].location != NSNotFound) {
        return self;
    }

    for (UIView* v in self.subviews) {
        id match = [v subviewOfClassMatching:partialName];
        if (match) {
            return match;
        }
    }

    return nil;
}

@end
然后,在您的UITableViewCell子类中,像这样覆盖willTransitionToState:
-(void)willTransitionToState:(UITableViewCellStateMask)state
{
    [super willTransitionToState:state];

    if (state == UITableViewCellStateShowingEditControlMask) {
        UIView* reorderControl = [self subviewOfClassMatching:@"ReorderControl"];
        UIView* reorderContainer = [[UIView alloc] initWithFrame:self.bounds];
        CGAffineTransform t = CGAffineTransformMakeScale(-1, 1);
        reorderContainer.transform = t;
        [self addSubview:reorderContainer];
        [reorderContainer addSubview:reorderControl];
    }
}