如何在圆形ImageView周围添加阴影

41

我想在圆形imageView周围添加阴影效果。这是我的代码。我想要实现下面图片的效果: image

这是我的.xml文件,请查看以下图片: screenshot1

activity_main.xml

<RelativeLayout xmlns:android="http://schemas.android.com/apk/res/android"
android:layout_width="match_parent"
android:layout_height="match_parent" >

<RelativeLayout
    android:id="@+id/layoutTop"
    android:layout_width="match_parent"
    android:layout_height="200dp"
    android:background="#355482" >
</RelativeLayout>

<RelativeLayout
    android:id="@+id/layoutBottom"
    android:layout_width="match_parent"
    android:layout_height="0dp"
    android:layout_alignParentBottom="true"
    android:layout_below="@+id/layoutTop"
    android:background="@drawable/loading" >

    <TextView
        android:id="@+id/textView1"
        android:layout_width="wrap_content"
        android:layout_height="wrap_content"
        android:layout_alignParentTop="true"
        android:layout_centerHorizontal="true"
        android:layout_marginTop="113dp"
        android:text="Profile"
        android:textColor="#355482"
        android:textSize="20dp"
        android:textStyle="bold" />
</RelativeLayout>

<ImageView
    android:id="@+id/overlapImage"
    android:layout_width="150dp"
    android:layout_height="150dp"
    android:layout_alignParentTop="true"
    android:layout_centerHorizontal="true"
    android:layout_marginTop="132dp"
    android:adjustViewBounds="true"
    android:background="@drawable/round_image"
    android:src="@drawable/ic_launcher" />

这是round_image.xml:

<?xml version="1.0" encoding="utf-8"?>

<shape xmlns:android="http://schemas.android.com/apk/res/android" 
android:shape="oval">

<solid android:color="#ffffff" />
<corners android:radius="2dp"/>

<size
    android:height="80dp"
    android:width="80dp" />

<padding
    android:bottom="0dp"
    android:left="0dp"
    android:right="0dp"
    android:top="0dp" />

</shape>

我尝试了一些产生阴影效果的代码,但它没有起作用。

7个回答

42

希望这可以帮到你 :)

<?xml version="1.0" encoding="utf-8"?>
<layer-list xmlns:android="http://schemas.android.com/apk/res/android">

    <item>
        <shape android:shape="oval">
              <solid android:color="@color/gray"/>
                <!--shadow Color-->
        </shape>
    </item>

    <item
        android:left="0dp"
        android:right="0dp"
        android:top="0dp"
        android:bottom="3dp">
        <shape android:shape="oval">
             <solid android:color="@color/lightgrey"/>//Background Color
        </shape>
    </item>
</layer-list>

根据您的需求更改背景颜色和阴影颜色。


11
这与屏幕截图不同。 - user924
1
你需要添加渐变,而不是实色。 - avisper
1
这可能不是你正在寻找的答案,但它解决了@damini提出的问题 :) - Pranita

27

这比你想象的要简单得多。您的ImageView需要基于椭圆形背景显示为圆角,因为默认情况下它是正方形的。然后您需要包含高程,它将按您所期望的显示。您不能将椭圆形背景设置为透明,因为它不允许阴影高程。

这是drawable/white_oval.xml

<?xml version="1.0" encoding="utf-8"?>
<layer-list xmlns:android="http://schemas.android.com/apk/res/android">
    <item>
        <shape android:shape="oval">
            <solid android:color="@android:color/white"/>
        </shape>
    </item>
</layer-list>

现在在你的ImageView中,我这里跳过了如何包含你的图片的步骤

<ImageView
    android:id="@+id/alert_icon"
    android:layout_width="@dimen/alert_icon"
    android:layout_height="@dimen/alert_icon"
    android:contentDescription="@string/your_shadow_rulez"
    android:background="@drawable/white_oval"
    android:elevation="@dimen/elevation_fab" />

当然要确保您的图像视图宽度和高度匹配。海拔越高,阴影就越大。

看看这个多么简单而美观


2
难以置信的简单,但是如此巧妙的解决方案!我猜这就是Android系统为视图绘制高程的方法。很奇怪为什么没有其他人投票支持你的解决方案! - soshial
这仅适用于普通视图。如果能为消失了高程的按钮提供优雅的解决方案,那就很酷了。但我猜,这可能涉及使用ListAnimator。有任何想法吗? - soshial
我没有任何想法。我只尝试过对圆形图像视图进行操作。 - user11736763
1
这就是方法。 - Hiro
你的解决方案很好,但是我只在底部得到了阴影。有什么原因我没有得到圆形阴影吗? - madhuri H R
@madhuriHR,因为高度属性遵循材料设计规范,其中阴影通常出现在底部。请参见https://material.io/design/environment/light-shadows.html#shadows - Gak2

23
创建一个名为circle_shadow.xml的文件,并使用以下代码。根据您的需求更改半径大小。

enter image description here

circle_shadow.xml

<!-- Drop Shadow -->
<item>
    <shape android:shape="oval">
        <padding
            android:bottom="1dp"
            android:left="1dp"
            android:right="1dp"
            android:top="1dp" />

        <solid android:color="#00CCCCCC" />

        <corners android:radius="3dp" />
    </shape>
</item>
<item>
    <shape android:shape="oval">
        <padding
            android:bottom="1dp"
            android:left="1dp"
            android:right="1dp"
            android:top="1dp" />

        <solid android:color="#10CCCCCC" />

        <corners android:radius="3dp" />
    </shape>
</item>
<item>
    <shape android:shape="oval">
        <padding
            android:bottom="1dp"
            android:left="1dp"
            android:right="1dp"
            android:top="1dp" />

        <solid android:color="#20CCCCCC" />

        <corners android:radius="3dp" />
    </shape>
</item>
<item>
    <shape android:shape="oval">
        <padding
            android:bottom="1dp"
            android:left="1dp"
            android:right="1dp"
            android:top="1dp" />

        <solid android:color="#30CCCCCC" />

        <corners android:radius="3dp" />
    </shape>
</item>
<item>
    <shape android:shape="oval">
        <padding
            android:bottom="1dp"
            android:left="1dp"
            android:right="1dp"
            android:top="1dp" />

        <solid android:color="#50CCCCCC" />

        <corners android:radius="3dp" />
    </shape>
</item>

<!-- Background Color (white) -->
<item>
    <shape android:shape="oval">
        <solid android:color="@android:color/white" />

        <corners android:radius="3dp" />
    </shape>
</item>


28
绝不要使用那个,它需要120毫秒才能绘制带有这种背景的ImageView,而简单的FAB仅需要35毫秒。为什么?因为它过度绘制了6次。 - Abduaziz Kayumov

6

在回答之前,我想给一些建议。你只需要在Google中输入你的问题标题。我试着搜索类似于circular imageview with shadow android

不使用库:

更改 android:color="#BDBDBD"shape标签中。 你的 round_image.xml 将会是这样的:

<?xml version="1.0" encoding="utf-8"?>

<shape xmlns:android="http://schemas.android.com/apk/res/android" 
android:shape="oval">

<solid android:color="#BDBDBD" />
<corners android:radius="2dp"/>

<size
    android:height="80dp"
    android:width="80dp" />

<padding
    android:bottom="0dp"
    android:left="0dp"
    android:right="0dp"
    android:top="0dp" />

</shape>

使用库:

你尝试过这个CircularImageView吗?

你可以使用这个库,或者如果你不想使用,那么可以从这个库的内部res文件夹获取一些代码。

输入图像描述

谢谢。


我不能使用任何库来制作这个圆形ImageView。我想在ImageView周围添加阴影,而不使用任何Android库。是否可以在round_image.xml中进行一些更改来实现? - Damini Mehra
我尝试了你的代码,但我想要像上面编辑过的图片一样。感谢您的支持。 - Damini Mehra
这个库对于圆形图片效果很好,但是我该如何添加阴影或模糊边缘呢? - Shay Ribera

6

在这里,我分享了一些细节,展示如何为一个圆形的图片/资源添加阴影效果的最佳实践。

enter image description here

上面的示例图片的图标尺寸为56dp x 56dp,并使用缩放视图进行裁剪,因此可能看起来不太吸引人,但在裸眼下实际设备上显示的结果会很好。

以上示例是通过以下方式实现的:

  • 添加一定程度的elevation,以便显示阴影。
  • 为该视图提供几乎是 elevation 的两倍的边距以适应阴影。
  • 确保父视图提供几乎是 elevation 的两倍的空间以适应阴影。
  • 创建并使用 OutlineProvider 来创建阴影。

现在我们开始编写代码。

<FrameLayout
        android:layout_width="wrap_content"
        android:layout_height="wrap_content"
        android:padding="@dimen/margin_14dp"> // Point no. 3

        <androidx.appcompat.widget.AppCompatImageView
            android:id="@+id/img"
            android:layout_width="@dimen/margin_56dp"
            android:layout_height="@dimen/margin_56dp"
            android:layout_margin="@dimen/margin_14dp" // Point no. 2
            android:elevation="@dimen/margin_8dp" // Point no. 1
            android:src="@drawable/ic_bell" />
 </FrameLayout>

我们来看第4个点,这里是用于圆形轮廓的OutlineProvider类。

import android.graphics.Outline;
import android.view.View;
import android.view.ViewOutlineProvider;

public class CircularOutlineProvider extends ViewOutlineProvider {  
    @Override
    public void getOutline(View view, Outline outline) {
        outline.setRoundRect(0, 0, view.getWidth(), view.getHeight(), (view.getWidth() / 2F));
    }
}

我们需要在Java/Kotlin类中使用OutlineProvider来实现运行时的魔法。
if (Build.VERSION.SDK_INT >= Build.VERSION_CODES.LOLLIPOP) 
    findViewById(R.id.img).setOutlineProvider(new CircularOutlineProvider());

魔法会话结束!

要获取更多体验和加强细节,请阅读官方文章


3

将此 XML 代码添加到您的 drawable 布局中,并将其添加到背景:

<?xml version="1.0" encoding="utf-8"?>

<selector xmlns:android="http://schemas.android.com/apk/res/android">
    <item>
        <layer-list>
            <item>
                <shape android:shape="oval">
                    <gradient
                        android:startColor="#FF000000"
                        android:endColor="#00000000"

                        android:gradientRadius="31dp"
                        android:type="radial"
                        />
                </shape>
            </item>
            <item android:top="4dp" android:left="4dp" android:right="4dp" android:bottom="4dp">
            <shape android:shape="oval">
                <size android:width="55dp"
                    android:height="55dp"/>
                <solid android:color="@android:color/white" />
            </shape>
            </item>


        </layer-list>
    </item>

</selector>

1

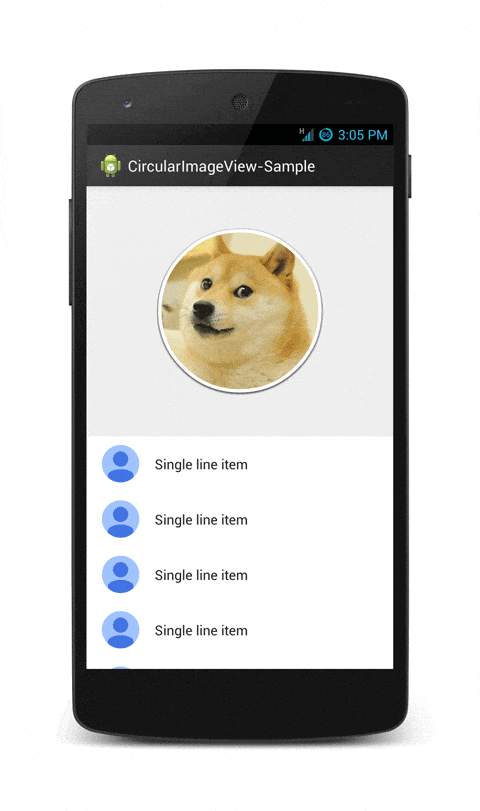
这个类是自定义的圆形ImageView,带有阴影、描边和饱和度调节功能。使用这个自定义的圆形ImageView可以将你的图片裁剪成圆形并设置半径。对于圆形阴影ImageView,不需要在Github上下载该类,直接使用即可。可以在根布局中动态添加CircularImageView。

  *Adding Circular ImageView to your layout dynamically* 

 RelativeLayout  rootLayout= (RelativeLayout) findViewById(R.id.rootLayout);

   rootLayout.addView(new CircularImageView(this,200,200,imageBitmap));


public CircularImageView(Context context, int width, int height, Bitmap bitmap)     {
    super(context);
    this.context = context;
    this.width = width;
    this.height = height;

  ------> here "bitmap" is the square shape(width* width) scaled bitmap ..

    this.bitmap = bitmap;


    paint = new Paint(Paint.ANTI_ALIAS_FLAG);
    paint.setAntiAlias(true);
    paint.setFilterBitmap(true);
    paint.setDither(true);


    paint3=new Paint();
    paint3.setStyle(Paint.Style.STROKE);
    paint3.setColor(Color.WHITE);
    paint3.setAntiAlias(true);

    paintBorder = new Paint();
    imagePaint= new Paint();

    paintBorder.setColor(Color.WHITE);
    paintBorder.setAntiAlias(true);
    this.setLayerType(LAYER_TYPE_SOFTWARE, paintBorder);


    this.bitmap2 = Bitmap.createScaledBitmap(bitmap, (bitmap.getWidth() - 40), (bitmap.getHeight() - 40), true);


    imagePaint.setAntiAlias(true);


    invalidate();
}

@Override
protected void onDraw(Canvas canvas) 
{
    super.onDraw(canvas);
    Shader b;
     if (bitmap3 != null)
        b = new BitmapShader(bitmap3, Shader.TileMode.CLAMP, Shader.TileMode.CLAMP);
     else
        b = new BitmapShader(bitmap2, Shader.TileMode.CLAMP, Shader.TileMode.CLAMP);
    imagePaint.setShader(b);
    canvas.drawBitmap(maskedBitmap(), 20, 20, null);
}

private Bitmap maskedBitmap()
{
    Bitmap l1 = Bitmap.createBitmap(width,width, Bitmap.Config.ARGB_8888);
    Canvas canvas = new Canvas(l1);
    paintBorder.setShadowLayer(radius, x, y, Color.parseColor("#454645"));
    paint.setXfermode(new PorterDuffXfermode(PorterDuff.Mode.SRC_IN));
    final RectF rect = new RectF();
    rect.set(20, 20, bitmap2.getWidth(), bitmap2.getHeight());

    canvas.drawRoundRect(rect, corner_radius, corner_radius, paintBorder);

    canvas.drawRoundRect(rect, corner_radius, corner_radius, imagePaint);

    if (strokeWidth!=0.0f)
    {
        paint3.setStrokeWidth(strokeWidth);
        canvas.drawRoundRect(rect, corner_radius, corner_radius, paint3);
    }

     paint.setXfermode(null);
    return l1;
}


------> use seekbar here, here you have to pass  "0 -- 250"  here corner radius will change ..

public void setCornerRadius(int corner_radius)
{
    this.corner_radius = corner_radius;
    invalidate();
}


-------->use seekbar here, here you have to pass  "0 -- 10.0f"  here shadow radius will change 

public void setShadow(float radius)
{
    this.radius = radius;
    invalidate();
}


----> use seekbar here, here you have to pass  "0 -- 10.0f"  here stroke size  will change 

public void setStroke(float stroke)
{
    this.strokeWidth = stroke;
    invalidate();
}

private Bitmap updateSat(Bitmap src, float settingSat)
{

    int w = src.getWidth();
    int h = src.getHeight();

    Bitmap bitmapResult =
            Bitmap.createBitmap(w, h, Bitmap.Config.ARGB_8888);
    Canvas canvasResult = new Canvas(bitmapResult);
    Paint paint = new Paint();
    ColorMatrix colorMatrix = new ColorMatrix();
    colorMatrix.setSaturation(settingSat);
    ColorMatrixColorFilter filter = new ColorMatrixColorFilter(colorMatrix);
    paint.setColorFilter(filter);
    canvasResult.drawBitmap(src, 0, 0, paint);

    return bitmapResult;
}


--------> use seekbar here, here you have to pass  "0 -- 2.0f"  here saturation  will change


public void setSaturation(float sat)
{
    System.out.println("qqqqqqqqqq            "+sat);
    bitmap3=updateSat(bitmap2, sat);

    invalidate();
} 


}


-------->      Seekbar to change radius

              radius_seekbar.setOnSeekBarChangeListener(new SeekBar.OnSeekBarChangeListener() {
                    @Override
                    public void onProgressChanged(SeekBar seekBar, int progress, boolean fromUser)
                    {
                        text_radius.setText(""+progress);
                        circularImageView.setCornerRadius(progress);
                    }

                    @Override
                    public void onStartTrackingTouch(SeekBar seekBar) {

                    }

                    @Override
                    public void onStopTrackingTouch(SeekBar seekBar) {

                    }
                });


 // Seekbar to change shadow

                shadow_seekbar.setOnSeekBarChangeListener(new SeekBar.OnSeekBarChangeListener() {
                    @Override
                    public void onProgressChanged(SeekBar seekBar, int progress, boolean fromUser)
                    {
                        float f= 4+progress/10.0f;
                        text_shadow.setText(""+progress);
                        circularImageView.setShadow(f);
                    }

                    @Override
                    public void onStartTrackingTouch(SeekBar seekBar) {

                    }

                    @Override
                    public void onStopTrackingTouch(SeekBar seekBar) {

                    }
                });


       // Seekbar to change saturation

                saturation_seekbar.setOnSeekBarChangeListener(new SeekBar.OnSeekBarChangeListener() {
                    @Override
                    public void onProgressChanged(SeekBar seekBar, int progress, boolean fromUser)
                    {
                        int progressSat = saturation_seekbar.getProgress();
                        float sat = (float) ((progressSat*4 / 100.0f)-1.0f);
                        circularImageView.setSaturation(sat);

                        text_saturation.setText(""+progressSat);
                    }

                    @Override
                    public void onStartTrackingTouch(SeekBar seekBar) {

                    }

                    @Override
                    public void onStopTrackingTouch(SeekBar seekBar) {

                    }
                });


// Seekbar to change stroke

                stroke_seekbar.setOnSeekBarChangeListener(new SeekBar.OnSeekBarChangeListener() {
                    @Override
                    public void onProgressChanged(SeekBar seekBar, int progress, boolean fromUser)
                    {
                        if (progress==0)
                        {
                            float f=(progress*10.0f/100.0f);
                            circularImageView.setStroke(f);
                        }
                        else
                        {
                            float f=(progress*10.0f/100.0f);
                            circularImageView.setStroke(f);
                        }

                        text_stroke.setText(""+progress);
                    }

                    @Override
                    public void onStartTrackingTouch(SeekBar seekBar) {

                    }

                    @Override
                    public void onStopTrackingTouch(SeekBar seekBar) {

                    }
                });


         //radius seekbar in xml file

         <SeekBar
            android:layout_width="match_parent"
            android:layout_gravity="center" 
            android:progress="50"
            android:max="250"
            android:id="@+id/radius_seekbar"
            android:layout_height="wrap_content" />


      //saturation seekbar in xml file

         <SeekBar
            android:layout_width="match_parent"
            android:layout_gravity="center" 
            android:progress="50"
            android:max="100"
            android:id="@+id/saturation_seekbar"
            android:layout_height="wrap_content" />


//shadow seekbar in xml file

         <SeekBar
            android:layout_width="match_parent"
            android:layout_gravity="center" 
            android:progress="0"
            android:max="100"
            android:id="@+id/shadow_seekbar"
            android:layout_height="wrap_content" />


     //stroke seekbar in xml file

         <SeekBar
            android:layout_width="match_parent"
            android:layout_gravity="center" 
            android:progress="0"
            android:max="100"
            android:id="@+id/stroke _seekbar"
            android:layout_height="wrap_content" />

2
如果您能将回复格式化得更好一些,将代码引用拆分为单独的类或布局,我想这将受到非常赞赏。现在这样很难浏览。 - NoHarmDan

网页内容由stack overflow 提供, 点击上面的
可以查看英文原文,
原文链接