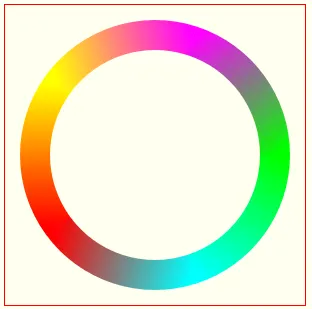
画布中的角度渐变
10
- AndrePliz
3
那被称为圆锥渐变。 - Kroltan
1也许你是对的,但在Photoshop中它被称为“角度” :) - AndrePliz
这篇帖子也可能会有所帮助。
https://dev59.com/9l0a5IYBdhLWcg3wkpWs#55918843 - Divyanshu Rawat
3个回答
21
context的strokeStyle可以是渐变:
// create a gradient

gradient = ctx.createLinearGradient(xStart, yStart, xEnd, yEnd);
gradient.addColorStop(0.0,"blue");
gradient.addColorStop(1.0,"purple");


// stroke using that gradient

ctx.strokeStyle = gradient;
使用渐变strokeStyle的示例代码和演示:http://jsfiddle.net/m1erickson/w46ps/
<!doctype html>
<html>
<head>
<link rel="stylesheet" type="text/css" media="all" href="css/reset.css" /> <!-- reset css -->
<script type="text/javascript" src="http://code.jquery.com/jquery.min.js"></script>
<style>
body{ background-color: ivory; }
#canvas{border:1px solid red;}
</style>
<script>
$(function(){
var canvas=document.getElementById("canvas");
var ctx=canvas.getContext("2d");
function drawMultiRadiantCircle(xc, yc, r, radientColors) {
var partLength = (2 * Math.PI) / radientColors.length;
var start = 0;
var gradient = null;
var startColor = null,
endColor = null;
for (var i = 0; i < radientColors.length; i++) {
startColor = radientColors[i];
endColor = radientColors[(i + 1) % radientColors.length];
// x start / end of the next arc to draw
var xStart = xc + Math.cos(start) * r;
var xEnd = xc + Math.cos(start + partLength) * r;
// y start / end of the next arc to draw
var yStart = yc + Math.sin(start) * r;
var yEnd = yc + Math.sin(start + partLength) * r;
ctx.beginPath();
gradient = ctx.createLinearGradient(xStart, yStart, xEnd, yEnd);
gradient.addColorStop(0, startColor);
gradient.addColorStop(1.0, endColor);
ctx.strokeStyle = gradient;
ctx.arc(xc, yc, r, start, start + partLength);
ctx.lineWidth = 30;
ctx.stroke();
ctx.closePath();
start += partLength;
}
}
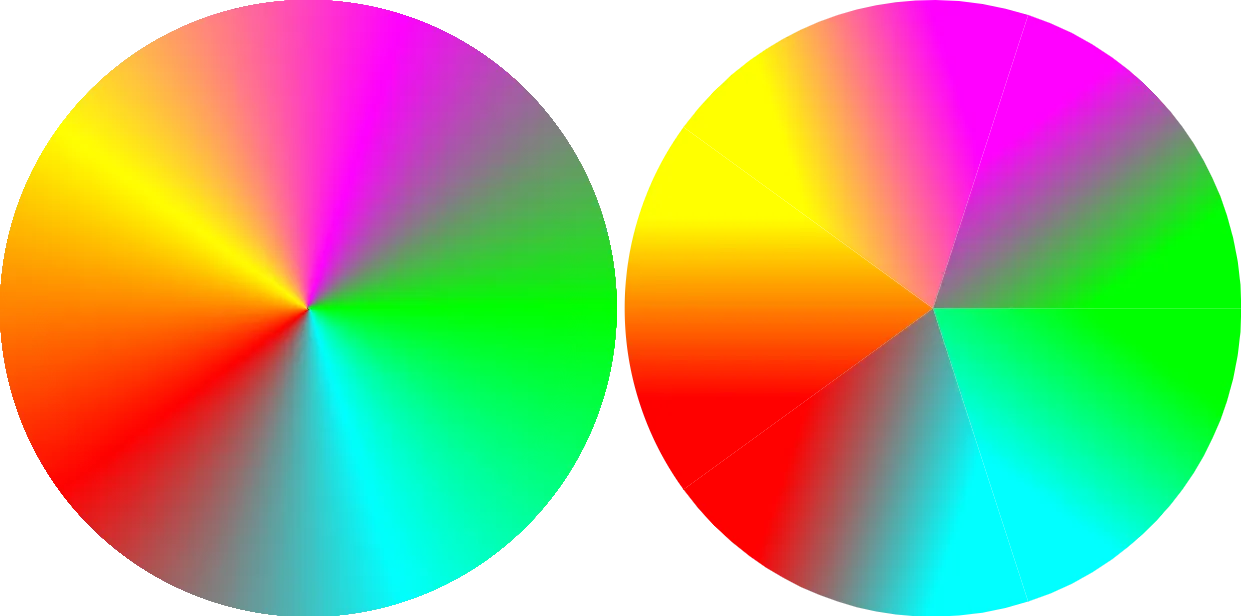
var someColors = [];
someColors.push('#0F0');
someColors.push('#0FF');
someColors.push('#F00');
someColors.push('#FF0');
someColors.push('#F0F');
drawMultiRadiantCircle(150, 150, 120, someColors);
}); // end $(function(){});
</script>
</head>
<body>
<canvas id="canvas" width=300 height=300></canvas>
</body>
</html>
- markE
5
2021年4月更新
有人创建了一个名为create-conical-gradient的npm包,它可以实现完全相同的图像,但速度要快得多。
它向CanvasRenderingContext2D.prototype添加了一个.createConicalGradient()方法。其语法如下:
/**
 * @param ox The x-axis coordinate of the origin of the gradient pattern, which
 *           default value is `0`.
 * @param oy The y-axis coordinate of the origin of the gradient pattern, which
 *           default value is `0`.
 * @param startAngle The angle at which the arc starts in radians measured from
 *                   the positive x-axis, which default value is `0`.
 * @param endAngle The angle at which the arc ends in radians measured from the
 *                 positive x-axis, which default value is `2 * Math.PI`.
 * @param anticlockwise An optional `Boolean`. If `true`, draws the gradient
 *                      counter-clockwise between the start and end angles.
 *                      The default is `false` (clockwise).
 */
const gradient = ctx.createConicalGradient(ox, oy, startAngle, endAngle, anticlockwise);
Example
const canvas = document.getElementById('my-canvas');
const ctx = canvas.getContext('2d');
const gradient = ctx.createConicalGradient(240, 135, -Math.PI, Math.PI);

gradient.addColorStop(0, '#f00');
gradient.addColorStop(0.2, '#00f');
gradient.addColorStop(0.4, '#0ff');
gradient.addColorStop(0.6, '#f0f');
gradient.addColorStop(0.8, '#ff0');
gradient.addColorStop(1, '#f00');

let isStroke = false;
const draw = () => {
  ctx.clearRect(0, 0, canvas.width, canvas.height);
  ctx.beginPath();
  ctx.arc(canvas.width / 2, canvas.height / 2, canvas.height / 2.5, 0, 2 * Math.PI);

  if (isStroke) {
    ctx.strokeStyle = gradient.pattern;
    ctx.lineWidth = 10;
    ctx.stroke();
  } else {
    ctx.fillStyle = gradient.pattern;
    ctx.fill();
  }

  ctx.closePath();
  isStroke = !isStroke;
};

draw();
canvas.addEventListener('click', draw);<script src="https://unpkg.com/create-conical-gradient@latest/umd/create-conical-gradient.min.js"></script>
<canvas id="my-canvas" width="480" height="270">
Your browser does not support canvas...
</canvas>原始答案
在我的情况下,我需要整个圆都被填充而不仅仅是周长上的描边。使用上面的答案并将线宽设置为半径的两倍会产生不良结果,因此我编写了自己的代码。
/**
 * @description Options used when calling CanvasRenderingContext2D.strokeArcGradient() and
 *              CanvasRenderingContext2D.fillArcGradient().
 * @property {Boolean} useDegrees Whether the specified angles should be interpreted as degrees rather than radians.
 *                                (default: false)
 * @property {Number} resolutionFactor The number of lines to render per pixel along the arc.  A higher number produces
 *                                     a cleaner gradient, but has worse performance for large radii.  Must be greater
 *                                     than 0. (default: 8)
 */
class ArcGradientOptions {
    constructor(options) {
        function validateParam(test, errorMessage, fatal = false) {
            if (!test) {
                if (fatal) {
                    throw new Error(errorMessage);
                } else {
                    console.assert(false, errorMessage);
                }
            }
        }

        options = Object.assign({
            useDegrees: false,
            resolutionFactor: 8,
        }, options);

        validateParam(
            (options.resolutionFactor instanceof Number | typeof options.resolutionFactor === 'number') &&
                options.resolutionFactor > 0,
            `ArcGradientOptions.resolutionFactor must be a Number greater than 0.  Given: ${options.resolutionFactor}`,
            true);

        Object.assign(this, options);
    }
};

(function () {
    /**
     * @description Strokes an arc using a linear gradient.
     * @param {number} x The x-component of origin of the arc.
     * @param {number} y The y-component of the origin of the arc.
     * @param {number} radius The radius of the arc.
     * @param {number} startAngle Where in the circle to begin the stroke.
     * @param {number} endAngle Where in the circle to end the stroke.
     * @param {ArcGradientOptions} options Additional options.
     */
    CanvasRenderingContext2D.prototype.strokeArcGradient = function (x, y, radius, startAngle, endAngle, colorStops,
            options) {
        options = new ArcGradientOptions(options);
        let lineWidth = this.lineWidth;
        this.fillArcGradient(x, y, startAngle, endAngle, colorStops, radius + lineWidth / 2, radius - lineWidth / 2,
            options);
    }

    /**
     * @description Fills a sector or a portion of a ring with a linear gradient.
     * @param {number} x The x-component of origin of the arc
     * @param {number} y The y-component of the origin of the arc
     * @param {number} startAngle Where in the circle to begin the fill.
     * @param {number} endAngle Where in the circle to end the fill.
     * @param {number} outerRadius The radius of the arc.
     * @param {number} innerRadius The radius of the arc that won't be filled.  An innerRadius = 0 will fill the whole
     *                             arc. (default: 0)
     * @param {ArcGradientOptions} options Additional options.
     */
    CanvasRenderingContext2D.prototype.fillArcGradient = function (x, y, startAngle, endAngle, colorStops, outerRadius,
            innerRadius = 0, options) {
        options = new ArcGradientOptions(options);

        let oldLineWidth = this.lineWidth,
            oldStrokeStyle = this.strokeStyle;

        if (options.useDegrees) {
            startAngle = startAngle * Math.PI / 180;
            endAngle = endAngle * Math.PI / 180;
        }

        let deltaArcAngle = endAngle - startAngle;
            gradientWidth = Math.floor(outerRadius * Math.abs(deltaArcAngle) * options.resolutionFactor),
            gData = generateGradientImgData(gradientWidth, colorStops).data;

        this.lineWidth = Math.min(4 / options.resolutionFactor, 1);

        for (let i = 0; i < gradientWidth; i++) {
            let gradi = i * 4,
                theta = startAngle + deltaArcAngle * i / gradientWidth;

            this.strokeStyle = `rgba(${gData[gradi]}, ${gData[gradi + 1]}, ${gData[gradi + 2]}, ${gData[gradi + 3]})`;

            this.beginPath();
            this.moveTo(x + Math.cos(theta) * innerRadius, y + Math.sin(theta) * innerRadius);
            this.lineTo(x + Math.cos(theta) * outerRadius, y + Math.sin(theta) * outerRadius);
            this.stroke();
            this.closePath();
        }

        this.lineWidth = oldLineWidth;
        this.strokeStyle = oldStrokeStyle;
    }

    function generateGradientImgData(width, colorStops) {
        let canvas = document.createElement('canvas');
        canvas.setAttribute('width', width);
        canvas.setAttribute('height', 1);
        let ctx = canvas.getContext('2d'),
            gradient = ctx.createLinearGradient(0, 0, width, 0);

        for (let i = 0; i < colorStops.length; i++) {
            gradient.addColorStop(colorStops[i].offset, colorStops[i].color);
        }

        ctx.fillStyle = gradient;
        ctx.fillRect(0, 0, width, 1);
        return ctx.getImageData(0, 0, width, 1);
    }
})();
这种方法从圆心到其边缘上的每个像素绘制线条,可以获得更清晰的渐变效果。
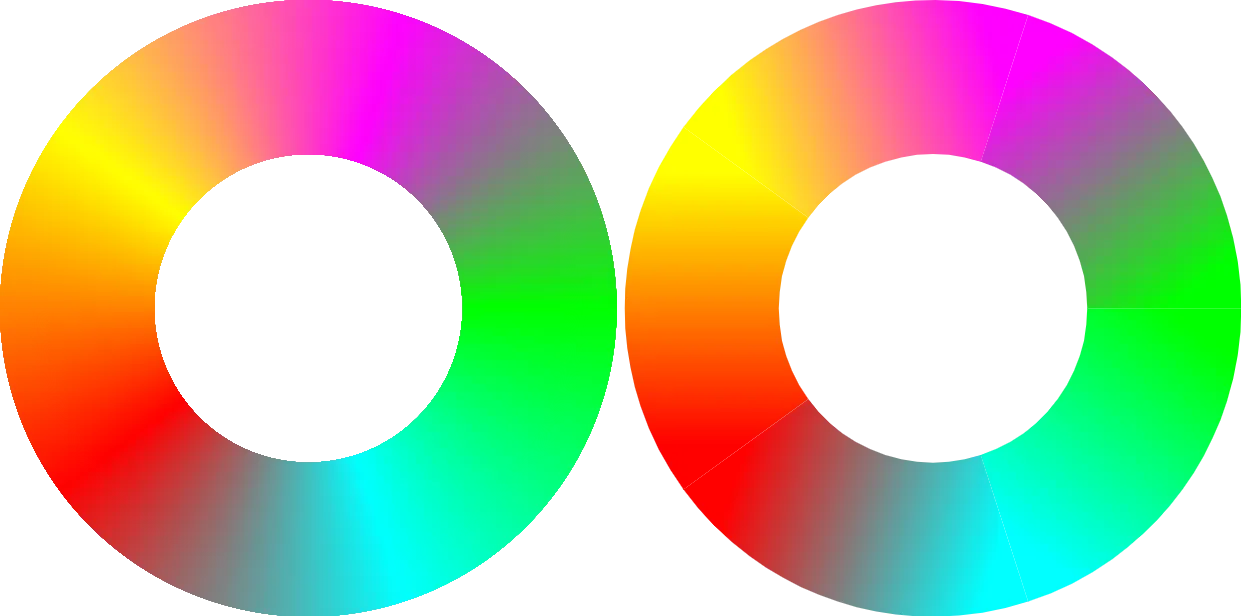
它的一个主要缺点是性能。如果您的半径非常大,为了产生一个漂亮的圆形所需的线条数量约为半径的50倍。
- dx_over_dt
2
谁要求使用jQuery?标签中只提到了JavaScript。 - user5515
我的解决方案不使用jQuery。 jsFiddle只使用jQuery来处理操纵应用我的解决方案的元素,如获取画布、处理点击和窗口调整大小等。所有相关代码都是附加到
CanvasRenderingContext2D原型的纯JavaScript代码。 - dx_over_dt1
我需要这个效果,前几天也有需求,后来我成功创建了一个解决方法来实现它。
我的做法是使用类似这样的方式叠加两个渐变色:
```html
这是JSFiddle中完整的代码和演示:
我的做法是使用类似这样的方式叠加两个渐变色:
```html
What I did was overlay one gradient over the other using something like this:
```var ic = [
/*0*/{ a:"#FEC331" ,b:"#FB1E24" ,r1:0 ,r2:1 ,x0:0 ,y0:rd*0.5 ,x1:0 ,y1:-rd},
/*1*/{ a:"#FEC331" ,b:"#FB1E24" ,r1:0.5 ,r2:0.5 ,x0:0 ,y0:rd*0.3 ,x1:0 ,y1:-rd},
/*2*/{ a:"#EA6F2B" ,b:"transparent" ,r1:0 ,r2:1 ,x0:-rd ,y0:0 ,x1:rd ,y1:0 }
];
这是JSFiddle中完整的代码和演示:
。 希望它有所帮助。
- ITWitch
网页内容由stack overflow 提供, 点击上面的可以查看英文原文,
原文链接
原文链接