Flutter中的Instagram个人资料头部布局

19
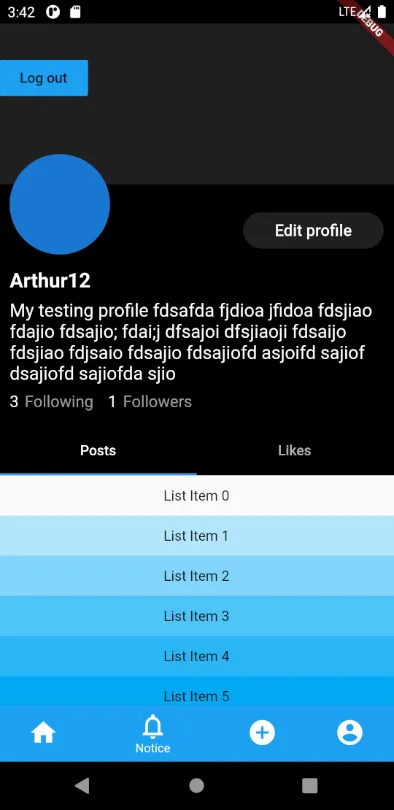
我一直在研究SliverAppBar、CustomScrollView、NestedScrollView、SliverPersistentHeader等技术,但是我找不到一种方法来构建类似Instagram用户个人资料屏幕头部的布局,其中只有选项卡栏固定。屏幕的主体部分是一个TabBarView,每个窗格都有一个可滚动的列表。
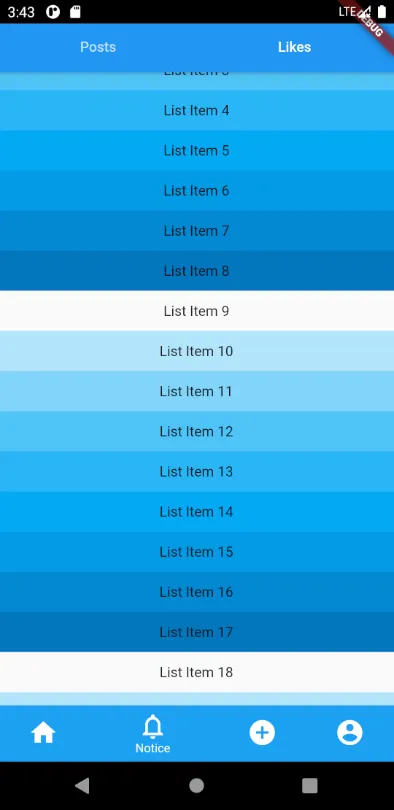
使用SliverAppBar,在bottom参数中添加TabBar很容易。但是我想在TabBar上方添加一个高度未知/可变的额外部件。当页面滚动时,这个额外的部件应该被滚动到一边,然后TabBar就会固定在屏幕顶部。

enter image description here

我所能做的只是在选项卡栏之前提供一个固定内容和一个固定选项卡栏。我无法让页眉滚动并将选项卡栏固定在顶部,仅在应用栏下方。
import 'package:flutter/material.dart';

void main() {
  runApp(MaterialApp(home: MyApp()));
}

class MyApp extends StatelessWidget {
  @override
  Widget build(BuildContext context) {
    return DefaultTabController(
      length: 2,
      child: Scaffold(
        appBar: AppBar(
          title: Text("pabloaleko"),
        ),
        body: CustomScrollView(
          physics: const BouncingScrollPhysics(),
          slivers: <Widget>[
            SliverToBoxAdapter(
              child: SafeArea(
                child: Text("an unknown\namount of content\n goes here in the header"),
              ),
            ),
            SliverToBoxAdapter(
              child: TabBar(
                tabs: [
                  Tab(child: Text('Days', style: TextStyle(color: Colors.black))),
                  Tab(child: Text('Months', style: TextStyle(color: Colors.black))),
                ],
              ),
            ),
            SliverFillRemaining(
              child: TabBarView(
                children: [
                  ListView(
                    children: <Widget>[
                      ListTile(title: Text('Sunday 1')),
                      ListTile(title: Text('Monday 2')),
                      ListTile(title: Text('Tuesday 3')),
                      ListTile(title: Text('Wednesday 4')),
                      ListTile(title: Text('Thursday 5')),
                      ListTile(title: Text('Friday 6')),
                      ListTile(title: Text('Saturday 7')),
                      ListTile(title: Text('Sunday 8')),
                      ListTile(title: Text('Monday 9')),
                      ListTile(title: Text('Tuesday 10')),
                      ListTile(title: Text('Wednesday 11')),
                      ListTile(title: Text('Thursday 12')),
                      ListTile(title: Text('Friday 13')),
                      ListTile(title: Text('Saturday 14')),
                    ],
                  ),
                  ListView(
                    children: <Widget>[
                      ListTile(title: Text('January')),
                      ListTile(title: Text('February')),
                      ListTile(title: Text('March')),
                      ListTile(title: Text('April')),
                      ListTile(title: Text('May')),
                      ListTile(title: Text('June')),
                      ListTile(title: Text('July')),
                      ListTile(title: Text('August')),
                      ListTile(title: Text('September')),
                      ListTile(title: Text('October')),
                      ListTile(title: Text('November')),
                      ListTile(title: Text('December')),
                    ],
                  ),
                ],
              ),
            ),
          ],
        ),
      ),
    );
  }
}

enter image description here

2个回答

51
您可以使用 NestedScrollViewScaffold 来实现此行为。
由于我们需要在 AppBarTabBar 之间动态构建并滚动小部件,所以请使用 ScaffoldappBar 属性来构建您的 AppBar,并使用 headerSliverBuilder 构建其他高度未知的小部件。使用 NestedScrollViewbody 属性来构建您的选项卡视图。
这样,headerSliverBuilder 中的元素将向上滚动,直到 body 达到 AppBar 的底部。
可能仅用文字有点难理解,以下是一个示例:

代码:

// InstaProfilePage
class InstaProfilePage extends StatefulWidget {
  @override
  _InstaProfilePageState createState() => _InstaProfilePageState();
}

class _InstaProfilePageState extends State<InstaProfilePage> {
  double get randHeight => Random().nextInt(100).toDouble();

  List<Widget> _randomChildren;

  // Children with random heights - You can build your widgets of unknown heights here
  // I'm just passing the context in case if any widgets built here needs  access to context based data like Theme or MediaQuery
  List<Widget> _randomHeightWidgets(BuildContext context) {
    _randomChildren ??= List.generate(3, (index) {
      final height = randHeight.clamp(
        50.0,
        MediaQuery.of(context).size.width, // simply using MediaQuery to demonstrate usage of context
      );
      return Container(
        color: Colors.primaries[index],
        height: height,
        child: Text('Random Height Child ${index + 1}'),
      );
    });

    return _randomChildren;
  }

  @override
  Widget build(BuildContext context) {
    return Scaffold(
      // Persistent AppBar that never scrolls
      appBar: AppBar(
        title: Text('AppBar'),
        elevation: 0.0,
      ),
      body: DefaultTabController(
        length: 2,
        child: NestedScrollView(
          // allows you to build a list of elements that would be scrolled away till the body reached the top
          headerSliverBuilder: (context, _) {
            return [
              SliverList(
                delegate: SliverChildListDelegate(
                  _randomHeightWidgets(context),
                ),
              ),
            ];
          },
          // You tab view goes here
          body: Column(
            children: <Widget>[
              TabBar(
                tabs: [
                  Tab(text: 'A'),
                  Tab(text: 'B'),
                ],
              ),
              Expanded(
                child: TabBarView(
                  children: [
                    GridView.count(
                      padding: EdgeInsets.zero,
                      crossAxisCount: 3,
                      children: Colors.primaries.map((color) {
                        return Container(color: color, height: 150.0);
                      }).toList(),
                    ),
                    ListView(
                      padding: EdgeInsets.zero,
                      children: Colors.primaries.map((color) {
                        return Container(color: color, height: 150.0);
                      }).toList(),
                    )
                  ],
                ),
              ),
            ],
          ),
        ),
      ),
    );
  }
}

输出:

输出图片

希望这会有所帮助!


这是一个不错的解决方案。为什么在我的应用中,“A”和“B”选项卡文本显示为白色背景上的白色,而在你的应用中是黑色背景上的白色? - Ted Henry
1
抱歉,我之前设置了我的“主题”主要颜色为“Colors.white”。这基本上取决于您的“主题”的“primaryColor”和“accentColor”。 - Hemanth Raj
嘿!@HemanthRaj 我尝试了这种方法,但我卡在了这个问题上,如果你能帮忙看一下就好了。底部导航栏和选项卡栏导致底部溢出。 https://dev59.com/KVoJtIcB2Jgan1znSiME?sem=2 - kanwar manraj
你如何为顶部的NestedScrollView实现下拉刷新(swipe refresh)? - daicky777
即使选项卡视图元素没有覆盖整个屏幕,滚动仍然会发生。有什么解决办法吗? - Rahul Mishra

4

另一个解决方案是,您可以使用固定的SliverAppBarDefaultTabController中的FlexibleSpaceBar。示例代码:

  Scaffold(
    body: DefaultTabController(
      length: 2,
      child: NestedScrollView(
        headerSliverBuilder: (context, value) {
          return [
            SliverAppBar(
              floating: true,
              pinned: true,
              bottom: TabBar(
                tabs: [
                  Tab(text: "Posts"),
                  Tab(text: "Likes"),
                ],
              ),
              expandedHeight: 450,
              flexibleSpace: FlexibleSpaceBar(
                collapseMode: CollapseMode.pin,
                background: Profile(), // This is where you build the profile part
              ),
            ),
          ];
        },
        body: TabBarView(
          children: [
            Container(
              child: ListView.builder(
                itemCount: 100,
                itemBuilder: (context, index) {
                  return Container(
                    height: 40,
                    alignment: Alignment.center,
                    color: Colors.lightBlue[100 * (index % 9)],
                    child: Text('List Item $index'),
                  );
                },
              ),
            ),
          ],
        ),
      ),
    ),
  ),

滚动前:

输入图片描述

滚动后:

输入图片描述


网页内容由stack overflow 提供, 点击上面的
可以查看英文原文,
原文链接