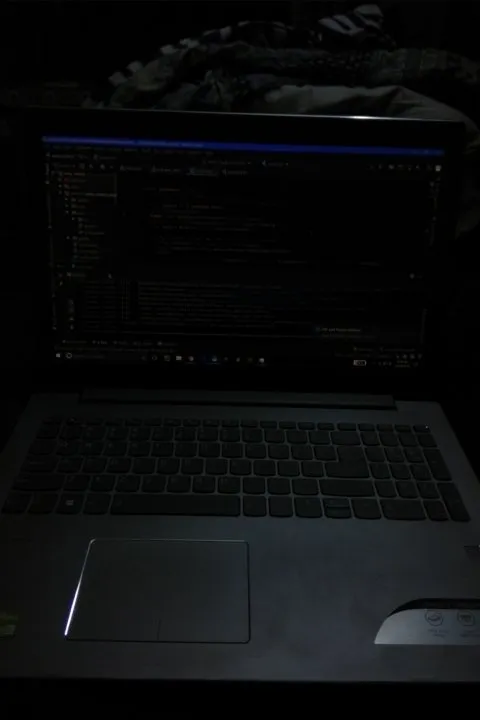
我从flutter相机插件中得到的图像太暗了。
相机预览显示正确,但拍照后变得太暗了。
我搜索了一下,发现这与相机的FPS和曝光有关。
我该如何解决这个问题?
我需要在我的应用程序中显示相机预览并拍照。
请不要告诉我使用image_picker包。
设备:红米Note 4
Android操作系统:7.0
这是图像 暗图 这是代码
相机预览显示正确,但拍照后变得太暗了。
我搜索了一下,发现这与相机的FPS和曝光有关。
我该如何解决这个问题?
我需要在我的应用程序中显示相机预览并拍照。
请不要告诉我使用image_picker包。
设备:红米Note 4
Android操作系统:7.0
这是图像 暗图 这是代码
import 'dart:async';
import 'dart:io';

import 'package:camera/camera.dart';
import 'package:flutter/material.dart';
import 'package:path/path.dart' show join;
import 'package:path_provider/path_provider.dart';

Future<void> main() async {
  // Obtain a list of the available cameras on the device.
  final cameras = await availableCameras();

  // Get a specific camera from the list of available cameras.
  final firstCamera = cameras.first;

  runApp(
    MaterialApp(
      theme: ThemeData.dark(),
      home: TakePictureScreen(
        // Pass the appropriate camera to the TakePictureScreen widget.
        camera: firstCamera,
      ),
    ),
  );
}

// A screen that allows users to take a picture using a given camera.
class TakePictureScreen extends StatefulWidget {
  final CameraDescription camera;

  const TakePictureScreen({
    Key key,
    @required this.camera,
  }) : super(key: key);

  @override
  TakePictureScreenState createState() => TakePictureScreenState();
}

class TakePictureScreenState extends State<TakePictureScreen> {
  CameraController _controller;
  Future<void> _initializeControllerFuture;

  @override
  void initState() {
    super.initState();
    // To display the current output from the Camera,
    // create a CameraController.
    _controller = CameraController(
      // Get a specific camera from the list of available cameras.
      widget.camera,
      // Define the resolution to use.
      ResolutionPreset.medium,
    );

    // Next, initialize the controller. This returns a Future.
    _initializeControllerFuture = _controller.initialize();
  }

  @override
  void dispose() {
    // Dispose of the controller when the widget is disposed.
    _controller.dispose();
    super.dispose();
  }

  @override
  Widget build(BuildContext context) {
    return Scaffold(
      appBar: AppBar(title: Text('Take a picture')),
      // Wait until the controller is initialized before displaying the
      // camera preview. Use a FutureBuilder to display a loading spinner
      // until the controller has finished initializing.
      body: FutureBuilder<void>(
        future: _initializeControllerFuture,
        builder: (context, snapshot) {
          if (snapshot.connectionState == ConnectionState.done) {
            // If the Future is complete, display the preview.
            return CameraPreview(_controller);
          } else {
            // Otherwise, display a loading indicator.
            return Center(child: CircularProgressIndicator());
          }
        },
      ),
      floatingActionButton: FloatingActionButton(
        child: Icon(Icons.camera_alt),
        // Provide an onPressed callback.
        onPressed: () async {
          // Take the Picture in a try / catch block. If anything goes wrong,
          // catch the error.
          try {
            // Ensure that the camera is initialized.
            await _initializeControllerFuture;

            // Construct the path where the image should be saved using the
            // pattern package.
            final path = join(
              // Store the picture in the temp directory.
              // Find the temp directory using the `path_provider` plugin.
              (await getTemporaryDirectory()).path,
              '${DateTime.now()}.png',
            );

            // Attempt to take a picture and log where it's been saved.
            await _controller.takePicture(path);

            // If the picture was taken, display it on a new screen.
            Navigator.push(
              context,
              MaterialPageRoute(
                builder: (context) => DisplayPictureScreen(imagePath: path),
              ),
            );
          } catch (e) {
            // If an error occurs, log the error to the console.
            print(e);
          }
        },
      ),
    );
  }
}

// A widget that displays the picture taken by the user.
class DisplayPictureScreen extends StatelessWidget {
  final String imagePath;

  const DisplayPictureScreen({Key key, this.imagePath}) : super(key: key);

  @override
  Widget build(BuildContext context) {
    return Scaffold(
      appBar: AppBar(title: Text('Display the Picture')),
      // The image is stored as a file on the device. Use the `Image.file`
      // constructor with the given path to display the image.
      body: Image.file(File(imagePath)),
    );
  }
}