我在文件cardslib_item_card_view中声明了一张卡片:
<it.gmariotti.cardslib.library.view.CardViewNative
  xmlns:android="http://schemas.android.com/apk/res/android"
  xmlns:card="http://schemas.android.com/apk/res-auto"
  xmlns:card_view="http://schemas.android.com/apk/res-auto"
  card_view:cardCornerRadius="4dp"
  style="@style/native_recyclerview_card.base"
  android:id="@+id/carddemo"
  android:layout_width="match_parent" android:layout_height="wrap_content">
并在
onCreate() 方法中设置为内容视图:public class CardMariotti extends ActionBarActivity{
@Override
protected void onCreate(Bundle savedInstanceState) {
super.onCreate(savedInstanceState);
setContentView(R.layout.cardslib_item_card_view);
//Create a Card
Card card = new Card(this);
CardViewNative cardView = (CardViewNative) this.findViewById(R.id.carddemo);
cardView.setCard(card);
card.setOnClickListener(new Card.OnCardClickListener() {
@Override
public void onClick(Card card, View view) {
Toast.makeText(CardMariotti.this, "Clickable card", Toast.LENGTH_LONG).show();
}
});
}
现在,我想使用自己的布局来进行定制,包含一个狭窄的页眉和一些信息,如下所示:
<RelativeLayout  android:id="@+id/cardlayout"
    xmlns:android="http://schemas.android.com/apk/res/android"
    android:layout_width="match_parent" android:layout_height="match_parent"
    android:background="?android:selectableItemBackground"
    android:clickable="true">

    <!-- layout containing 3 TextView -->
</RelativeLayout>
这样的过程有什么标准程序吗?我已经尝试了很多调整,例如:
- 创建第二个名为
cardslib_item_layout.xml的xml文件,并在Card的构造函数中引用它:Card card = new Card(this, R.layout.cardslib_item_layout);然后设置setContentView(R.layout.cardslib_item_card_view) - 将布局附加在卡片中,然后设置
setContentView(R.layout.cardslib_item_card_view)
cardslib_item_card_view:<it.gmariotti.cardslib.library.view.CardViewNative
xmlns:android="http://schemas.android.com/apk/res/android"
xmlns:card="http://schemas.android.com/apk/res-auto"
xmlns:card_view="http://schemas.android.com/apk/res-auto"
card_view:cardCornerRadius="4dp"
android:id="@+id/carddemo"
android:layout_width="match_parent" android:layout_height="wrap_content">
<RelativeLayout>
<!-- my layout containing a header and some TextViews -->
</RelativeLayout>
</it.gmariotti.cardslib.library.view.CardViewNative>
在两个测试中,我遇到了以下问题:
- 整体结果完全扭曲
- 最重要的是,RelativeLayout被放置在卡片的上方,使得对卡片进行任何操作都变得不可能(例如,在卡片本身上设置
Card.OnCardClickListener将无法工作,因为用户将点击RelativeLayout而不是卡片本身)
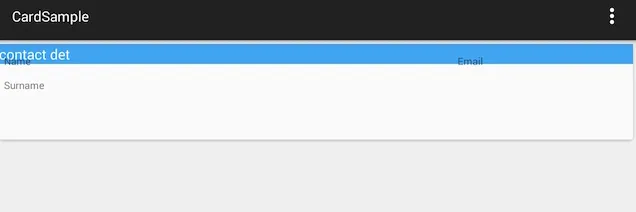
尝试1:
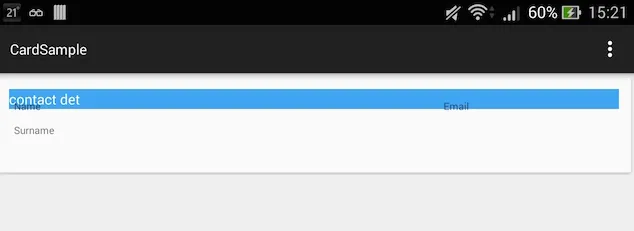 尝试2:
尝试2:
规范的程序是什么?
编辑2:答案
@Msk提供的贡献对我非常有效,尽管后来我发现通过使用原始的cardslib的
Card类也可以在不创建扩展Card类的新类DeviceCard的情况下获得相同的结果。我能够通过在
cardslib_item_layout.xml文件中进行一些微小而琐碎的更改(之前我忽略了这一点)来调整我的布局(标题和卡片的其余部分重叠,如屏幕截图所示)。同时,我还可以通过应用Mariotti在this问题的答案来消除自动附加到每个卡片的虚拟填充。