虽然 @AbAppletic 的答案很好,但我想增加另一种解决问题的方式。您可以在Java中定义一个圆形视图,然后在XML布局中多次使用此视图,并根据需要更改其颜色。
圆形视图:
import android.content.Context;
import android.content.res.TypedArray;
import android.graphics.Canvas;
import android.graphics.Paint;
import android.util.AttributeSet;
import android.view.View;
public class Circle extends View {
Paint p;
int color ;
public Circle(Context context) {
this(context, null);
}
public Circle(Context context, AttributeSet attrs) {
this(context, attrs, 0);
}
public Circle(Context context, AttributeSet attrs, int defStyle) {
super(context, attrs, defStyle);
TypedArray a = context.getTheme().obtainStyledAttributes(
attrs,
R.styleable.Circle,
0, 0
);
try {
color = a.getColor(R.styleable.Circle_circleColor, 0xff000000);
} finally {
a.recycle();
}
init();
}
public void init()
{
p = new Paint();
p.setColor(color);
}
@Override
protected void onDraw(Canvas canvas) {
super.onDraw(canvas);
if(canvas!=null)
{
canvas.drawCircle(getHeight()/2, getWidth()/2,getWidth()/2,p );
}
}
}
把以下内容添加到attrs.xml文件中:
<declare-styleable name="Circle">
        <attr name="circleRadius" format="integer"/>
        <attr name="circleColor" format="color" />
    </declare-styleable>
然后,您可以在布局中多次使用此视图,并更改其背景:
<?xml version="1.0" encoding="utf-8"?>
<TableLayout xmlns:android="http://schemas.android.com/apk/res/android"
android:layout_width="match_parent"
android:layout_height="match_parent"
android:gravity="center"
android:orientation="vertical">

<TableRow android:gravity="center">

    <com.afranet.broadbandportal.view.Circle xmlns:app="http://schemas.android.com/apk/res-auto"
        android:id="@+id/cv"
        android:layout_width="match_parent"
        android:layout_height="match_parent"
        android:layout_margin="5dp"
        android:background="@color/colorPrimary"
        app:circleColor="@color/color1" />

    <com.afranet.broadbandportal.view.Circle xmlns:app="http://schemas.android.com/apk/res-auto"
        android:id="@+id/cv2"
        android:layout_width="120dp"
        android:layout_height="120dp"
        android:layout_margin="5dp"
        android:background="@color/colorPrimary"
        app:circleColor="@color/color2" />

</TableRow>

<TableRow android:gravity="center">

    <com.afranet.broadbandportal.view.Circle xmlns:app="http://schemas.android.com/apk/res-auto"
        android:id="@+id/cv3"
        android:layout_width="120dp"
        android:layout_height="120dp"
        android:layout_margin="5dp"
        android:background="@color/colorPrimary"
        app:circleColor="@color/color3" />

    <com.afranet.broadbandportal.view.Circle xmlns:app="http://schemas.android.com/apk/res-auto"
        android:id="@+id/cv4"
        android:layout_width="120dp"
        android:layout_height="120dp"
        android:layout_margin="5dp"
        android:background="@color/colorPrimary"
        app:circleColor="@color/color4" />

</TableRow>

<TableRow android:gravity="center">

    <com.afranet.broadbandportal.view.Circle xmlns:app="http://schemas.android.com/apk/res-auto"
        android:id="@+id/cv5"
        android:layout_width="120dp"
        android:layout_height="120dp"
        android:layout_margin="5dp"
        android:background="@color/colorPrimary"
        app:circleColor="@color/color5" />

    <com.afranet.broadbandportal.view.Circle xmlns:app="http://schemas.android.com/apk/res-auto"
        android:id="@+id/cv6"
        android:layout_width="120dp"
        android:layout_height="120dp"
        android:layout_margin="5dp"
        android:background="@color/colorPrimary"
        app:circleColor="@color/color6" />

</TableRow>
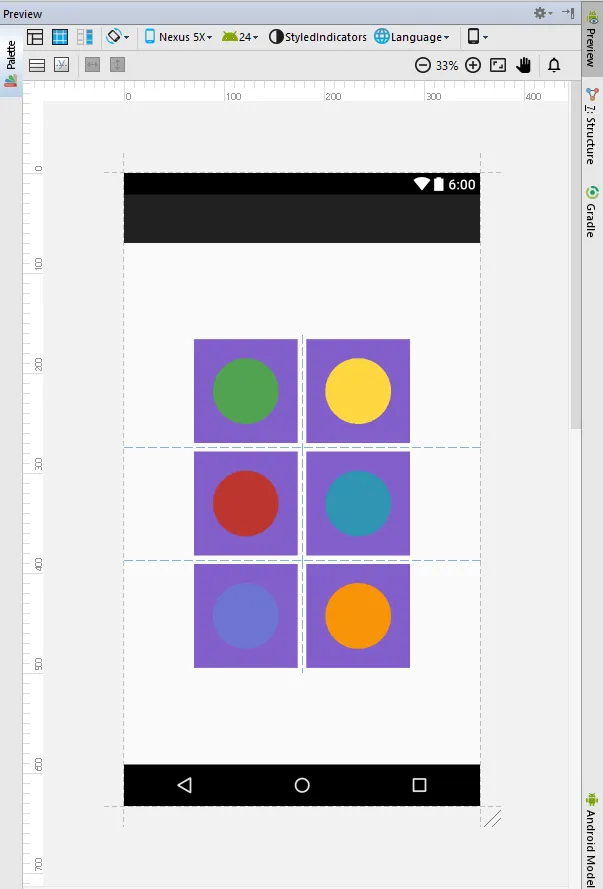
这是屏幕截图: