向SwiftUI的NavigationView添加分段样式选择器

15
问题就像标题中的那样简单。我正在尝试将一个具有SegmentedPickerStyle样式的Picker放置在SwiftUI中的NavigationBar中。就像原生的Phone应用程序的历史页面一样。以下是图片。

enter image description here

我在谷歌和Github上找了一些示例项目、库或教程,但没能找到。我认为如果原生应用程序和WhatsApp等应用有这个功能,那么它应该是可行的。任何帮助都将不胜感激。

5个回答

17
SwiftUI 2 + 工具栏:
struct DemoView: View {

    @State private var mode: Int = 0

    var body: some View {
        Text("Hello, World!")
            .toolbar {
                ToolbarItem(placement: .principal) {
                    Picker("Color", selection: $mode) {
                        Text("Light").tag(0)
                        Text("Dark").tag(1)
                    }
                    .pickerStyle(SegmentedPickerStyle())
                }
            }
    }
}

== 更新
@iAugus说
对于任何想要使用选择器的内在内容大小/理想大小的人,只需将.fixedSize()修饰符应用于它。

完美!使用.principal来设置顶部居中,使用.bottomBar来设置更易到达的内容。 - Othyn
5
如果有人想要让 Picker 使用其固有内容大小/理想大小,只需要应用 .fixedSize() 修饰符即可。 - iAugus

12

你可以将 Picker 直接放入 .navigationBarItems 中。

在此输入图片描述

我唯一遇到的问题是如何让 Picker 居中。(只是为了展示 Picker 确实可以在导航栏中,我使用 frame 和 Geometry Reader 组合了一个不太优雅的解决方案。你需要找到一个适当的居中方案。)

struct ContentView: View {
    @State private var choices = ["All", "Missed"]
    @State private var choice = 0

    @State private var contacts = [("Anna Lisa Moreno", "9:40 AM"), ("Justin Shumaker", "9:35 AM")]

    var body: some View {
        GeometryReader { geometry in
            NavigationView {
                List {
                    ForEach(self.contacts, id: \.self.0) { (contact, time) in
                        ContactView(name: contact, time: time)
                    }
                    .onDelete(perform: self.deleteItems)
                }
                .navigationBarTitle("Recents")
                .navigationBarItems(
                    leading:
                    HStack {
                        Button("Clear") {
                            // do stuff
                        }
                        Picker(selection: self.$choice, label: Text("Pick One")) {
                            ForEach(0 ..< self.choices.count) {
                                Text(self.choices[$0])
                            }
                        }
                        .frame(width: 130)
                        .pickerStyle(SegmentedPickerStyle())
                            .padding(.leading, (geometry.size.width / 2.0) - 130)
                    },
                trailing: EditButton())
            }
        }
    }

    func deleteItems(at offsets: IndexSet) {
        contacts.remove(atOffsets: offsets)
    }

}

struct ContactView: View {
    var name: String
    var time: String

    var body: some View {
        HStack {
            VStack {
                Image(systemName: "phone.fill.arrow.up.right")
                .font(.headline)
                .foregroundColor(.secondary)
                Text("")
            }
            VStack(alignment: .leading) {
                Text(self.name)
                    .font(.headline)
                Text("iPhone")
                    .foregroundColor(.secondary)
            }
            Spacer()
            Text(self.time)
                .foregroundColor(.secondary)
        }
    }
}

@Faruk对于居中选择器的回答很好:https://dev59.com/YVIH5IYBdhLWcg3wWcg0#60510555 - Jonas Deichelmann

6

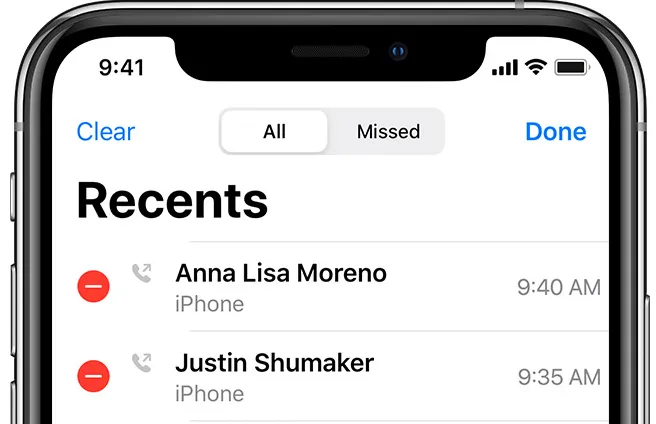
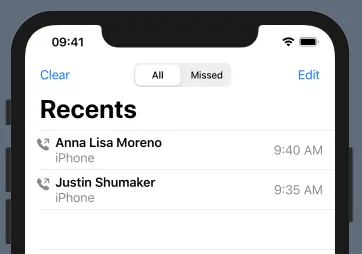
如果想让内容居中,可以在两侧放置两个HStack,并使它们的宽度固定且相等。

将此方法添加到View扩展中。

extension View {
    func navigationBarItems<L, C, T>(leading: L, center: C, trailing: T) -> some View where L: View, C: View, T: View {
        self.navigationBarItems(leading:
            HStack{
                HStack {
                    leading
                }
                .frame(width: 60, alignment: .leading)
                Spacer()
                HStack {
                    center
                }
                 .frame(width: 300, alignment: .center)
                Spacer()
                HStack {
                    //Text("asdasd")
                    trailing
                }
                //.background(Color.blue)
                .frame(width: 100, alignment: .trailing)
            } 
            //.background(Color.yellow)
            .frame(width: UIScreen.main.bounds.size.width-32)
        )
    }
}

现在您有一个与`navigationBatItems(:_)`用法相同的`View`修饰符。您可以根据需要编辑代码。
使用示例:
.navigationBarItems(leading: EmptyView(), center:       
    Picker(selection: self.$choice, label: Text("Pick One")) {
        ForEach(0 ..< self.choices.count) {
             Text(self.choices[$0])
        }
     }
    .pickerStyle(SegmentedPickerStyle())
}, trailing: EmptyView())

更新

出现了一个问题,导航栏的leadingtrailing项目违反了UINavigationBarContentViewsafeArea。在搜索中,我遇到了另一个解决方案,在这个答案中。它是一个小型辅助库,名为SwiftUIX。如果你不想安装整个库,像我一样,我为navigationBarItems创建了一个gist。只需将文件添加到您的项目中即可。

但是不要忘记,它会拉伸Picker以覆盖所有空闲空间,并强制StatusView变窄。因此,我必须设置以下框架:

.navigationBarItems(center:
    Picker(...) {
        ...
    }
    .frame(width: 150)
, trailing:
    StatusView()
    .frame(width: 70)
)

这样做行不通,提供一个可行的解决方案示例以澄清。 - Mattia Righetti

1
如何居中分段控制器并隐藏其中一个按钮的简单答案。
@State var showLeadingButton = true
    var body: some View {
        HStack {
            Button(action: {}, label: {"leading"})
                          .opacity(showLeadingButton ? true : false)


            Spacer()

            Picker(selection: $selectedStatus,
                   label: Text("SEGMENT") {
                segmentValues
                }
             .id(UUID())
             .pickerStyle(SegmentedPickerStyle())
             .fixedSize()

             Spacer()
             Button(action: {}, label: {"trailing"})
        }
        .frame(width: UIScreen.main.bounds.width)
    }

1
如果您需要将分段控件置于中心位置,则需要使用GeometryReader。下面的代码将提供选择器作为标题和尾随(右侧)按钮。
您可以设置两个视图在左右两侧,具有相同的宽度,中间视图将占据其余部分。 5是一个神奇的数字,取决于您需要分段控件的宽度。您可以进行实验并查看最适合您的选项。
   GeometryReader {
    
    Text("TEST")
     .navigationBarItems(leading:
                                    HStack {
                                        Spacer().frame(width: geometry.size.width / 5)
                                        Spacer()
                                        picker
                                        Spacer()
                                        Button().frame(width: geometry.size.width / 5)
                                           }.frame(width: geometry.size.width)
    
    }

更好的解决方案是保存选择器的大小,然后计算其他框架的大小,这样选择器在iPad和iPhone上将保持相同。

 @State var segmentControllerWidth: CGFloat = 0

    var body: some View {
            HStack {
                Spacer()
                    .frame(width: (geometry.size.width / 2) - (segmentControllerWidth / 2))
                    .background(Color.red)
                segmentController
                    .fixedSize()
                    .background(PreferenceViewSetter())
                profileButton
                    .frame(width: (geometry.size.width / 2) - (segmentControllerWidth / 2))
            }
            .onPreferenceChange(PreferenceViewKey.self) { preferences in
                segmentControllerWidth = preferences.width
            }
        }
    
    
    struct PreferenceViewSetter: View {
        var body: some View {
            GeometryReader { geometry in
                Rectangle()
                    .fill(Color.clear)
                    .preference(key: PreferenceViewKey.self,
                                value: PreferenceViewData(width: geometry.size.width))
            }
        }
    }
    
    struct PreferenceViewData: Equatable {
        let width: CGFloat
    }
    
    struct PreferenceViewKey: PreferenceKey {
        typealias Value = PreferenceViewData
    
        static var defaultValue = PreferenceViewData(width: 0)
    
        static func reduce(value: inout PreferenceViewData, nextValue: () -> PreferenceViewData) {
            value = nextValue()
        }
    }

网页内容由stack overflow 提供, 点击上面的
可以查看英文原文,
原文链接