我正在使用Android Material Design API,想以网格格式显示一些数据。我尝试了GridLayout和StaggeredGridlayout,两者看起来相同。为了一般性的信息,我想问一下Gridlayout和StaggeredGridlayout有什么区别?
谢谢。
Android - 网格布局和瀑布流布局的区别
45
- IBRAR AHMAD
1
4GridView是对称的,而StaggeredGridView是不对称的。 - Aditya Vyas-Lakhan
4个回答
77
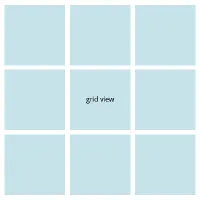
网格视图:它是一个ViewGroup,可以在二维的可滚动网格中显示项目。在此中每个网格的大小(高度和宽度)相同。网格视图以对称的方式显示视图中的项目。
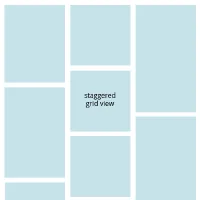
交错网格视图:它基本上是Grid View的扩展,但在此中每个网格的大小(高度和宽度)不同。交错网格视图以不对称的方式显示视图中的项目。
实现交错网格视图的教程:
- Vipul Asri
8
我在Oodles Technologies的时间让我了解到什么是staggered。我将分享这方面的知识。
StaggeredGridLayout 是一种LayoutManager,类似于GridView,但在该网格中每个视图都有自己的大小(高度和宽度)。它支持垂直和水平布局。
以下是创建交错网格的基本步骤:
1)创建一个视图。
我们知道StaggeredGrid不是一个直接的视图,它是一种LayoutManager,以交错网格形式布置子项。我们使用RecyclerView作为交错网格的视图。 下面是我们在布局中的RecyclerView:
<RelativeLayout xmlns:android="http://schemas.android.com/apk/res/android"
    xmlns:tools="http://schemas.android.com/tools"
    android:layout_width="match_parent"
    android:layout_height="match_parent">

    <android.support.v7.widget.RecyclerView
        android:id="@+id/favPlaces"
        android:layout_width="match_parent"
        android:layout_height="match_parent"/>

</RelativeLayout>
2)设置StaggeredGridLayout布局管理器。
一旦视图准备就绪,让我们使用LayoutManager在视图上创建网格:
RecyclerView favPlaces = (RecyclerView) findViewById(R.id.favPlaces);
StaggeredGridLayoutManager layoutManager = new StaggeredGridLayoutManager(2,StaggeredGridLayoutManager.VERTICAL);
layoutManager.setGapStrategy(StaggeredGridLayoutManager.GAP_HANDLING_NONE);
favPlaces.setLayoutManager(layoutManager);
favPlaces.setHasFixedSize(true);
3) 用于填充StaggeredGrid视图的适配器。
为了以网格形式填充数据,我们首先需要一个布局来表示这些数据。我们使用CardView,并且布局如下:
<LinearLayout xmlns:android="http://schemas.android.com/apk/res/android"
    xmlns:app="http://schemas.android.com/apk/res-auto"
    android:layout_width="match_parent"
    android:layout_height="match_parent"
    android:orientation="vertical">

    <android.support.v7.widget.CardView
        android:layout_width="match_parent"
        android:layout_height="wrap_content"
        app:cardcornerradius="4dp"
        app:cardusecompatpadding="true">

        <LinearLayout
            android:layout_width="match_parent"
            android:layout_height="match_parent"
            android:background="@color/colorPrimary"
            android:orientation="vertical">

            <ImageView
                android:id="@+id/placePic"
                android:layout_width="match_parent"
                android:layout_height="match_parent"
                android:adjustviewbounds="true"
                android:scaletype="fitXY" />

            <TextView
                android:id="@+id/placeName"
                android:layout_width="match_parent"
                android:layout_height="wrap_content"
                android:gravity="center"
                android:textsize="16sp" />

        </LinearLayout>

    </android.support.v7.widget.CardView>

</LinearLayout>
在我们完成所有基本步骤之后,现在是时候完成我们的主要活动了。以下是MainActivity的完整代码:
public class MainActivity extends AppCompatActivity {

    int placeImage[]= {R.drawable.agattia_airport_lakshadweep,R.drawable.nainital,R.drawable.goa,
            R.drawable.lotus_temple,R.drawable.valley_of_flowers,R.drawable.ranikhet,R.drawable.dehradun,R.drawable.nainital1};

    String placeName[]= {"Lakshadweep, India","Nainital, India","Goa, India","Lotus-Temple, India","Valley-Of-Flowers, India","Ranikhet, India",
    "Dehradun, India","Nainital, India"};

    @Override
    protected void onCreate(Bundle savedInstanceState) {
        super.onCreate(savedInstanceState);
        setContentView(R.layout.activity_main);
        RecyclerView favPlaces = (RecyclerView) findViewById(R.id.favPlaces);
        StaggeredGridLayoutManager layoutManager = new StaggeredGridLayoutManager(2,StaggeredGridLayoutManager.VERTICAL);
        layoutManager.setGapStrategy(StaggeredGridLayoutManager.GAP_HANDLING_NONE);
        favPlaces.setLayoutManager(layoutManager);
        favPlaces.setHasFixedSize(true);
        ArrayList<PlaceDetails> placeList = getPlaces();

        StaggeredAdapter staggeredAdapter = new StaggeredAdapter(placeList);
        favPlaces.setAdapter(staggeredAdapter);
    }

    private ArrayList<PlaceDetails> getPlaces() {
        ArrayList<PlaceDetails> details = new ArrayList<>();
        for (int index=0; index<placeImage.length;index++){
            details.add(new PlaceDetails(placeImage[index],placeName[index]));
        }
        return details;
    }
}
- Anirudh Bhardwaj
3
StaggeredGridlayout
- 这种布局将子项以交错网格的形式排列。
- 它支持水平和垂直布局,以及在反向布局子项的能力。
- 交错网格很可能在布局边缘有间隙。
- 为了避免间隙,
StaggeredGridLayoutManager可以独立地偏移跨度或在跨度之间移动项目。您可以通过setGapStrategy(int)来控制此行为。
GridLayout
- 这种布局在矩形网格中安排其子项。
- 该网格由一组无限细的线条组成,将视图区域分成单元格。
- 子项占用一个或多个连续的单元格,由它们的
rowSpec和columnSpec布局参数定义。
- Shree Krishna
2
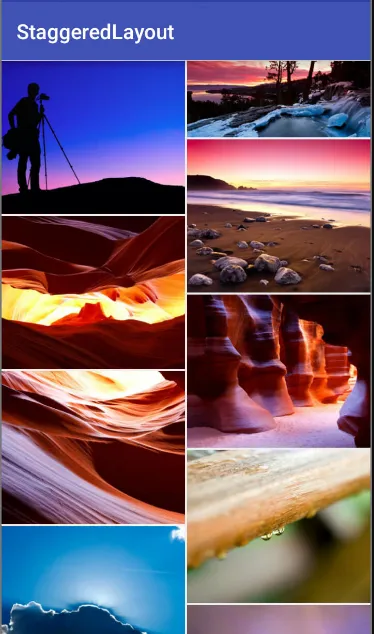
4你的图片布局不是StaggeredGridLayout,而是来自https://github.com/felipecsl/AsymmetricGridView的自定义GridLayout。 - java acm
1@javaacm 这并不重要,因为他已经正确地澄清了他的观点... - Skaldebane
0
交错网格布局包括多列具有不同大小的多行。
它允许以头部和底部的方式查看灵活的列/行视图,实现相对容易,虽然使用Gradle的用户比使用Eclipse和Ant的用户更容易。这就是在Etsy Github app中开发的视图。
而网格布局是一种将其子项放置在矩形网格中的布局。
它是在API级别14中引入的,并最近在支持库中进行了回退。其主要目的是解决其他布局中的对齐和性能问题。如果您想了解有关GridLayout的更多信息,请查看this tutorial。
- Garg
网页内容由stack overflow 提供, 点击上面的可以查看英文原文,
原文链接
原文链接