我该如何创建没有边距、边框、内边距等的RichTextBox?换句话说,如何像TextBlock一样显示内容?我已经尝试过以下方法:
<RichTextBox Margin="0" Padding="0" Grid.Row="0" BorderThickness="0" >
<FlowDocument >
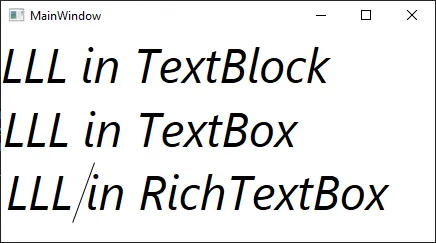
<Paragraph>LLL</Paragraph>
</FlowDocument>
</RichTextBox>
<TextBlock>LLL</TextBlock>
但是结果仍然不是我想要的内容:
文档内容之前(也可能在文档顶部或底部)仍有一些空间。我该如何删除它?
如果你想知道我为什么需要这个:我正在尝试让H.B.的答案对我的问题在WPF中创建吉他和弦编辑器进行修改,以便与字距一起使用,并且我不想在字符之间产生不自然的空格。
编辑
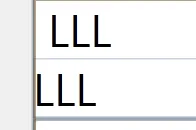
所以它不仅仅是ControlTemplate,因为以下代码将产生与上图完全相同的结果:
<RichTextBox Margin="0" Padding="0" Grid.Row="0" BorderThickness="0">
    <RichTextBox.Template>
        <ControlTemplate>
            <ScrollViewer Padding="0" Margin="0" x:Name="PART_ContentHost"/>
        </ControlTemplate>
    </RichTextBox.Template>
    <FlowDocument PagePadding="0">
        <Paragraph Padding="0" Margin="0" >LLL</Paragraph>
    </FlowDocument>
</RichTextBox>
我原以为这将是一个容易回答的问题...有趣的观察:当我设置模板并在FlowDocument上设置PagePadding="0"时,在VisualStudio设计器中它显示了我想要的布局,但一旦运行演示,它就又变错了...当我关闭演示时,设计器中又变错了。这是VS的一个小bug还是实际上已经正确设置了一段时间,但后来某些东西将PagePadding的值更改回了错误的值?
编辑#2
Daniel Rose的修改答案对我也不起作用。这是XAML:
<FlowDocument PagePadding="{Binding PagePadding}">
    <Paragraph x:Name="paragraph" Padding="0"
        TextIndent="0"  Margin="0,0,0,0" >hello</Paragraph>
</FlowDocument>
这是代码:
public static DependencyProperty PagePaddingProperty =
            DependencyProperty.Register("PagePadding", typeof(Thickness),   typeof(EditableTextBlock),
            new PropertyMetadata(new Thickness(0)));

public Thickness PagePadding {
    get { return (Thickness)GetValue(PagePaddingProperty); }
    set { SetValue(PagePaddingProperty, value); }
}
结果没有改变。空间仍然存在。
编辑#3
按照Daniel Rose在他最后的编辑中建议的添加双向绑定,它可以工作。但我仍然认为这不是很清楚(因为我需要将PagePadding保持为0值而使用依赖属性)。我认为这是一种hack- bug解决方法。如果有更好的解决方案,请分享。
显然,“更改 FlowDocument 的 PagePadding ”为 0.5 是一个错误。如果有人有MSDN账户,如果他们报告此错误将会很好。